
The Night Blooming Cereus holds a quiet, moonlit charm that feels almost like a secret.
I have spent many evenings waiting for that rare, singular moment when the lovely blooms finally unfurl in the darkness.
That shared anticipation is exactly why we gather in plant groups, swapping stories and advice on nurturing these shy beauties.
I am excited to share my experience with growing and maintaining this plant, covering potting essentials and troubleshooting tips.
I’ll walk you through the gentle art of caring for this plant, ensuring it feels safe enough to bloom for you.
What is a Night Blooming Cereus?
When I talk about the Night Blooming Cereus, I am actually referring to a lovely group of species, often Epiphyllum oxypetalum or Selenicereus.
You might hear them affectionately called “Queen of the Night” or simply the “night blooming cactus flower.”
I adore their wild, trailing stems because these epiphytes naturally cling to trees rather than rooting deep in the ground.
In their natural habitat, they thrive on humidity and dappled light, growing rapidly into sprawling, sculptural beauties.
With the right care, they become long-lived companions, eventually gifting us those massive, fragrant white blooms that make every bit of effort worthwhile.
Why You Must Grow the Night Blooming Cereus?
There are so many reasons I cherish having this plant in my home, beyond just the mystery of its midnight show.
- The graceful white flowers fill the night air with a heavy, intoxicating scent.
- It asks for very little attention compared to other fussy tropical plants I own.
- I find it flourishes easily whether nestled in a cozy living room or out on a patio.
- The rare, fleeting bloom offers a dramatic spectacle that feels like a personal gift.
- Sharing its progress naturally sparks excitement and connection within my gardening circle.
These simple joys make growing this cactus a deeply fulfilling experience for me.
Types of Night Blooming Cereus
I often pause to appreciate the unique personalities within this family, as several distinct plants share the same enchanting name.
While they all offer that magical nocturnal bloom, I have noticed they each have their own specific look and preferences.
| Variety | Common Name | Visual Identifiers | Care Nuances |
| Epiphyllum oxypetalum | Dutchman’s Pipe | Broad, flat, leaf-like stems that are smooth and spineless. | Prefers filtered light and forgives me if I occasionally overwater it. |
| Selenicereus grandiflorus | Queen of the Night | Ribbed, rope-like stems that can look a bit messy, with small spines. | Needs a sturdier support for its heavy vines and prefers drier soil than others. |
| Hylocereus undatus | Dragon Fruit Cactus | Triangular, fleshy stems with aerial roots and distinct scalloped edges. | Requires a strong trellis and needs significantly more sun if I want it to produce fruit. |
Night Blooming Cactus Flower: Ideal Growing Conditions
I believe that finding the perfect spot for this cactus is like setting a stage for a quiet performance. It thrives best when we mimic the gentle, warm atmosphere of its natural tropical home.
1. Light Requirements
I always place my plants where they can bathe in bright, indirect light, much like the dappled sun found under a forest canopy. Direct noon sun is often too harsh and can quickly scorch their tender leaves, turning them an unhappy yellow.
Indoors, an east-facing window is my favorite spot. If my home feels a bit dim during winter, I rely on a soft grow light to keep them happy without overwhelming them.
2. Temperature & Humidity
Since these are tropical souls, I keep them warm, usually maintaining the air between 65 and 80 degrees Fahrenheit. They really dislike the cold, so I bring them inside well before the first frost chills the air.
Humidity is essential here; I mist them occasionally or keep them near a humidifier. This moisture helps replicate the steamy air of their native jungles, encouraging lush green growth and those highly anticipated blooms.
3. Soil Preferences
My secret to a happy cereus is ensuring its roots never sit in stagnant water. I create a custom blend by mixing standard cactus soil with generous handfuls of orchid bark, coco coir, and perlite.
This loose, airy texture mimics the forest floor, allowing water to flow through freely while the roots breathe. It strikes a gentle balance, retaining just enough moisture to hydrate the plant without risking the suffocation of root rot.
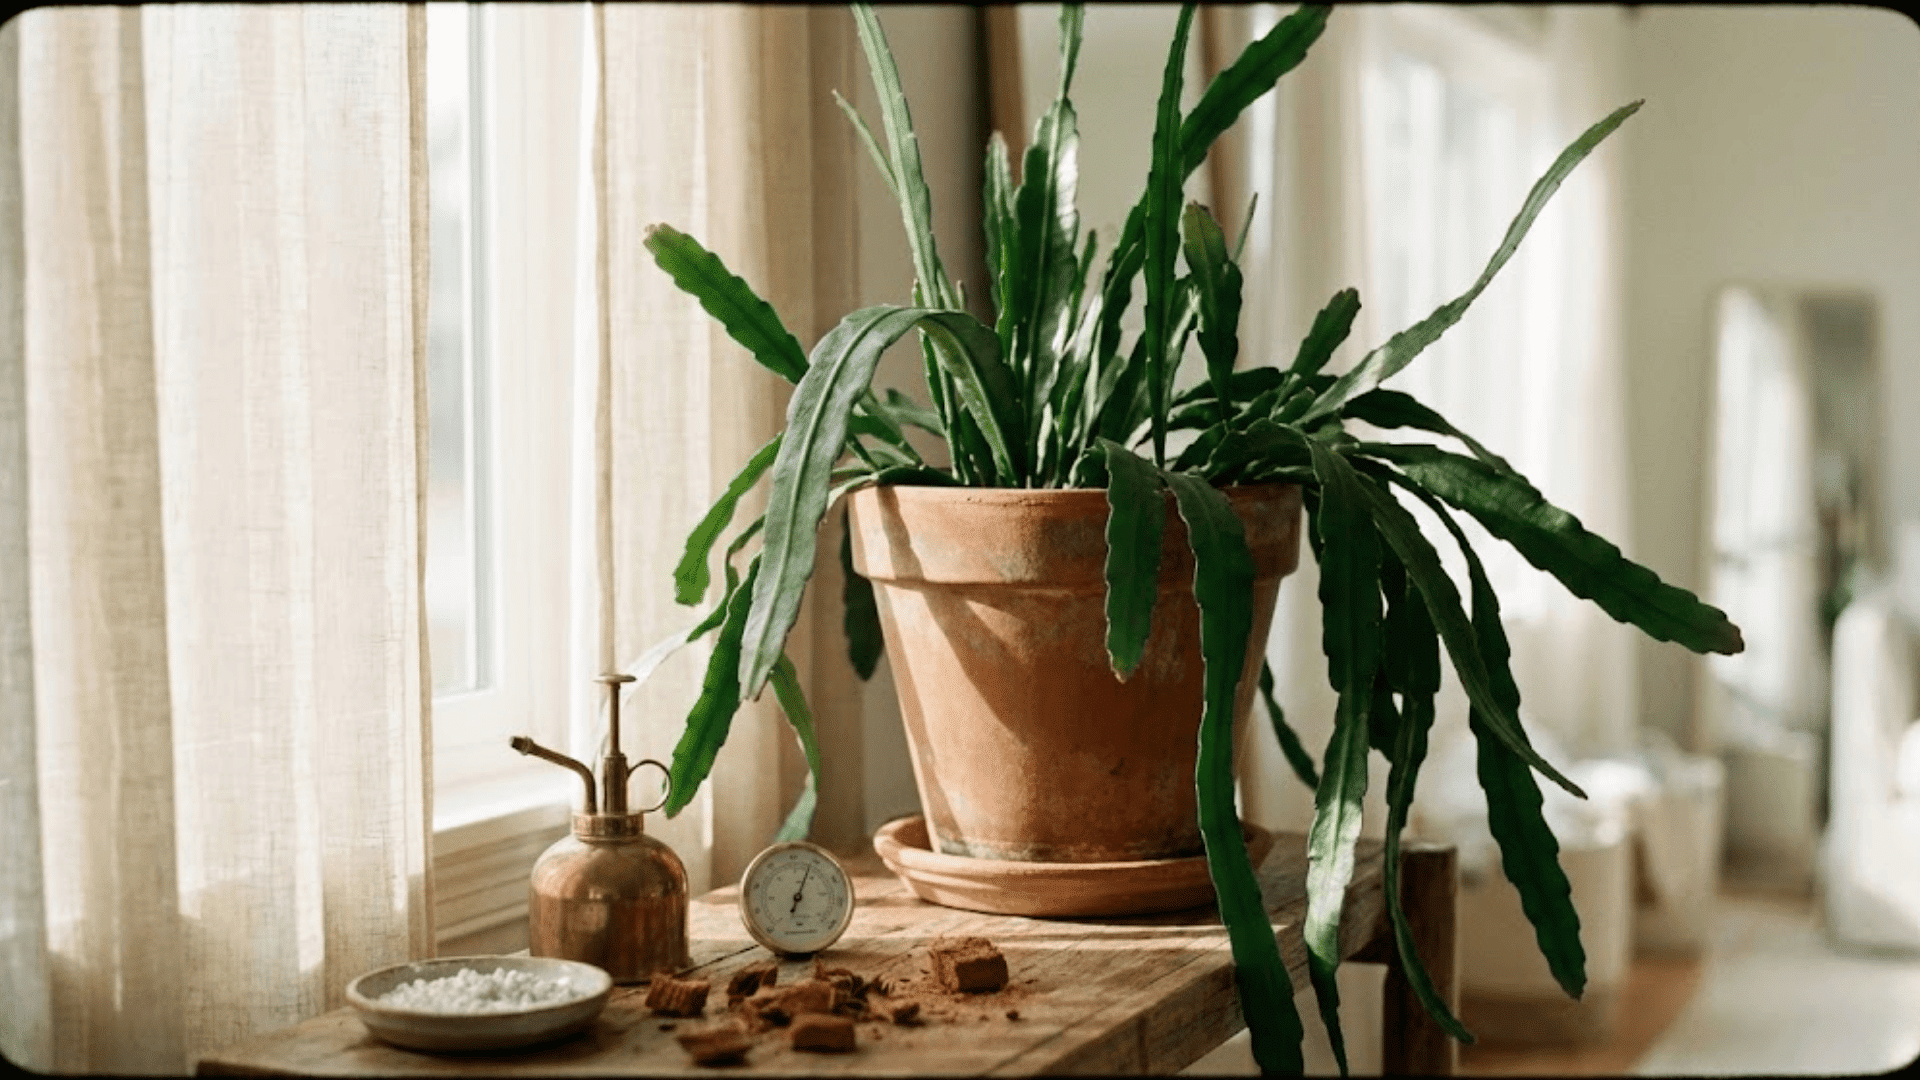
4. Pot Selection
Choosing the right home for the roots is surprisingly important. I generally prefer unglazed terracotta pots because the porous clay breathes, naturally wicking away excess moisture that plastic containers might trap.
Since these plants can get quite top-heavy with their trailing stems, I select a heavy pot for stability. I also keep the size snug; I have found they actually bloom more willingly when their roots feel a little bit crowded.
How to Plant Night Blooming Cereus?
I find that whether I am starting a fresh cutting or welcoming a nursery-grown plant, the planting process is a gentle ritual that sets the foundation for years of growth.
It is all about handling the roots with care and giving them a comfortable, airy home to settle into.
Planting From a Cutting
Propagating these plants is one of my favorite ways to share them with friends, but patience is key to ensuring the stem survives the transition.
- Step 1: I take a healthy four-to-six-inch cutting from a mature stem and let it sit in a cool, dry spot for several days until the cut end heals over completely.
- Step 2: Once the callus forms, I prepare a small pot with my well-draining cactus and perlite mix, slightly moistening it beforehand.
- Step 3: I gently insert the callused end about an inch or two deep into the soil, pressing down lightly to keep it upright.
- Step 4: For the first week, I mist the soil surface rather than watering deeply to prevent the stem from rotting before roots develop.
- Step 5: I place the pot in warm, bright shade, waiting until I see new growth to begin a regular watering routine.
Planting a Nursery Plant
When I bring a full plant home, I focus on helping it adjust to its new pot without shocking its sensitive root system.
- Step 1: I choose a pot only slightly larger than the current one, filling the bottom with a fresh layer of my airy soil blend.
- Step 2: I tip the nursery pot carefully, supporting the stems with my hand to slide the root ball out without pulling or tearing.
- Step 3: If the roots look tightly wound, I very gently tease them outward so they can explore the new soil easily.
- Step 4: I position the plant in the center and fill the gaps with soil, ensuring I do not bury the stems deeper than they were previously.
- Step 5: Finally, I give it a light drink to settle the soil around the roots and let it rest in a shaded spot for a few days to recover.
Hydrating Your Night Bloomer
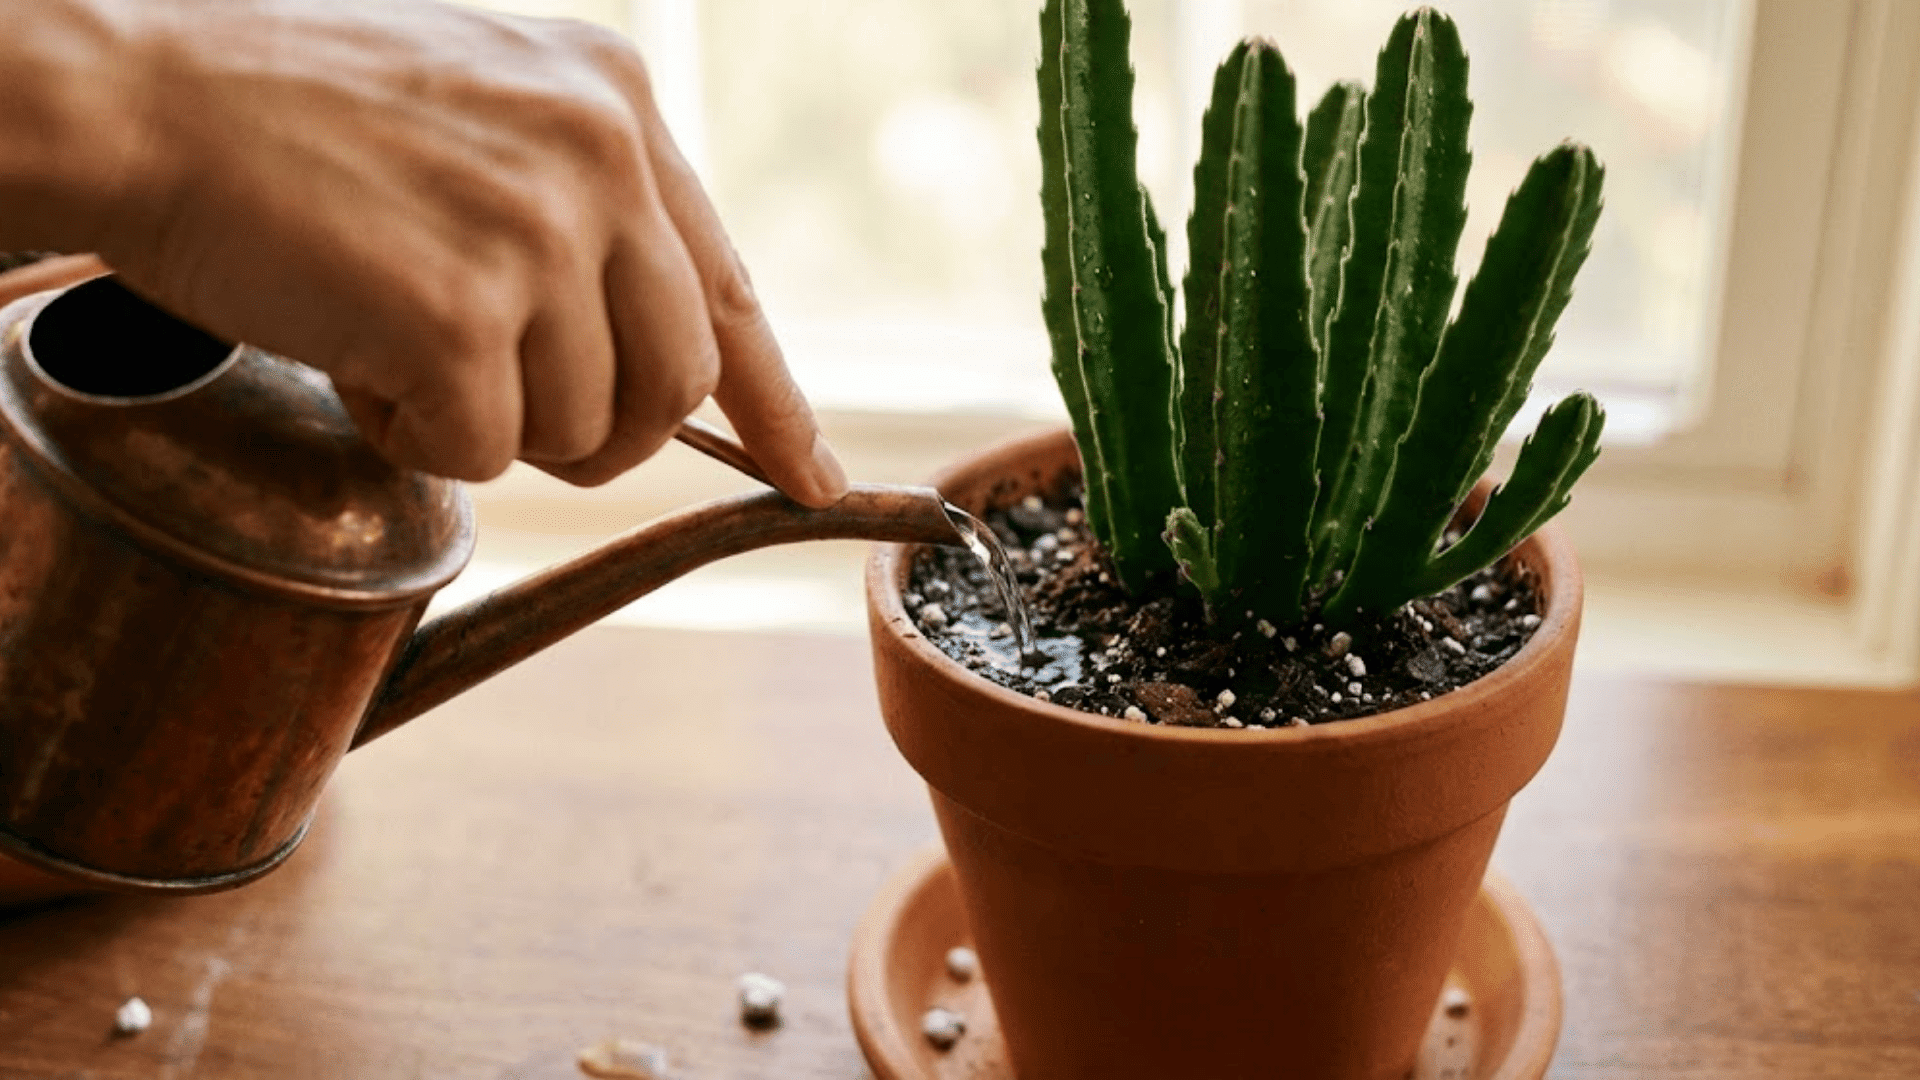
I treat watering as a quiet conversation with my plant, adjusting based on the season. During the active spring and summer months, I water whenever the top inch of soil feels dry, keeping it hydrated but never soggy.
As winter approaches, I slow down significantly, allowing the soil to dry out almost completely between drinks to prevent root rot.
I always rely on the “soak-and-dry” method; watering until it flows from the drainage holes, then waiting.
- Thirsty Signs: The leaves look wrinkled or feel limp to the touch.
- Too Much Water: Stems turn yellow, mushy, or brown at the base.
If my home feels particularly dry, I might mist the leaves, whereas in humid weather, I water even less to keep the roots happy.
Nourishing for Blooms
I believe that feeding this plant is a delicate balance, less about constant growth and more about gently encouraging those flowers.
If I provide too much nitrogen, I often end up with lush, wild green stems but absolutely no buds, which is always a disappointment. Instead, I carefully time my feedings to match the plant’s energy cycles.
I rely on a routine that shifts as the season warms, using specific nutrients to nudge the plant toward flowering rather than just expanding its foliage.
| Phase | My Schedule | The Nutrient Mix | My Goal |
| Active Growth | Early Spring through Early Summer | Balanced 10-10-10 diluted to half strength. | To support strong, healthy stem development after the winter rest. |
| Pre-Bloom | Mid-Summer to Early Autumn | Low-Nitrogen, High-Phosphorus formula (like 0-10-10). | To signal the plant to stop making leaves and start forming flower buds. |
| Dormancy | Late Autumn and Winter | I stop fertilizing completely. | To let the plant rest and recharge its energy for the next year. |
Pruning & Shaping the Night Blooming Cereus
I find that a little maintenance goes a long way in keeping this wild grower manageable and healthy. It helps me direct the plant’s energy exactly where I want it, rather than letting it take over my living room.
Managing Growth & Branching
Occasional trimming prevents stems from becoming too long or thin, encouraging the plant to fill out beautifully.
- Wait until early spring to do any major cutting, just before the new growth starts.
- Use clean, sharp shears to snip off any weak or damaged stems right at the base.
- Cut long stems back by a third, just above a node, to promote more flowering branches.
- Wear thick gloves, as even the smooth varieties can surprise you with tiny, hidden bristles.
- Save the healthy cuttings to propagate later, ensuring that nothing goes to waste.
Supporting the Vines
Since these plants are natural climbers, giving them a sturdy trellis allows them to lean comfortably and prevents a tangled mess on the floor.
- Insert a trellis into the pot while the plant is young to avoid damaging established roots later on.
- Gently lift the heavy stems and guide them upward, securing them loosely with soft plant velcro or ties.
- Spread the stems out horizontally, which exposes more surface area to the light.
- Check the ties every few months to ensure they aren’t cutting into the stems as they thicken.
- Providing this structure keeps the heavy blooms safe and fully visible when they finally open.
How to Make Night Blooming Cereus Bloom?
Inviting this shy plant to flower is a practice in patience. I have learned that young plants rarely bloom; they often need about three years to reach full maturity.
Light is the biggest trigger; without bright, filtered sunshine, they simply won’t bud. I like to mimic the seasons by keeping them warm in summer and cooler in winter to signal dormancy.
When I spot new growth, I switch to a bloom-boosting fertilizer.
If yours is stubborn, check the pot size; I find they actually flower better when their roots are a bit crowded, proving that sometimes, less space means more beauty.
Bloom Night: What to Expect?
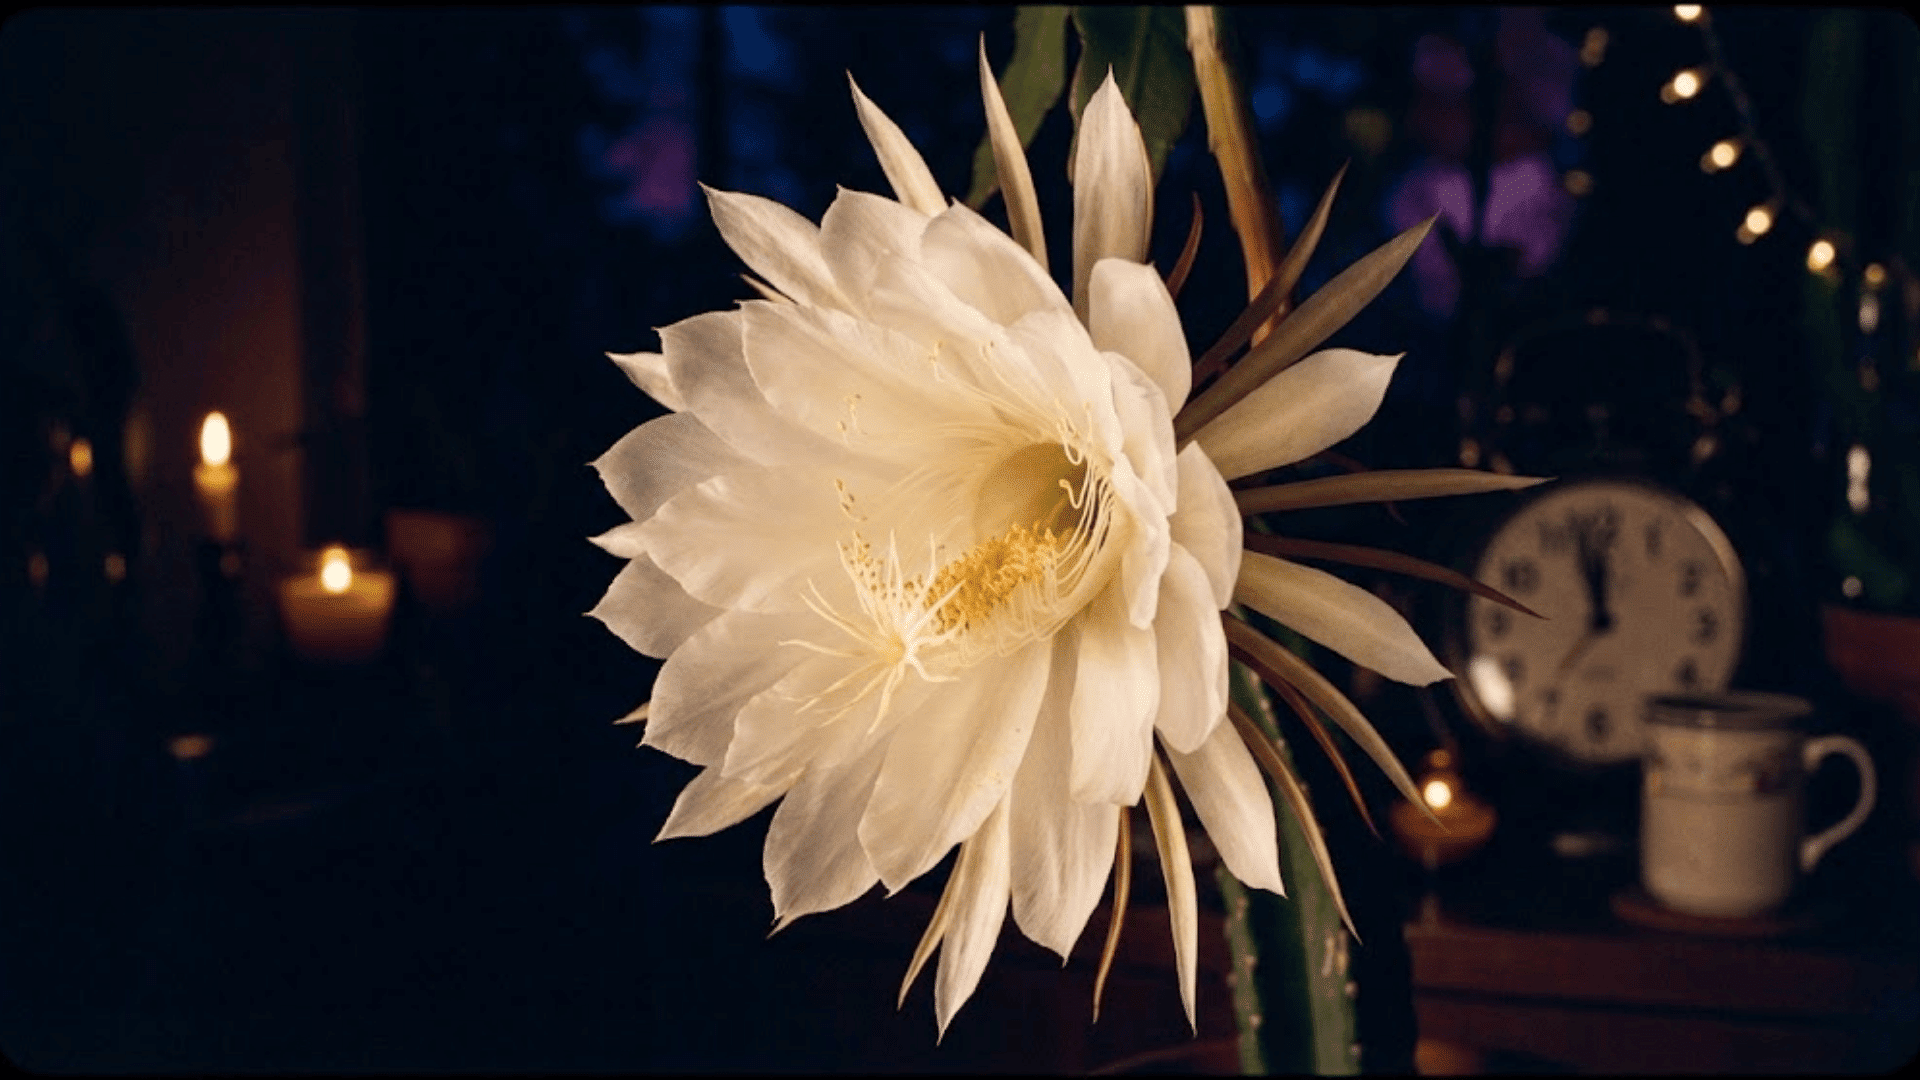
Watching the bloom unfold is the true reward for all our patience, feeling like a quiet, private celebration I get to witness.
- I look for tiny, fuzzy nubs on the leaf edges that slowly curl upward like a shepherd’s hook.
- The bud takes weeks to swell, but the actual opening is a fast, magical event starting just after dusk.
- When open, the dinner-plate-sized bloom glows white and fills the air with a heavy, spicy vanilla scent.
- The show is incredibly short, with the flower fading and wilting by the time the morning sun hits.
- To capture the memory, I use a soft, warm light for photos rather than a harsh flash to preserve the details.
It is a fleeting, dreamlike experience that I always stay up late to savor before it vanishes with the dawn.
Common Problems & How to Fix Them
Even with the most attentive care, the plant may sometimes struggle to communicate its needs. These signs are simply gentle nudges to adjust the environment before any lasting damage occurs.
Problem 1: The Stems are Turning Yellow
Fix: This often signals overwatering or insufficient light exposure. Letting the soil dry out completely and moving the pot to a brighter spot usually helps the vibrant green color return.
Problem 2: The Leaves Look Wrinkled and Limp
Fix: When stems look wrinkled or sad, it is often a cry for thirst or a sign of root distress. Checking the soil moisture immediately is essential; if it is bone dry, a thorough soak typically perks the plant right back up.
Problem 3: Unwanted Pests Have Appeared
Fix: Tiny intruders like mealybugs or spider mites can hide in crevices, appearing as white cottony fluff or fine webbing. Gently wiping them away with a cotton swab dipped in rubbing alcohol and rinsing the stems clears the infestation.
Problem 4: The Base is Mushy and Brown
Fix: A mushy, brown base indicates that the roots are likely sitting in stagnant water. Trimming away the compromised parts and repotting the healthy sections in fresh, dry soil gives the plant a second chance.
Night Blooming Cereus: Seasonal Care Checklist
I find that aligning my care routine with the changing seasons is the best way to keep this plant happy.
It has a natural rhythm: waking up, working hard to bloom, and then resting; and my job is simply to support each phase.
| Season | My Focus | Watering & Feeding | Maintenance Tasks |
| Spring | Awakening | Increase water slightly; resume gentle feeding. | Repot if rootbound; prune leggy stems. |
| Summer | Blooming | Keep soil moist; switch to bloom booster. | Mist for humidity; add support for buds. |
| Fall | Transition | Reduce frequency; stop fertilizing entirely. | Check for pests; bring indoors before frost. |
| Winter | Dormancy | Water sparingly (sips only); no food. | Maximize available light; protect from drafts. |
A Note on Dormancy: I realize winter’s quiet stillness is the secret to summer’s spectacle, as plants gather energy during this cool rest to produce breathtaking midnight blooms.
Growing Night Blooming Cereus Indoors
Bringing this forest dweller inside requires a little mindfulness to replicate its tropical home. I find that an east-facing window offers the perfect soft morning glow without the harshness of the afternoon sun.
Since indoor air can be quite dry, placing the pot on a pebble tray filled with water helps boost humidity around the leaves.
To prevent the stems from leaning too heavily toward the light, turning the pot a quarter turn every week ensures even growth.
Finally, gently wiping the flat stems with a damp cloth clears away dust, allowing the plant to breathe and photosynthesize freely.
Night Blooming Cereus Care: Outdoor Growing Tips
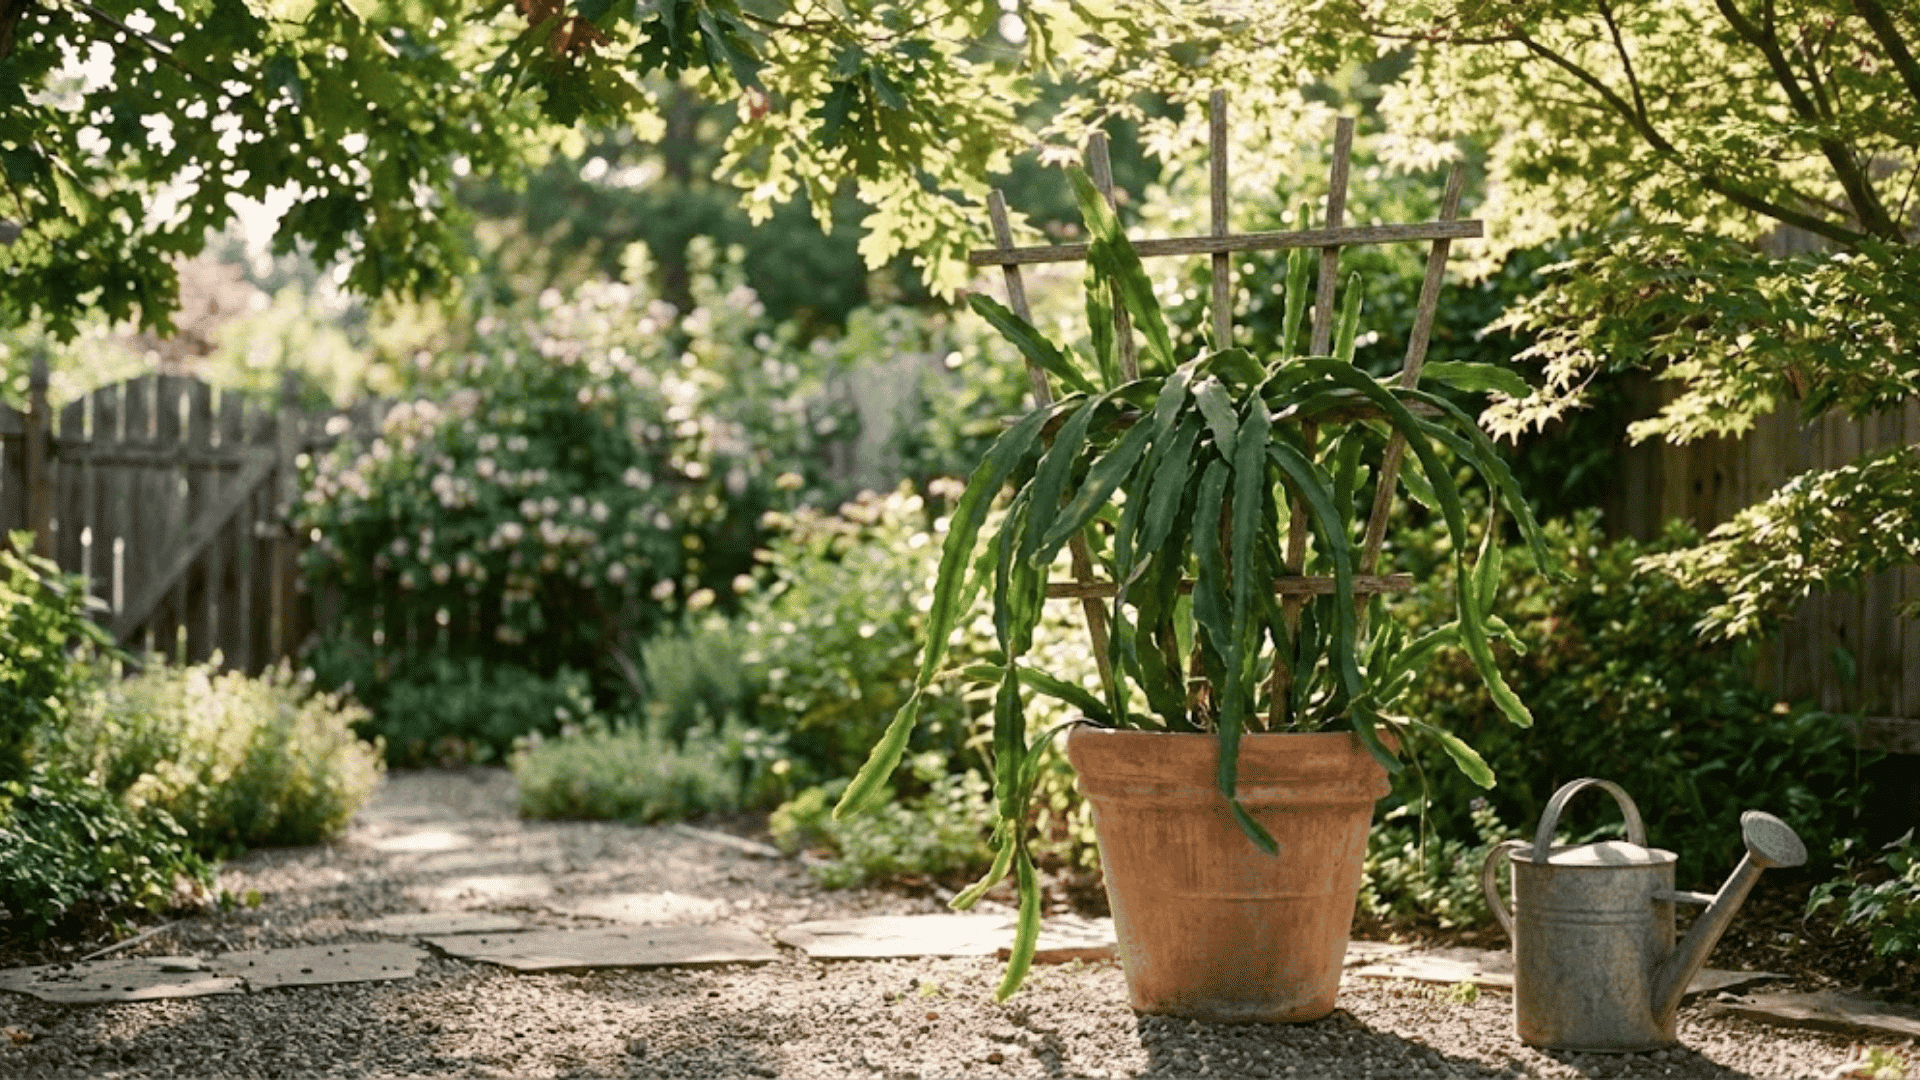
Allowing the plant to spend the warmer months outside often encourages vigorous growth and better blooming. It feels right at home in the fresh air, provided it has a sheltered spot to retreat from the elements.
- Nestle the pot under a leafy tree canopy to provide the perfect dappled shade.
- Secure the heavy stems against a fence or sturdy trellis for protection against wind.
- Ensure the spot offers shelter from the harsh midday sun to prevent scorching.
- Monitor the foliage closely, moving it to deeper shade if stems appear pale.
- Bring the plant back inside well before the first autumn chill settles in.
Natural airflow and warmth work wonders, as long as the temperature remains gentle and stable.
Propagation for Abundant New Plants
Propagating this cactus is a generous act, allowing me to multiply the magic.
While stem cuttings are the most common method, simply callusing and planting a leaf segment, I also use division during repotting to gently separate crowded clumps into their own pots.
For a safer route, layering works beautifully; I pin a low-hanging stem to the soil until roots form before cutting it free.
Once established, these young plants make thoughtful gifts. Passing them on to friends or neighbors feels like sharing a piece of the night’s mystery, keeping the cycle of growth alive in other homes.
Night Blooming Cereus Care: Potting & Repotting
Giving the roots fresh space is essential, but this plant actually prefers a cozy fit and blooms best when slightly rootbound.
It is a balance between providing enough room to grow and keeping the roots snug enough to feel secure.
| Action | The Trigger | My Method |
| Standard Schedule | Young plants (Yearly) vs. Mature (3-4 Years) | I inspect roots annually, but avoid unnecessary moves |
| Signs to Repot | Roots escaping drainage holes; rapid drying | Move to a pot only one size larger; loosen tight roots |
| Soil Refresh | The plant is too heavy or established to unpot | Gently replace just the top two inches of soil |
| Full Soil Swap | Old soil has degraded into dust or dense mud | Remove old mix completely; replant in fresh, airy soil |
Refreshing the soil or moving to a new home gives the plant a burst of energy. It ensures the foundation remains healthy without disturbing the plant more than necessary.
Toxicity & Pet Safety
One of the greatest reliefs in growing the Night Blooming Cereus is knowing it shares a gentle nature with our homes.
Unlike many popular tropical houseplants, it is considered non-toxic to cats, dogs, and curious children.
If a pet happens to take a nibble, they generally won’t face any serious toxicity issues. However, I still prefer to place mine on a high shelf or a tall plant stand.
While the sap isn’t poisonous, ingesting fibrous plant material can still cause a mild stomachache. Plus, keeping those long, trailing stems out of reach ensures the plant remains pristine for its big night.
Night Blooming Cereus Varieties in Community Discussions
Browsing through plant forums, the excitement surrounding specific varieties is contagious. You often see growers debating the merits of the classic Oxypetalum versus the wilder Selenicereus.
Experienced members frequently share the same golden rule in r/houseplants discussions: benign neglect is better than over-caring.
My absolute favorite threads are the “first bloom” stories found in r/Epiphyllum communities.
Owners describe staying up until the early hours, watching the petals slowly unfurl, and finally smelling that legendary scent. It creates a sense of shared connection, knowing others are also awake, waiting for the magic to happen.
The Closing Note
Living with a Night Blooming Cereus reminds me that the most breathtaking moments are worth waiting for.
Tending to these wild, trailing stems brings a sense of calm, knowing that a magical, moonlit show will eventually reward the effort.
It converts simple plant care into a ritual of anticipation, connecting us to a slower, more natural rhythm. I hope this guide helps you feel ready to nurture this nocturnal beauty in your own space.
Have you ever stayed up late to watch a bloom open, or are you just planting your first cutting? I would love to read about your experiences in the comments.


6 Responses
Thank you for this article. I inherited a night blooming cereus from my grandmother , born 1883, and along with it heard all her stories of summer night parties anticipating a bloom. I was.”busy” in 1966 and let it die. Now I’m nurturing one in hopes I’ll live long enough to see a bloom😊. Wish me luck. I just came across Robert Hayden’s poem on the plant. It’s wonderful too
my plant haslong skinny leaves on most of it. only one stem has full leaves as in picture . what should i do?
My night blooming cactus broke away from its root base today and I am so sad. it had been leaning to the side for about a month. I did not over water the plant and allowed time for the soil to dry between waterings. Last year it bloomed three times before the end of September. Is it possible to revive it or is the cactus dead? My cactus had a base that looked like a hot air balloon. Any advise is greatly appreciated, thanks.
I love my Queen of the Nille! I went out in the dark many times in pajamas to catch the blooms open. It froze this year unfortunately so I am working today to revive her. I appreciate your comments and will surely use them to hopefully save her. Thanks so much
In order to enjoy this amazing flower earlier, I observe the flower as it forms. This can take about two weeks in my experience. When the tip of the flower begins to open, I cover it with a brown paper bag tricking it into thinking it is nighttime sooner. Allowing you to enjoy the flower earlier in the evening.
I have a large Dutchman’s Pipe bought on a trip to Florida more than 40years ago. It has been a consistent bloomer when moved outside for the summer. My problem is the deer nearly devoured the plant last summer. A rooted cutting they ate roots and all! It seems to be a favorite food! Now I don’t know where to grow it so it will bloom but won’t be eaten. It’s been in the house all winter and has grown quite well. Should I just keep it indoors?