There’s something deeply satisfying about a Monstera thriving in your space. Those iconic split leaves and climbing vines bring instant jungle vibes to any corner, turning ordinary rooms into lush, breathing sanctuaries.
The classic Deliciosa, with its dramatic fenestrations, or the delicate trailing Adansonii, have captured hearts worldwide for good reason. They’re forgiving for beginners yet rewarding for seasoned plant parents.
We’ll cover finding that perfect light spot, nailing your watering routine, mastering propagation, and troubleshooting those tricky moments, plus real wisdom from fellow Monstera lovers who’ve learned along the way.
Understanding Monstera Plants
Monstera are natural climbers from the tropical rainforests of Central America, where they scale trees in search of sunlight.
Those signature leaf holes, called fenestrations, aren’t just for show. They help the plant withstand heavy rain and wind while maximizing light capture beneath the canopy.
The Monstera deliciosa is the classic giant with dramatic splits, while Monstera adansonii offers delicate, trailing vibes perfect for smaller spaces. Then there’s the coveted Thai Constellation with its creamy variegation.
Indoors, expect your Monstera to grow steadily during spring and summer, then slow down considerably in winter. With proper support, deliciosas can reach impressive heights, while adansonii stays more compact and manageable.
Ideal Lighting for Monstera
Light is where most Monstera success happens. Get it right, and you’ll see fenestrations develop beautifully. Too much direct sun burns the leaves, while too little keeps them small and plain. Finding that sweet spot of bright, indirect light makes all the difference in how your plant grows and splits.
Finding the Perfect Light Balance
Think of bright, indirect light as the dappled sunshine filtering through a rainforest canopy. East or north-facing windows work beautifully, offering gentle morning or consistent soft light.
South and west windows can be intense, especially in summer. Watch for yellowing or brown patches signaling sunburn, or leggy stems with small, solid leaves crying out for more brightness.
If your Monstera isn’t fenestrating, light is usually the culprit. Many plant parents swear by sheer curtains to diffuse harsh rays, while others use affordable light meters to take the guesswork out completely.
What Actually Works in Real Homes
Plant lovers have found creative solutions for tricky lighting situations. Some place their Monstera a few feet back from bright south windows, letting it bask without burning.
Others hang sheer curtains or bamboo blinds to create that perfect filtered glow. In one Greg community discussion, a plant parent noticed their newer leaves had stopped fenestrating compared to older ones.
After relocating their Monstera to the living room for more sunlight, they saw bigger, better-fenestrated leaves. If you’re dealing with low light, supplementing with grow lights can encourage those coveted splits to finally appear.
Watering Your Monstera Properly
Watering might seem simple, but it’s where many plant parents stumble.
Monstera prefer their soil to dry out slightly between waterings rather than staying consistently moist. The key is reading your plant’s signals and adjusting based on your home’s conditions, because every space is different.
1. Getting the Timing Right
During spring and summer growing seasons, most Monstera need water every seven to ten days. Come fall and winter, that can stretch to two weeks or longer as growth slows down.
Rather than sticking to a rigid calendar, check the soil first. Stick your finger about two inches deep into the soil. If it feels dry at that depth, it’s time to water. If it’s still damp, wait a few more days.
Moisture meters remove guesswork, but the finger test works well. Water your Monstera thoroughly until water drains out, then let it drain completely. Never let it stand in water.
2. Recognizing Watering Issues
Your Monstera will tell you when something’s off. Watch for these signs:
- Overwatering: Yellow leaves that feel soft or mushy, stems turning brown and mushy at the base, soil that stays wet for days, or a sour smell from the pot
- Underwatering: Leaves curling inward, crispy brown edges or tips, drooping stems, soil pulling away from the pot edges
3. Real Talk from Plant Parents
Climate makes a huge difference in watering needs. In one Greg community discussion, plant parents shared how conditions like temperature, humidity levels, and container type all affect watering frequency.
One person waters every week and a half by checking with a finger or chopstick, while others adjust based on their environment. For frequent travelers, self-watering pots can be lifesavers.
Some people set phone reminders to check their plants, while others simply make it part of their weekend routine. The trick is finding what works for your lifestyle and space.
Best Soil Mix for Monstera
Soil is more than just dirt holding your plant in place. Monstera are aroids that naturally grow on trees in the wild, so their roots crave air pockets and quick drainage.
Heavy, compacted soil leads to root rot fast. The goal is to create a chunky, fluffy mix that holds some moisture while letting excess water drain away freely.
What Your Monstera Actually Needs?
Think loose and airy rather than dense and compact. A proper Monstera mix should dry out within a week or so after watering, not stay soggy for days.
Chunky aroid mixes work perfectly because they include larger particles that create air spaces around the roots. When you water, the mix should absorb moisture but never feel waterlogged.
Test this by squeezing a handful after watering; it should feel moist but not drip water. Ingredients matter as each serves a purpose: some retain moisture, others improve drainage, and some prevent compaction.
Soil Mix Recipes That Work
Here’s how different ingredients contribute to a healthy mix:
| Ingredient | Purpose | Proportion |
|---|---|---|
| Peat moss or coco coir | Retains moisture and provides structure | 40-50% |
| Perlite or pumice | Improves drainage and adds air pockets | 20-30% |
| Orchid bark | Creates chunky texture and prevents compaction | 20-30% |
| Activated charcoal | Absorbs impurities and keeps soil fresh | 5-10% (optional) |
Simple DIY recipe: Mix equal parts potting soil, perlite, and orchid bark; three ingredients you can grab at any garden center. One person in a Greg discussion swears by this exact combo for excellent drainage. Some growers toss in a handful of charcoal, but it’s optional. Start here and tweak based on how your soil performs.
Potting & Repotting: How to Care for Monstera
Repotting feels intimidating, but your Monstera will tell you when it’s time. Most Monstera need a new home every one to two years, though fast growers might need it sooner.
Reading the Signs
Your plant sends clear signals when it’s outgrown its pot. Spring or early summer is ideal for repotting since the plant is actively growing and recovers faster.
| Sign | What It Means |
|---|---|
| Roots out of drainage holes | The root system has run out of space |
| Water runs straight through | Roots have taken over most of the soil |
| Stunted or slow growth | Not enough room for roots to expand |
| Soil dries within a day | Too many roots, not enough soil to retain moisture |
| Plant lifts easily from the pot | Severely root-bound and needs immediate repotting |
Go up only one or two inches in pot size; too much extra space leads to overwatering.
Drainage holes are non-negotiable. Terracotta dries faster (great for overwaterers), plastic retains moisture longer (ideal for dry climates), and ceramic falls somewhere in between.
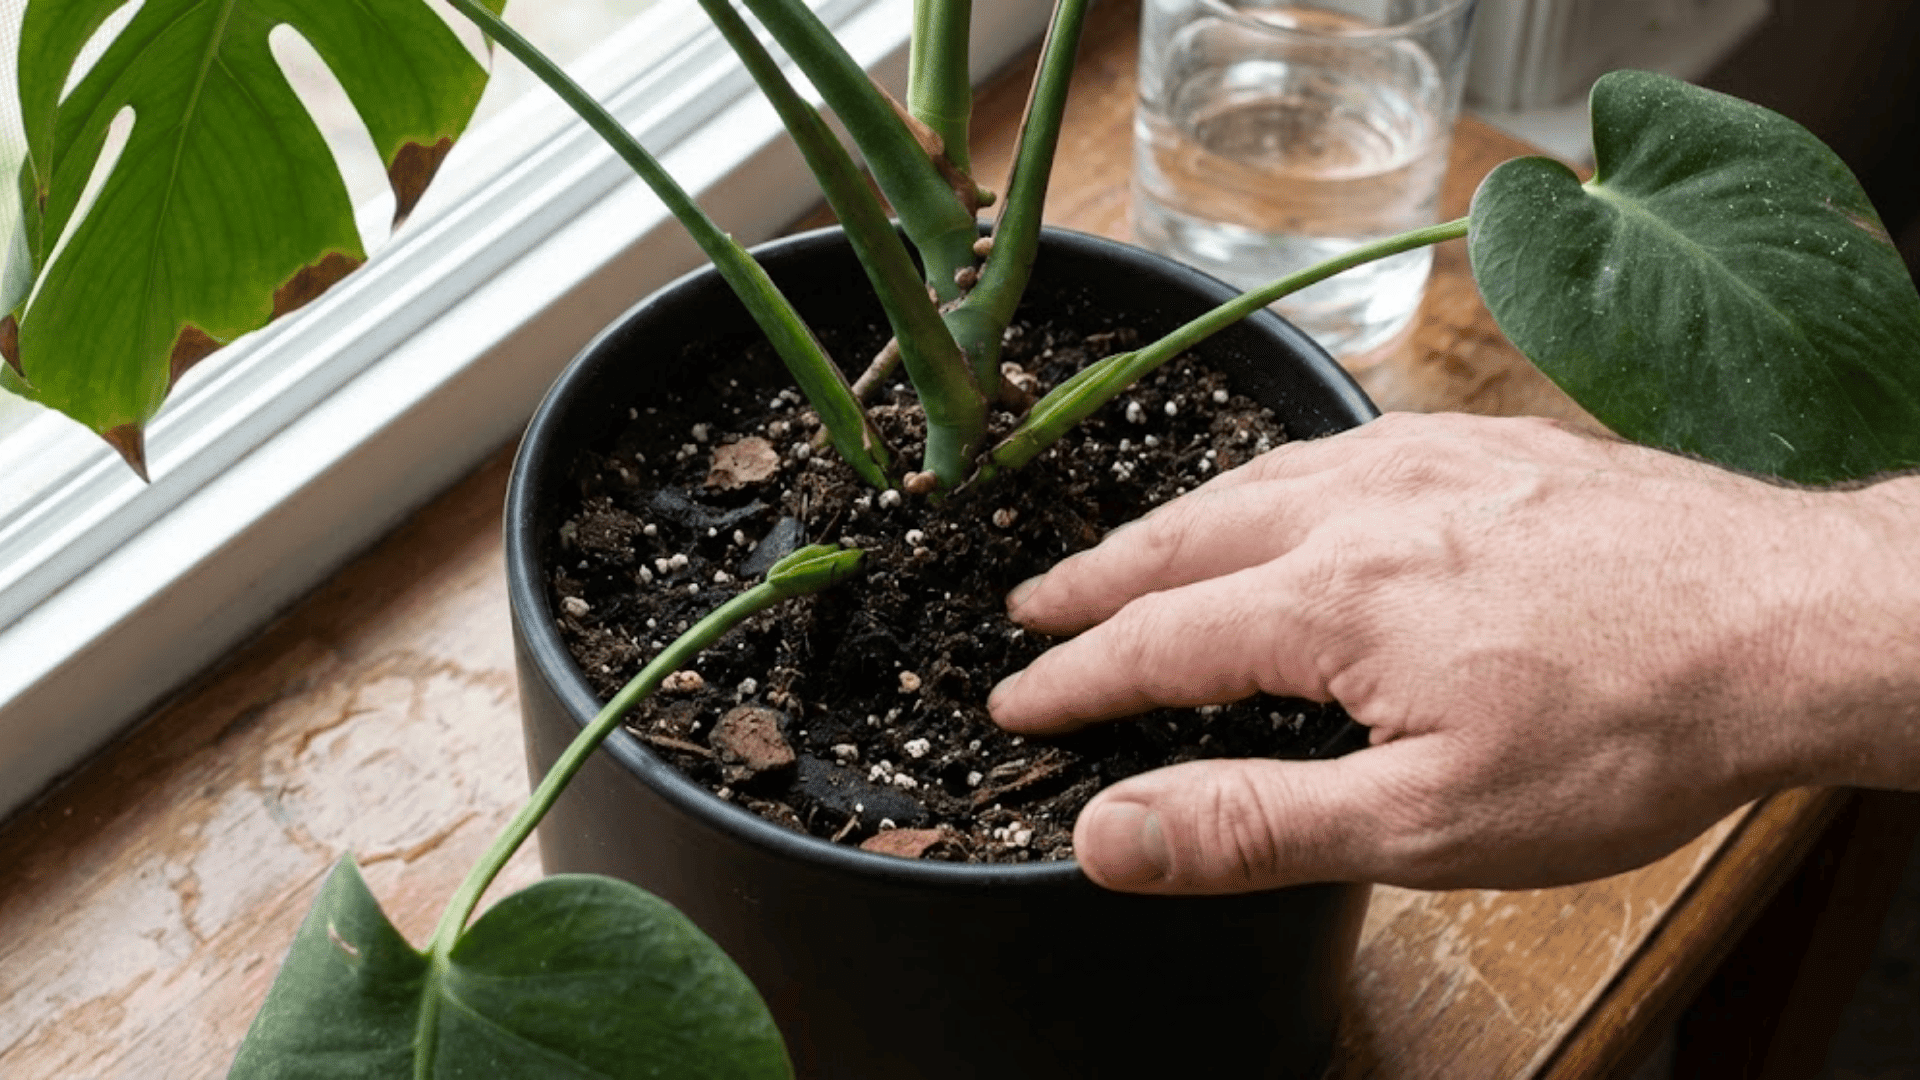
The Repotting Process
Follow these steps for a smooth transition that won’t shock your plant. The goal is disturbing the roots as little as necessary while giving them fresh, nutrient-rich soil to grow into.
- Step 1: Water your Monstera a day before repotting so the root ball slides out more easily.
- Step 2: Gently loosen the roots with your fingers, removing old soil and untangling any circles.
- Step 3: Trim away any mushy, black, or dead roots with clean scissors; healthy roots are white or tan.
- Step 4: Place fresh soil in the new pot, position the plant at the same depth, and fill around the sides.
- Step 5: Water thoroughly and keep it in bright, indirect light while it settles in.
In a Greg community discussion, plant parents shared that gently loosening severely root-bound root balls prevents tangling, and it’s okay if some roots break; Monstera bounce back and grow new ones.
Hold off on fertilizing for about a month after repotting to avoid root shock.
Monstera Care Guide: Humidity & Temperature Needs

Monsteras come from tropical rainforests, so it naturally craves warmth and moisture in the air.
While they’re surprisingly adaptable to average home conditions, giving them a bit more humidity can make the difference between a plant that survives and one that absolutely thrives.
Creating the Right Environment
Keep temperatures between 65-85°F (18-29°C) and avoid placing near vents or drafty windows. Aim for 60% humidity or higher for impressive fenestrations and lush growth.
Most Monstera adapt fine to 40-50% humidity, though they might grow more slowly with smaller leaves. Consistency matters more than hitting perfect numbers every single day.
Simple Ways to Add Moisture
Boosting humidity doesn’t require complicated setups. Here are methods that actually work:
- Humidifiers: Most effective option, especially during dry winter months; place near your plant.
- Pebble Trays: Fill a shallow tray with pebbles and water, keeping the pot above the waterline.
- Grouping Plants: Plants release moisture through their leaves, creating shared humid microclimates.
- Strategic Placement: Bathrooms and kitchens naturally have higher humidity levels.
Watch for crispy brown edges signaling low humidity. In a Greg discussion, plant parents noted misting can cause fungal issues without good airflow; humidifiers remain the better long-term solution.
Fertilizing Your Monstera
Fertilizer fuels those big, beautiful leaves, but Monstera don’t need much to thrive.
Think of it as a boost during active growth rather than a constant requirement. Overdoing it causes more problems than underdoing it, so a light hand wins every time.
1. When and How Often to Feed?
Fertilize during the growing season (spring and summer) when your Monstera is actively pushing out new leaves. Every two to four weeks works well for most liquid fertilizers diluted to half strength.
Come fall and winter, your plant enters semi-dormancy, and growth slows dramatically. Cut back to once every six to eight weeks or stop entirely until spring returns.
If you notice new growth has stalled completely in winter, that’s your cue to skip feeding until warmer months.
2. Choosing Your Fertilizer
Different fertilizers work for different lifestyles and preferences:
| Type | How It Works | Best For |
|---|---|---|
| Liquid fertilizers | Mixed with water during regular watering, fast-acting | People who want control over feeding frequency |
| Slow-release pellets | Sprinkle on the soil surface, releasing nutrients over months | Low-maintenance routines, forgetful plant parents |
| Organic options | Worm castings or compost tea provide gentle, natural nutrients | Those preferring chemical-free care |
3. When You’ve Gone Overboard
Too much fertilizer shows up quickly. Watch for these warning signs:
- White crusty buildup on the soil surface or pot edges
- Brown, crispy leaf tips even with proper watering
- Yellowing leaves with burnt edges
- Stunted growth or leaves that look smaller than usual
If you spot these symptoms, flush the soil thoroughly by running water through the pot for several minutes, letting it drain completely. Hold off on fertilizing for at least a month while your Monstera recovers.
Monstera Pruning & Training
Pruning isn’t just about keeping your Monstera tidy; it’s about encouraging fuller growth and guiding your plant exactly where you want it to go.
With the right approach, you can shape your Monstera into a climbing showpiece or a bushier tabletop beauty.
Pruning for Health and Shape
Knowing when and how to cut makes all the difference. Prune during spring or early summer when the plant bounces back fastest:
- Use clean, sharp scissors or pruning shears sterilized with rubbing alcohol to prevent infection.
- Cut just above a node (the bump where leaves emerge) at a 45-degree angle.
- Remove yellow, damaged, or leggy stems to redirect energy toward healthy growth.
- For bushier plants, cut back long vines to encourage branching from lower nodes.
- Save healthy cuttings for propagation; don’t let them go to waste.
Strategic pruning combined with bright, indirect light produces fuller foliage. Plants in lower light tend to grow tall and sparse, while those in optimal light naturally branch more.
Getting Your Monstera to Climb
Monstera are natural climbers that use aerial roots to scale trees in the wild. Giving them a moss pole or trellis mimics this growth pattern and encourages larger, more fenestrated leaves.
Position the pole behind the plant and gently tie stems to it using soft plant ties or velcro straps; never tie too tightly. As your Monstera grows, its aerial roots will naturally attach and climb upward.
Keep the moss pole moist by misting or watering it directly, which encourages aerial roots to grip better. The higher your Monstera climbs, the bigger and more dramatic its leaves become.
Propagating Monstera
Propagation is one of the most rewarding parts of Monstera ownership, turning one plant into many.
The key is understanding nodes, the bumps on stems where roots and leaves emerge. Each cutting needs at least one node and ideally one leaf to succeed.
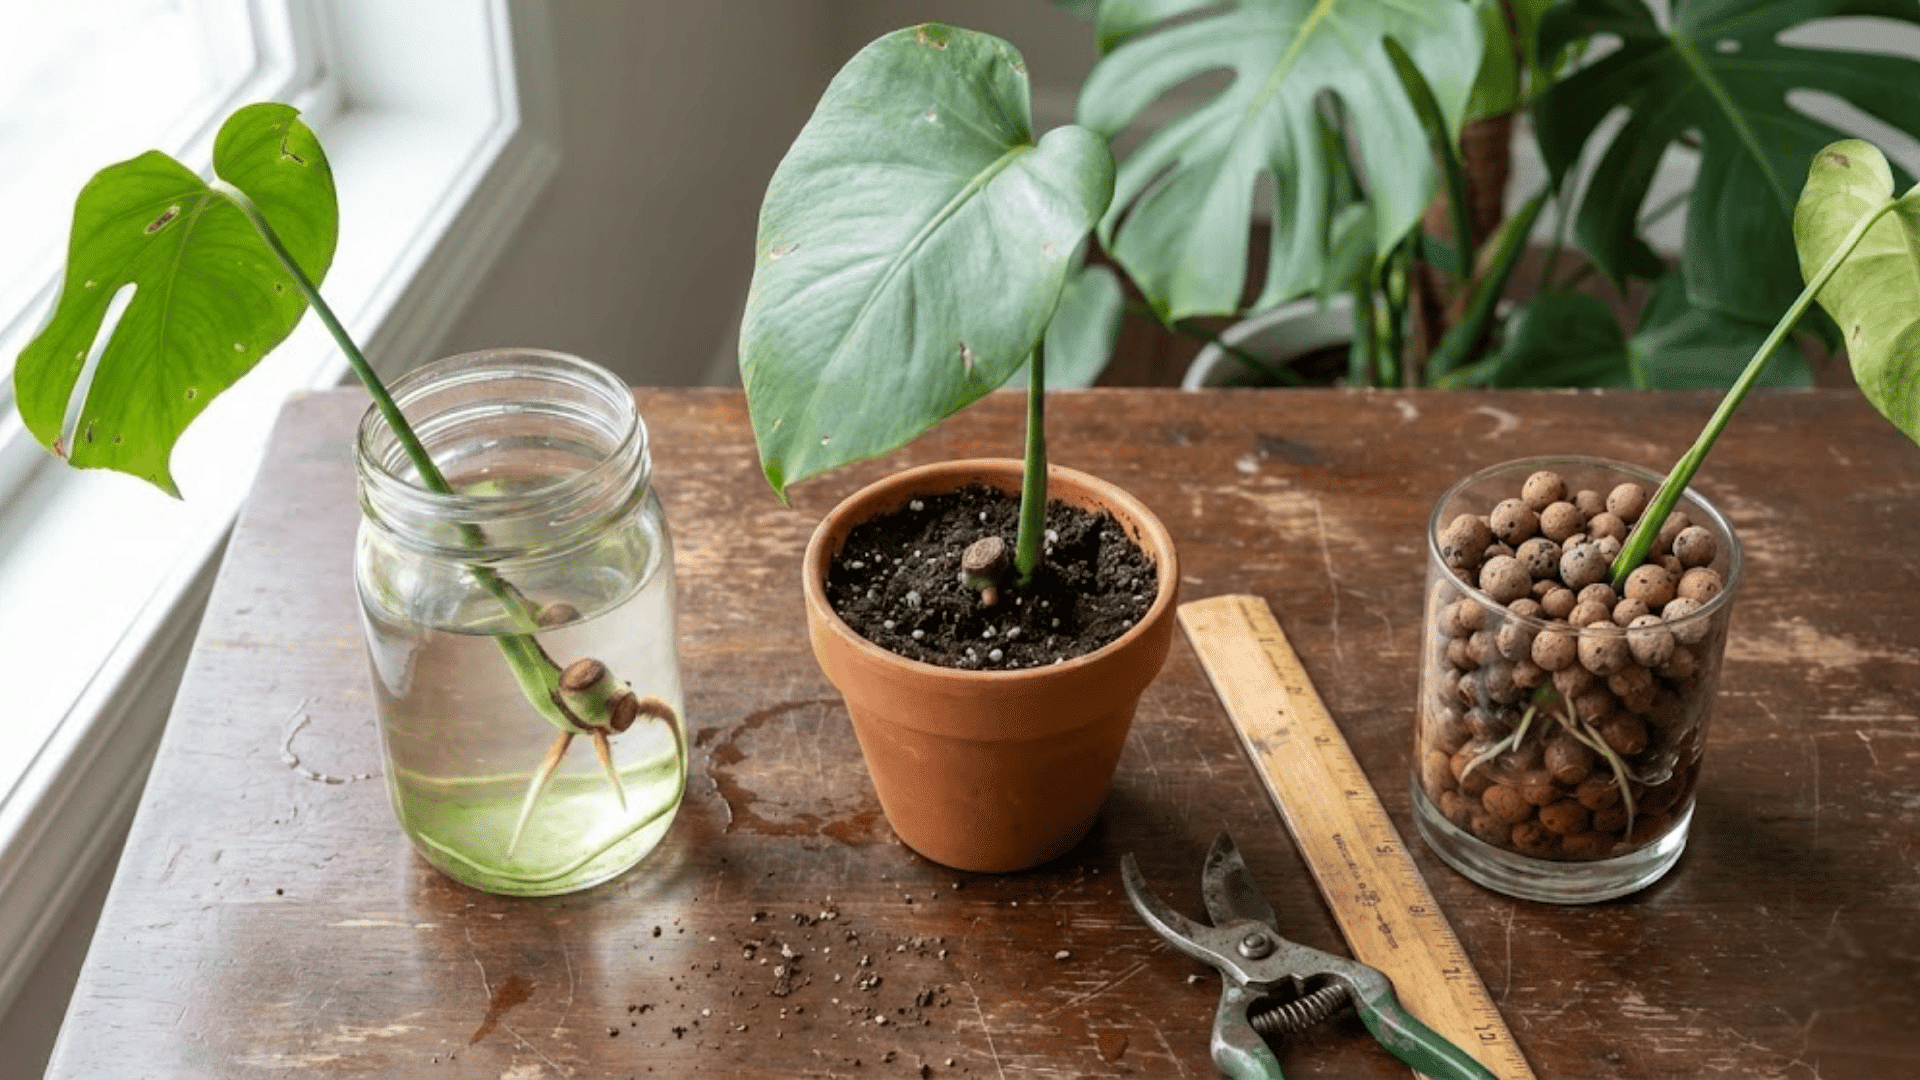
Propagation Methods That Work
- Water Propagation: Place cuttings in a clear container so you can watch roots develop, changing water weekly.
- Soil Propagation: Plant cuttings directly into moist soil for a seamless transition without transplant shock.
- LECA/Semi-Hydro: Use clay balls for a cleaner setup that provides excellent oxygenation to developing roots.
Monstera Timeline: From Cutting to Established Plant
Once you’ve taken your cutting, patience becomes your best friend. Different methods move at different speeds:
| Method | Root Development | Ready to Pot |
|---|---|---|
| Water Propagation | 2-4 weeks for visible roots | When roots reach 2-3 inches long |
| Soil Propagation | 3-5 weeks (hidden growth) | Keep in place, no transplanting needed |
| LECA/Semi-Hydro | 2-3 weeks for root development | Can stay in LECA permanently or transfer to soil |
The biggest mistakes? Rushing to pot water cuttings before roots reach 2-3 inches, forgetting to change cloudy water, and overwatering soil cuttings, which rots the node. Keep cuttings in bright, indirect light and warmth for faster rooting.
Common Monstera Problems & Solutions
Even healthy Monsteras hit bumps along the way. The good news? Most issues have straightforward fixes once you identify what’s going wrong.
Here’s how to troubleshoot the most common problems:
- Yellow Leaves: Usually overwatering or poor drainage; check soil moisture and ensure proper drainage holes.
- Brown Tips and Edges: Low humidity or inconsistent watering; boost moisture in the air or adjust watering schedule.
- Droopy Leaves: Underwatering or root issues; check if the soil is bone dry or if the roots are rotting from overwatering.
- No Fenestrations: Insufficient light or young plant; move closer to bright indirect light and give it time to mature.
- Pests (Thrips, Spider Mites, Mealybugs): Isolate immediately, wipe leaves with neem oil solution weekly, and maintain good airflow to prevent future infestations.
Most problems stem from lighting or watering imbalances. When you spot an issue, adjust one thing at a time and give your plant a few weeks to respond before making more changes.
The Bottom Line
Caring for your Monstera doesn’t require perfection, just consistency and attention to what your plant is telling you.
Master the basics of bright, indirect light, proper watering, and well-draining soil, and you’ll see those wondrous fenestrated leaves emerge naturally.
Each new leaf is a little victory worth celebrating.
Have questions or want to share your own Monstera wins and struggles? Drop a comment below and let’s chat about what’s working (or not working) for your plant!