Brussels sprouts are those charming little cabbage-like gems clustered along tall, sturdy stalks, belonging to the Brassica oleracea Gemmifera Group, and they’re quietly becoming a garden favorite for good reason.
Growing your own means harvesting sprouts at their sweetest, especially after a light frost kisses them with extra flavor.
These cool-season beauties do ask for patience, needing a long, leisurely growing period to develop their signature mini-heads. Watching them form along the stem, stacked like nature’s sculpture, makes the wait worthwhile.
If you’re drawn to vegetables that reward dedication with exceptional taste, Brussels sprouts deserve a spot in your garden beds.
Understanding the Brussels Sprout Plant
Brussels sprouts grow on a single upright stalk that can reach several feet tall, with large, leafy greens fanning out at the top.
The sprouts themselves form in the leaf axils along the stem, developing from bottom to top as tiny cabbage heads. This remarkable process takes time, typically anywhere from 80 to over 120 days from planting to harvest.
They thrive in cool weather and actually prefer chilly conditions, making them perfect for fall and early winter gardens.
A light frost works magic on their flavor, converting starches to sugars and creating that coveted sweet, nutty taste gardeners adore.
Stage 1: Planning Your Brussels Sprouts Growing Season
Success with Brussels sprouts truly starts before seeds ever touch soil. These patient plants reward careful planning, especially when it comes to timing and location.
Aiming for a spring harvest or the sweeter fall crop requires understanding your regional climate and preparing the perfect growing spot, which sets the foundation for those beautiful, flavor-packed sprouts.
Think of this stage as mapping out your garden’s future success.
| Aspect | Spring Planting | Fall Planting | Key Considerations |
|---|---|---|---|
| Timing | Start seeds indoors in early spring for a summer harvest | Start mid-summer for autumn/winter harvest | Fall crops taste sweeter due to frost exposure |
| Best Regions | Cool climates with mild summers | Most regions, especially mild/warm climates | Avoid planting where the heat exceeds comfort levels |
| Sunlight | 6-8+ hours direct sun daily | 6-8+ hours direct sun daily | More sun = stronger plants and better yields |
| Soil Needs | Well-draining, fertile, pH 6.0-7.5 | Well-draining, fertile, pH 6.0-7.5 | Rich in organic matter, never waterlogged |
| Crop Rotation | Avoid previous brassica locations | Avoid previous brassica locations | Prevents disease buildup and nutrient depletion |
Stage 2: Seed Starting & Germination
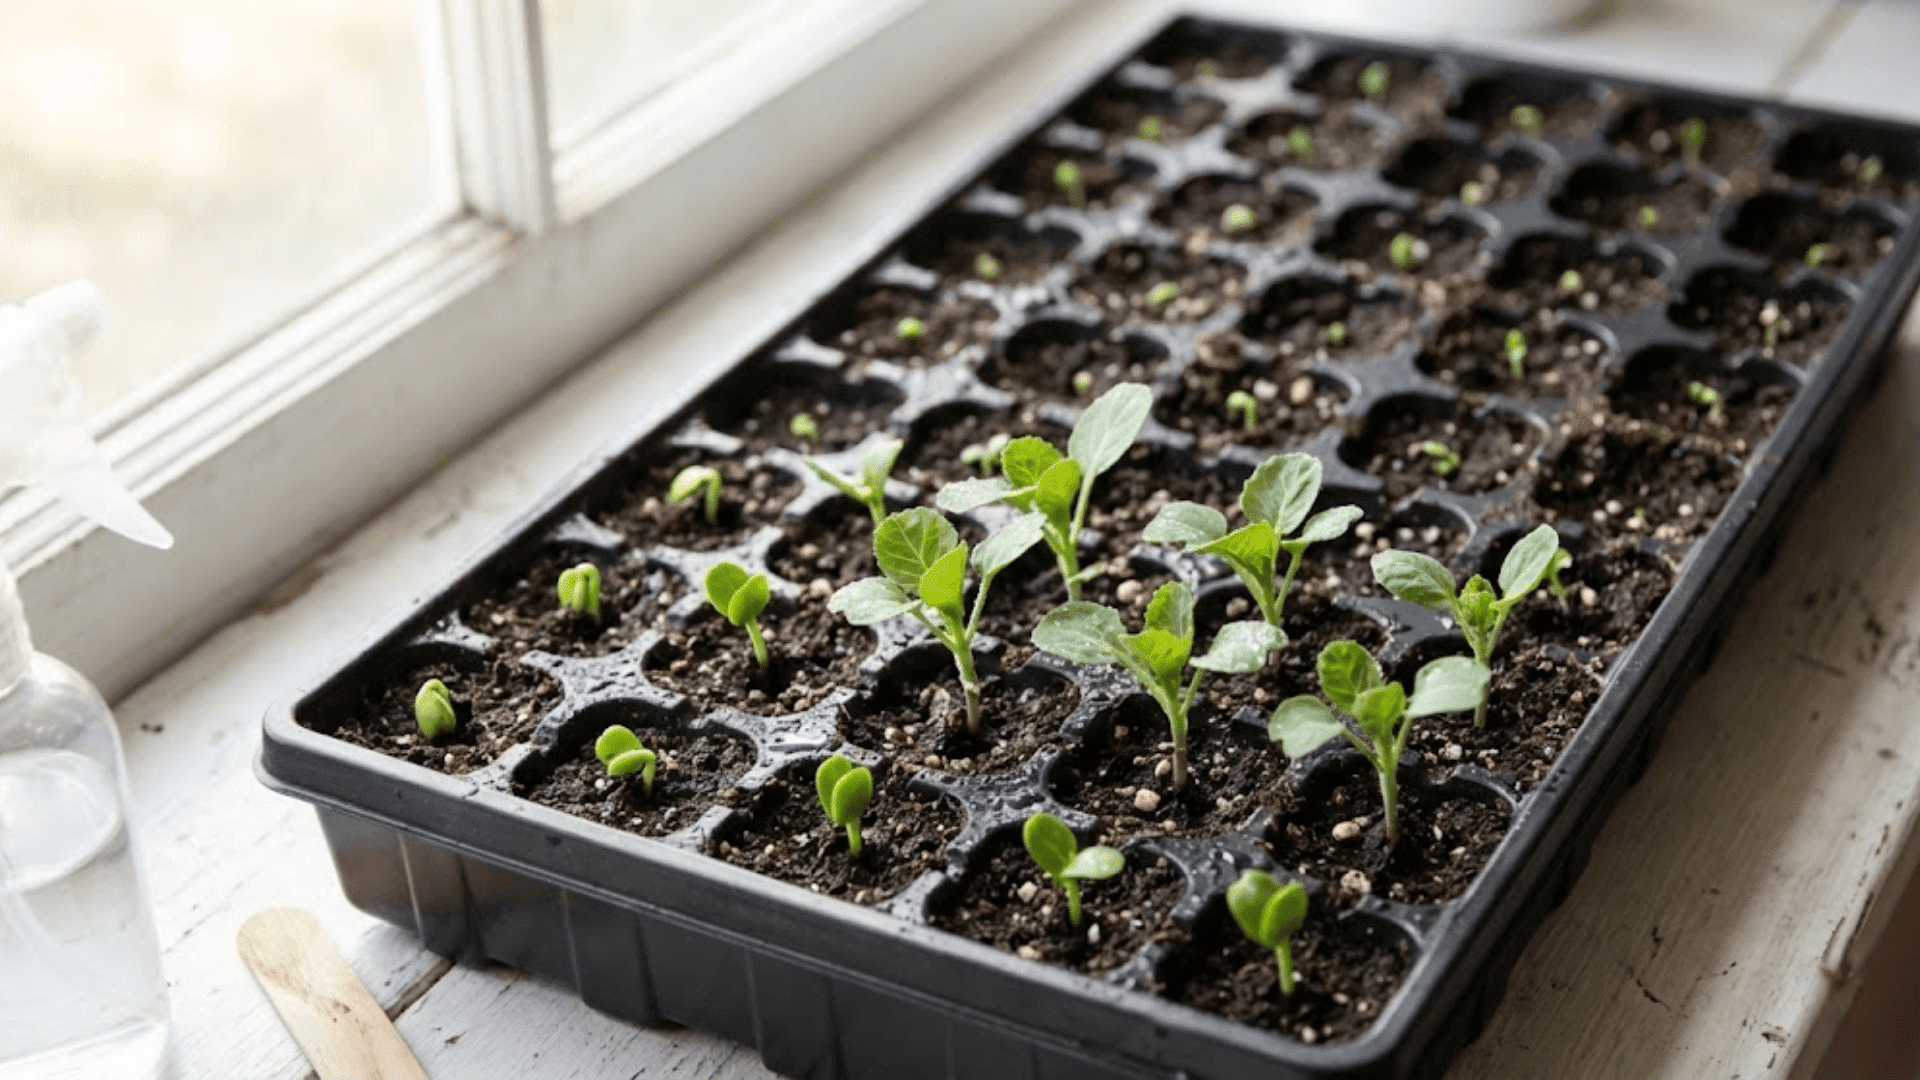
This is where Brussels sprouts begin their quiet journey from tiny seeds to sturdy seedlings.
The germination stage requires attention to detail and a bit of patience, but watching those first green shoots emerge makes every careful step worthwhile.
Starting Brussels Sprouts From Seed
Indoor seed starting gives you control and a head start, perfect for most gardeners. Start seeds six to eight weeks before your last spring frost for transplanting, or in mid-summer for fall crops.
Direct sowing works in mild climates but offers less control. Plant seeds a quarter to half-inch deep in quality seed-starting mix, spacing them about two inches apart in trays or small containers.
Keep the soil consistently moist but never soggy, and provide warmth and light once sprouts emerge for strong, stocky seedlings.
Creating Perfect Germination Conditions
Brussels sprout seeds need specific conditions to wake up and grow.
Here’s how to give them the best start:
- Temperature Range: Keep soil between 45-85°F, with 60-70°F being ideal for fastest germination.
- Germination Timeline: Expect sprouts to emerge in 5-10 days under optimal conditions.
- Moisture Balance: Keep soil consistently moist using a spray bottle, never letting it dry out completely.
- Light Exposure: Once seedlings emerge, provide 12-16 hours of bright light daily using a grow light or sunny window.
- Healthy Seedlings: Look for strong stems, deep green leaves, and compact growth rather than tall, leggy plants.
Stage 3: Transplanting & Early Growth
The plant shifts into growth mode once it moves from cozy indoor conditions to the garden.
This transition period determines how well your Brussels sprouts establish themselves and build the strong foundation needed for that towering stalk and abundant sprouts.
Preparing the Soil for Transplants
Brussels sprouts are heavy feeders, demanding rich, nutrient-dense soil to fuel their long growing season and impressive production.
Proper soil preparation before transplanting sets your plants up for months of healthy growth.
- Amend with Compost: Work in 2-4 inches of well-aged compost or aged manure into the top 8-12 inches of soil.
- Balance pH Levels: Test and adjust soil to maintain a pH between 6.0 and 7.5 using lime, if needed.
- Boost Nitrogen: Add a balanced organic fertilizer or blood meal since brassicas need plenty of nitrogen for leafy growth.
- Improve Drainage: Mix in organic matter to create a loose, well-draining soil structure that prevents waterlogging.
- Firm the Bed: Gently compact amended soil so tall plants have stable anchoring for their heavy stalks.
Transplanting Seedlings Outdoors
Seedlings are ready for the garden when they have 3-4 true leaves and stems as thick as a pencil, typically four to six weeks after germination.
Space plants 18-24 inches apart in rows 30-36 inches wide, giving each plant room to develop a strong stalk and catch adequate sunlight.
Before moving outdoors permanently, hardening off is essential. Gradually expose seedlings to outdoor conditions over 7-10 days, starting with an hour in shade and slowly increasing time and sun exposure.
Skipping this step shocks plants, causing wilting, sunburn, and stunted growth that delays your harvest.
Stage 4: Vegetative Growth (Building the Stalk)
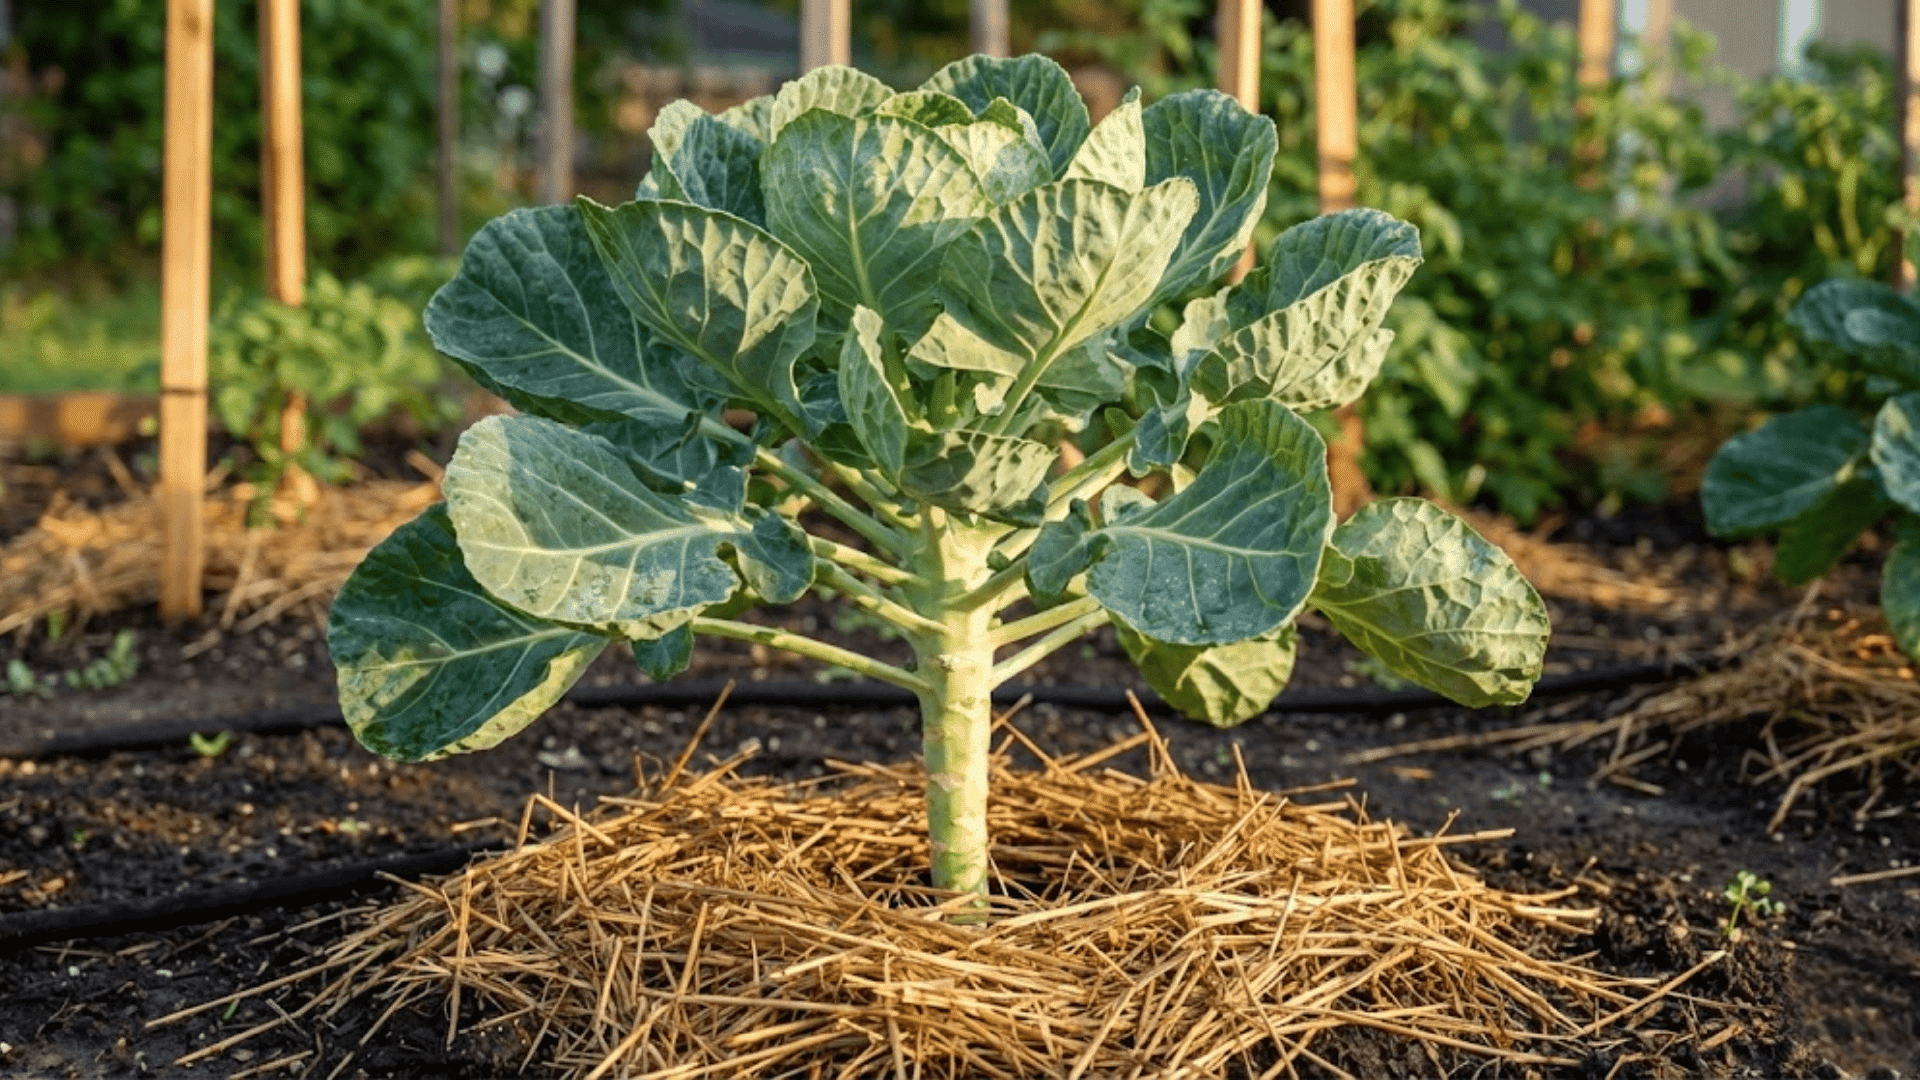
Leaves grow first, not sprouts. This stage can feel puzzling for first-time growers watching their plants seemingly do nothing but produce more foliage.
Understanding what’s happening beneath all that greenery helps you appreciate this crucial foundation-building phase.
1. The Pre-Sprout Development Phase
Before a single sprout appears, your Brussels sprout plant focuses entirely on building infrastructure.
The thick central stalk must grow tall and strong enough to support dozens of sprouts, while the large leaves act as solar panels, gathering energy for future production.
This vegetative stage typically lasts 50-70 days after transplanting. During this time, plants may reach two to three feet tall with massive leaves fanning outward.
It looks like all leaves and no sprouts because that’s exactly what’s happening, and it’s perfectly normal and necessary.
2. Watering and Feeding for Strong Growth
Active growth demands consistent resources. Water deeply once or twice weekly, providing 1-1.5 inches of water to encourage deep root development rather than shallow daily sprinkles.
Brussels sprouts need steady moisture without waterlogged soil.
Feed every three to four weeks with nitrogen-rich fertilizer or compost tea to fuel leaf and stalk growth.
Side-dress with compost midway through this stage for sustained nutrition. Watch for yellowing lower leaves, which signal nitrogen deficiency requiring immediate feeding.
3. Mulching for Season-Long Success
Apply a 2-3 inch layer of organic mulch around plants once they’re established, keeping it a few inches from the stalk base.
Mulch regulates soil temperature, keeping roots cool during warm spells and insulated as the weather chills. It conserves moisture, reducing watering frequency while preventing the soil surface from crusting.
Mulch also suppresses weeds that compete for nutrients and creates a cleaner environment that discourages soil-borne pests from reaching your plants.
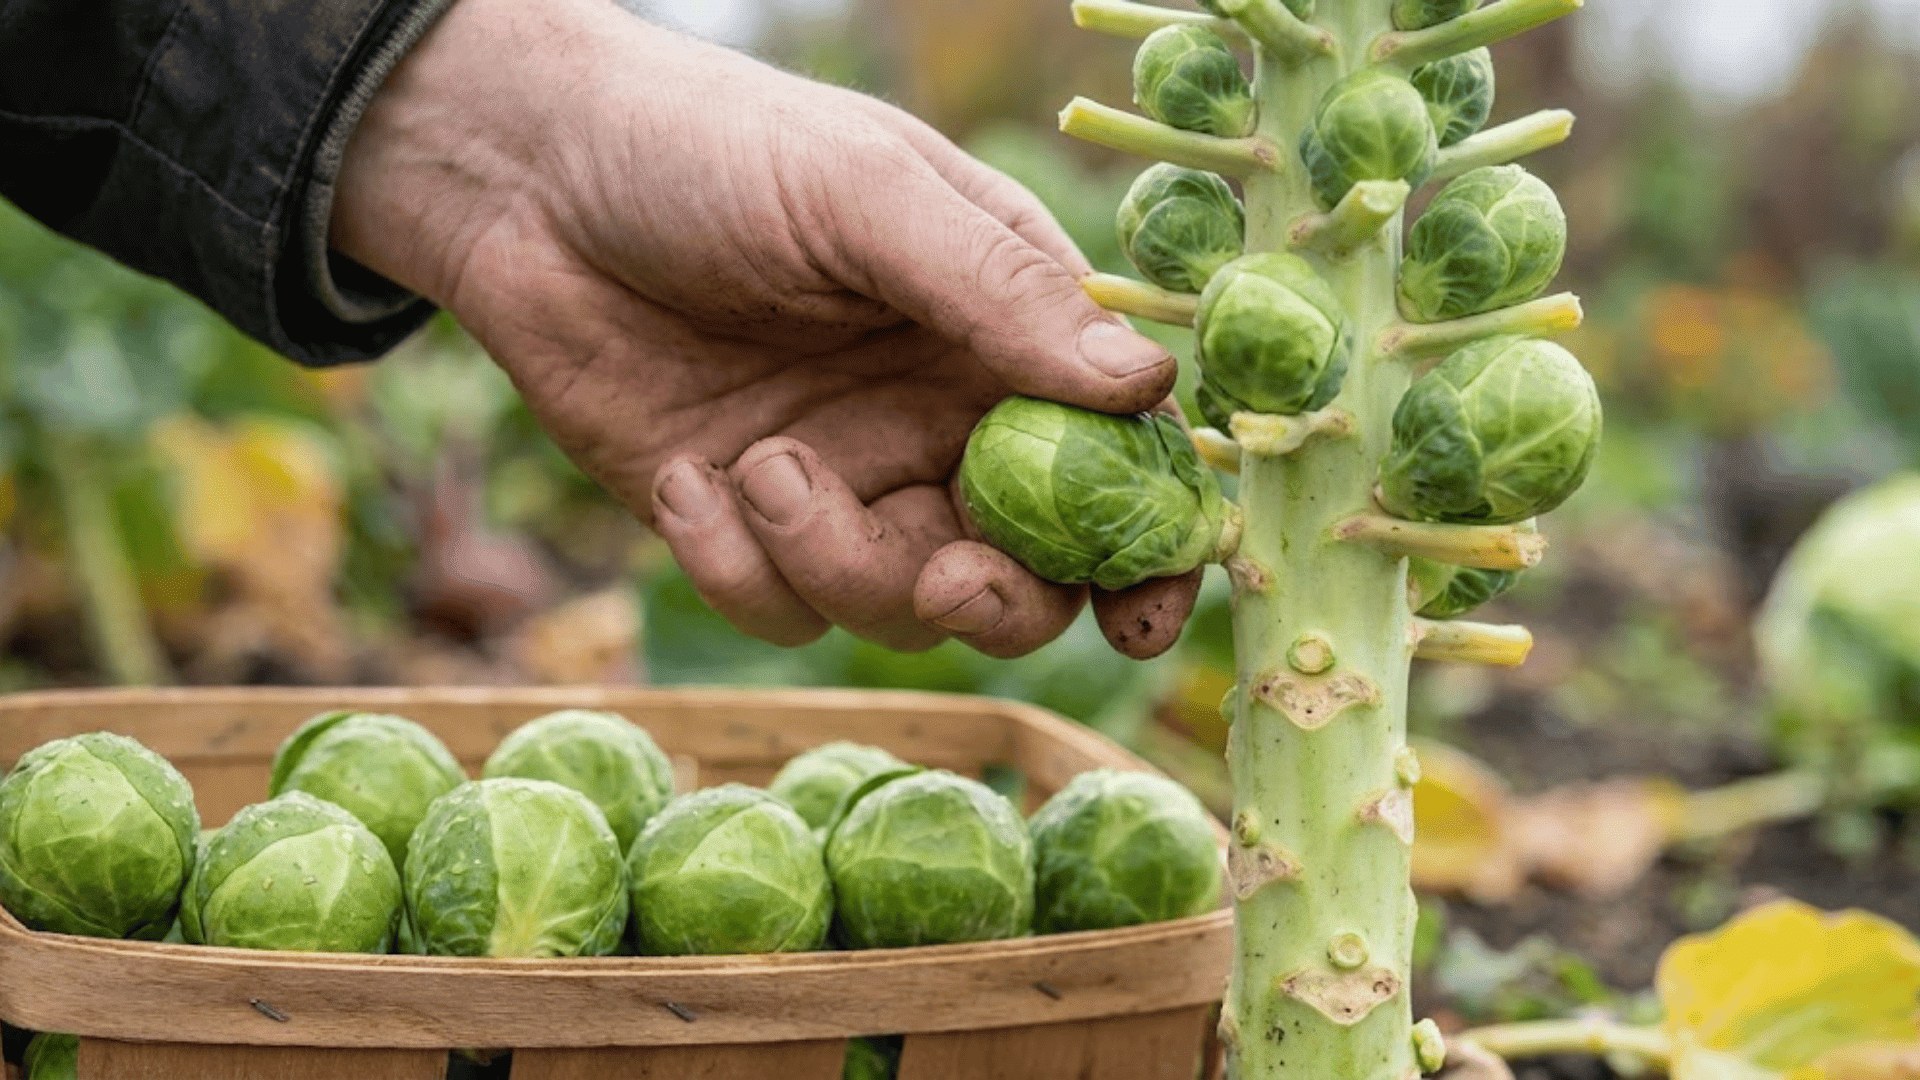
Stage 5: Sprout Formation Along the Stalk
The most exciting phase arrives when tiny sprouts form in the leaf axils along the stalk, typically 80-100 days after planting. They develop from bottom to top, starting as small buds that gradually swell into mini cabbage heads.
Cool temperatures between 60-70°F during the day produce the tightest, most compact sprouts. Remove lower leaves as sprouts form to improve airflow and light penetration, snapping them off cleanly at the stalk.
Many gardeners top the plant by pinching off the growing tip four to six weeks before harvest, redirecting energy into uniform sprout development.
Check the lower stalk first; that’s where harvest begins.
Stage 6: Maturation & Flavor Development
Cold weather works magic on Brussels sprouts, transforming them from simple vegetables into sweet, nutty delights. This final stage is where patience pays off in the most delicious way possible.
Maturation Timeline and Frost Benefits
Sprouts need time and cold exposure to reach their full potential. Understanding this timeline helps you plan the perfect harvest window.
| Growth Phase | Timeframe | What Happens |
|---|---|---|
| Sprout Development | 3-4 weeks after formation | Buds grow from pea-sized to firm, golf ball-sized heads |
| Full Maturity | 90-120+ days from transplant | Complete development with dense, compact layering |
| Harvest Window | Bottom to top, over several weeks | Lower sprouts mature first, allowing gradual picking |
| Frost Exposure | After 1-2 light frosts (below 32°F) | Plants convert starches to sugars as natural antifreeze |
| Optimal Flavor | Post-frost period | Sweetness intensifies, bitterness reduces significantly |
| Cold Tolerance | Light frosts beneficial, below 20°F risks damage | Heavy freezes can harm sprouts, but light cold improves them |
Reading Harvest Readiness
Firm, compact sprouts about 1-2 inches in diameter signal perfect harvest timing. Gently squeeze them; they should feel solid like a small cabbage rather than soft or spongy.
The outer leaves will be tight and bright green, wrapping snugly around the head. Harvest begins at the bottom, where sprouts mature first, working upward over several weeks.
Stunted or loose sprouts indicate stress from heat, inconsistent watering, or pest damage. Loose, open heads suggest the plant is bolting or didn’t receive adequate cold exposure for proper development.
Stage 7: Harvesting Brussels Sprouts
From plant to plate, harvesting is the rewarding finale of months of careful tending. Knowing when and how to pick ensures the best flavor and texture for your homegrown sprouts.
When to Harvest
Ideal sprout size ranges from 1-2 inches in diameter, about the size of a walnut or golf ball, with a firm, compact feel and bright green color.
Begin harvesting from the bottom of the stalk upward as lower sprouts mature first, typically after the first frost when flavor peaks.
You can pick sprouts gradually over several weeks, taking only the ready ones while leaving smaller sprouts to continue growing.
Alternatively, harvest the entire stalk at once by cutting it at ground level when most sprouts have matured. This whole-stalk method works beautifully for processing large batches or when hard freezes approach.
How to Harvest Brussels Sprouts?
Proper harvesting technique protects both the sprouts and the plant, allowing continued production throughout the season.
- Twist and Snap Method: Grasp the sprout firmly and twist downward while pulling away from the stalk until it snaps off cleanly.
- Cutting Technique: Use a sharp knife to slice sprouts off flush with the stalk if twisting feels difficult or damages the plant.
- Remove Lower Leaves: Strip off any yellowing leaves below harvested sprouts to redirect energy upward and improve air circulation.
- Whole Stalk Harvest: Cut the entire stalk at soil level when 75% of sprouts are ready or before temperatures drop below 20°F.
- Handle Gently: Place harvested sprouts in a container without stacking too deeply to prevent bruising and crushing outer leaves.
Stage 8: After Harvest (Storage & Use)
Don’t waste your crop after all that careful growing. Proper storage preserves the sweet, nutty flavor you worked months to achieve, keeping your Brussels sprouts delicious for weeks or even months.
| Storage Method | Preparation | Duration | Best Practices |
|---|---|---|---|
| Refrigerator Storage | Remove loose outer leaves, keep unwashed | 3-5 weeks | Store in a perforated plastic bag in the crisper drawer; wash only before use |
| Freezing | Blanch in boiling water for 3-4 minutes, ice bath, then drain and dry | 10-12 months | Freeze on a baking sheet first, then transfer to freezer bags for the best texture |
| On-the-Stalk Storage | Leave sprouts on the harvested stalk, store in a cool location | Several weeks | Keeps sprouts fresher longer; snap off as needed for meals |
| Root Cellar Method | Pull the entire plant with roots, hang upside down in a cool, humid space | 4-6 weeks | Maintains freshness without refrigeration in temperatures around 32-40°F |
Fresh Brussels sprouts taste best within the first week, but maintain quality for much longer with proper cold storage. The key is keeping them cold, slightly humid, and minimizing moisture on the outer leaves to prevent rot.
Stage 9: Troubleshooting by Growth Stage
Problems happen, but most Brussels sprout challenges trace back to specific growth stages with straightforward solutions.
Identifying where things went wrong helps you course-correct quickly and salvage your harvest.
Problem 1: Seedlings Not Growing or Damping Off (Stage 2)
Solution: Check soil temperature first; seeds germinate poorly below 45°F or in overly wet conditions. Improve air circulation, reduce watering, and ensure soil drains well to prevent damping-off disease that kills seedlings.
Problem 2: All Leaves, No Sprouts Forming (Stage 4)
Solution: This is normal in the vegetative phase, but if plants are over 90 days old with no buds, they probably faced heat stress. Brussels sprouts need cool temperatures to form sprouts; heat causes leaf growth.
Problem 3: Small, Loose, or Stunted Sprouts (Stage 5-6)
Solution: Loose sprouts result from insufficient cold exposure or inconsistent watering. Ensure plants stay below 70°F and experience at least one light frost for tight, compact heads. Apply compost side-dressed and keep soil moist during sprouting.
Problem 4: Yellowing Leaves Throughout Growth (Multiple Stages)
Solution:Lower leaf yellowing is natural with maturity, but widespread yellowing indicates nitrogen deficiency. Apply nitrogen-rich fertilizer or compost tea immediately and verify soil pH stays within 6.0-7.5 for nutrient uptake.
Final Thoughts
Understanding how Brussels sprouts grow transforms these patient plants from mysterious garden experiments into reliable cool-season crops.
From that first tiny seed to the satisfying snap of harvest, each growth stage builds toward those sweet, frost-kissed sprouts that make the wait worthwhile.
The tall stalks, the gradual sprout formation, the magic of cold weather; it all comes together in a vegetable that rewards your dedication with exceptional homegrown flavor.
Share your growing experiences, questions, or favorite harvest tips in the comments below. Happy growing, and may your stalks be tall and your sprouts be plentiful!