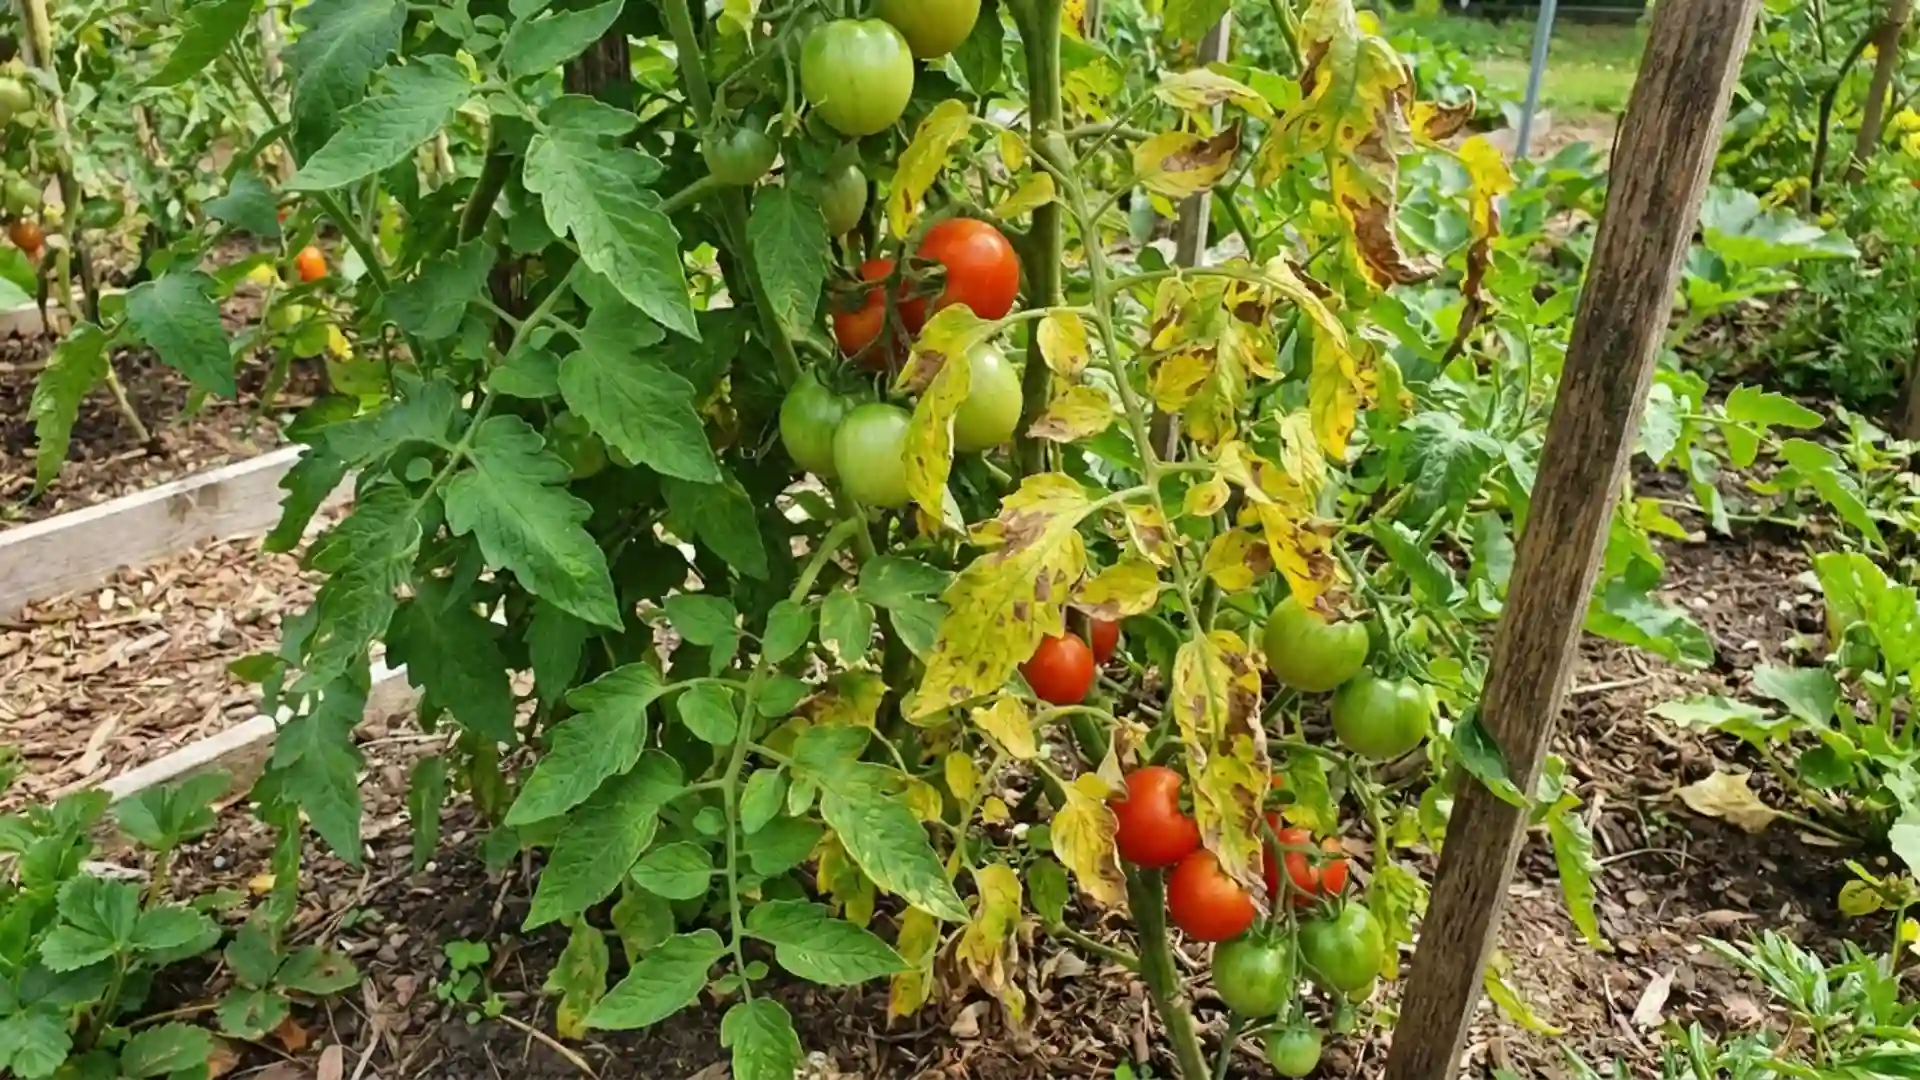
Yellow tomato leaves show up in almost every garden, and most of the time they are not a sign of disaster.
Sometimes it’s just an older leaf retiring gracefully. Other times, your plant is waving a flag for help: it might need more nitrogen, more water, or relief from a pest hiding underneath.
In my years growing tomatoes, the leaves have never once lied to me. They just take a bit of patience to read correctly.
This piece walks through the patterns, the pests, the diseases, and the fixes, so you can get your plant back to thriving.
Understanding Yellow Leaves on Tomato Plants
Yellow leaves are one of the most common signals tomato plants send when something in their environment or care routine needs attention.
The color change occurs because chlorophyll production slows, whether due to a nutrient shortfall, an imbalance in watering, pest activity, or disease.
Not every yellow leaf is a red flag. Older, lower leaves often turn yellow simply as part of normal plant aging.
The goal here is to help you tell the difference between harmless yellowing and a genuine problem, then walk through exactly what’s causing it and how to fix it before it spreads further.
Is It Normal? How to Tell Aging Leaves from a Real Problem
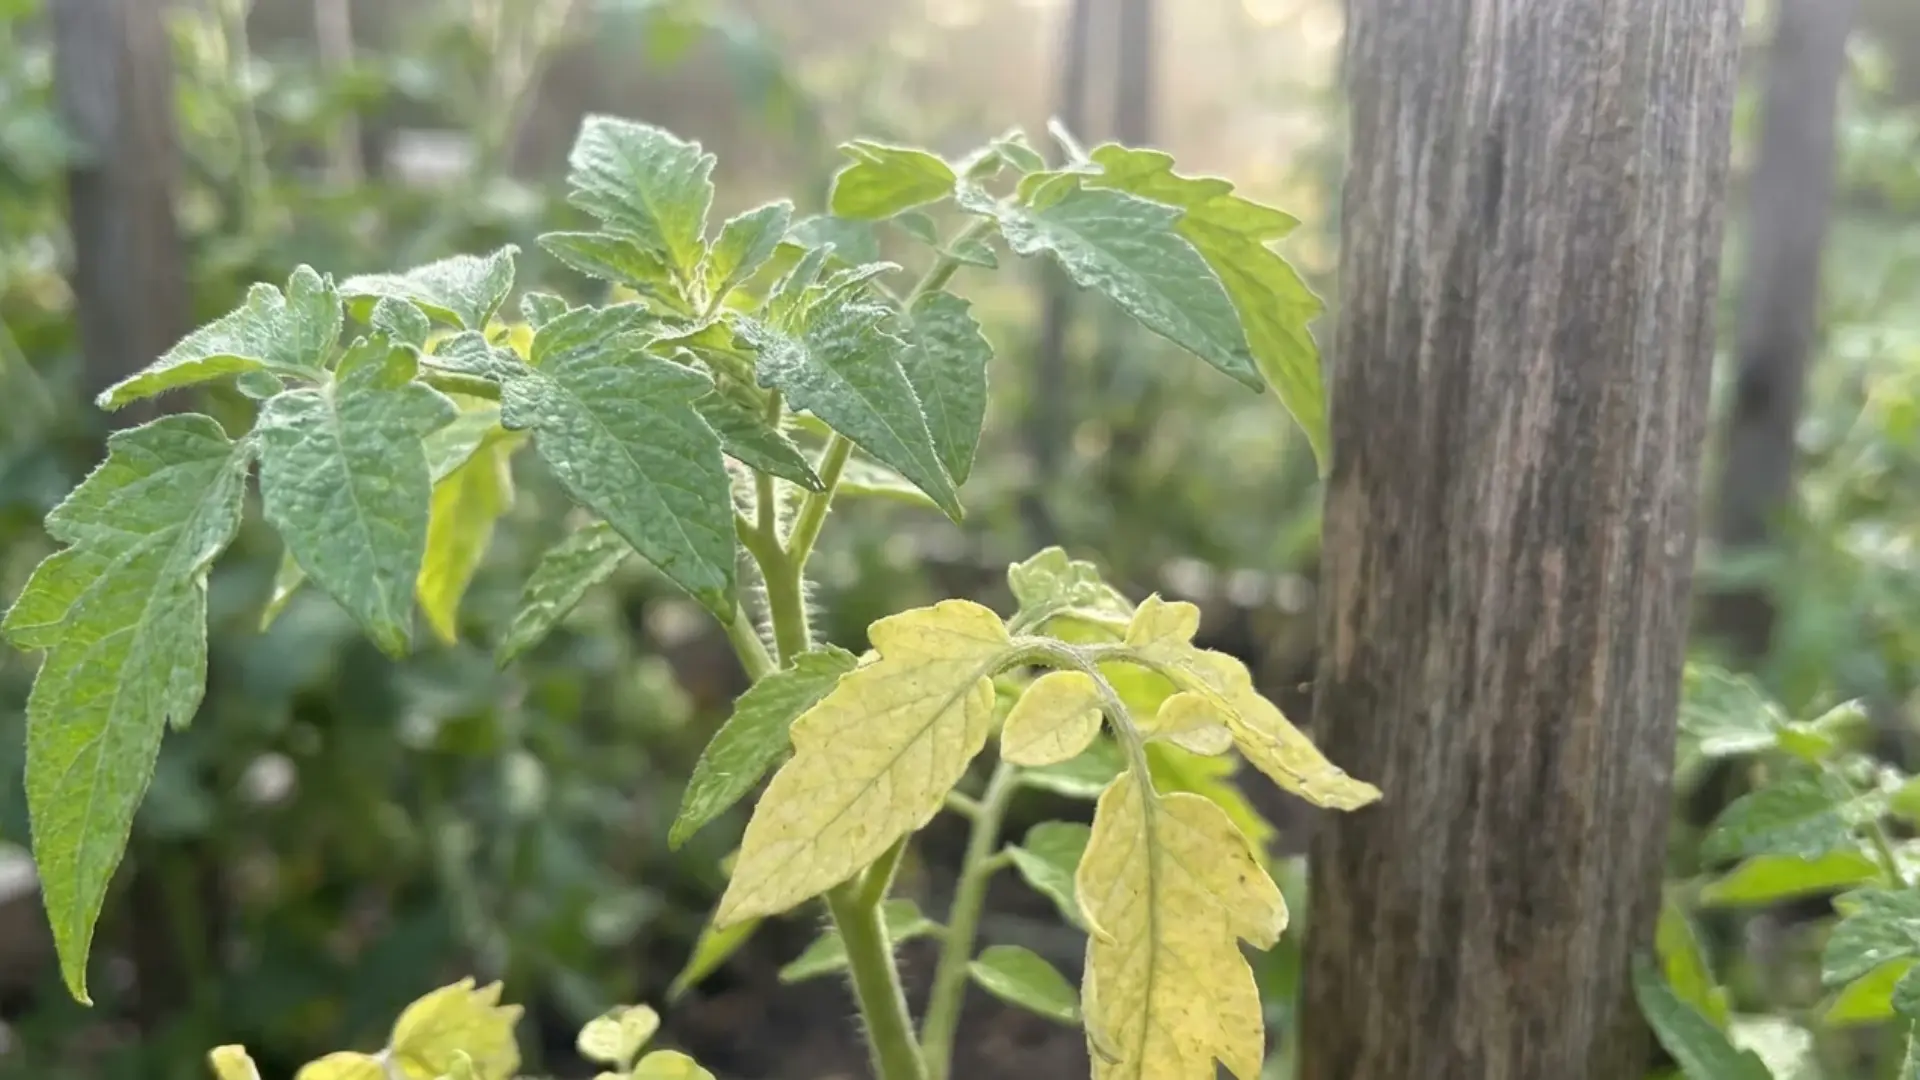
Before assuming the worst, it helps to step back and look at where the yellowing is happening and how it’s behaving over time.
Tomato plants naturally shed some leaves as they grow, and this process can look identical to disease or deficiency if you don’t know what to look for. Here’s how to tell the two apart.
When Yellowing Is Just Part of Growing Older
As a tomato plant matures, its lower leaves are the first to be sacrificed. These leaves are the oldest on the plant, and once the plant has enough foliage higher up to support photosynthesis, it stops investing energy in maintaining them.
They’ll turn uniformly yellow, dry out, and drop off on their own, usually one or two at a time.
This is a slow, gradual process, not something that appears overnight, and it rarely affects more than the bottom few leaves at once.
Warning Signs That Mean It’s Not Just Aging
Real trouble tends to move faster and spread wider than natural aging. Watch for:
- Yellowing that appears on new, upper, or middle leaves instead of just the bottom ones
- Spots, streaks, or blotches accompanying the yellow color
- Wilting, curling, or drooping alongside the discoloration
- Rapid spread across many leaves within days
- Sticky residue, webbing, or visible insects on leaf undersides
Any of these signs points to a deficiency, pest, or disease that needs attention.
Diagnose the Pattern First: A Quick Self-Check
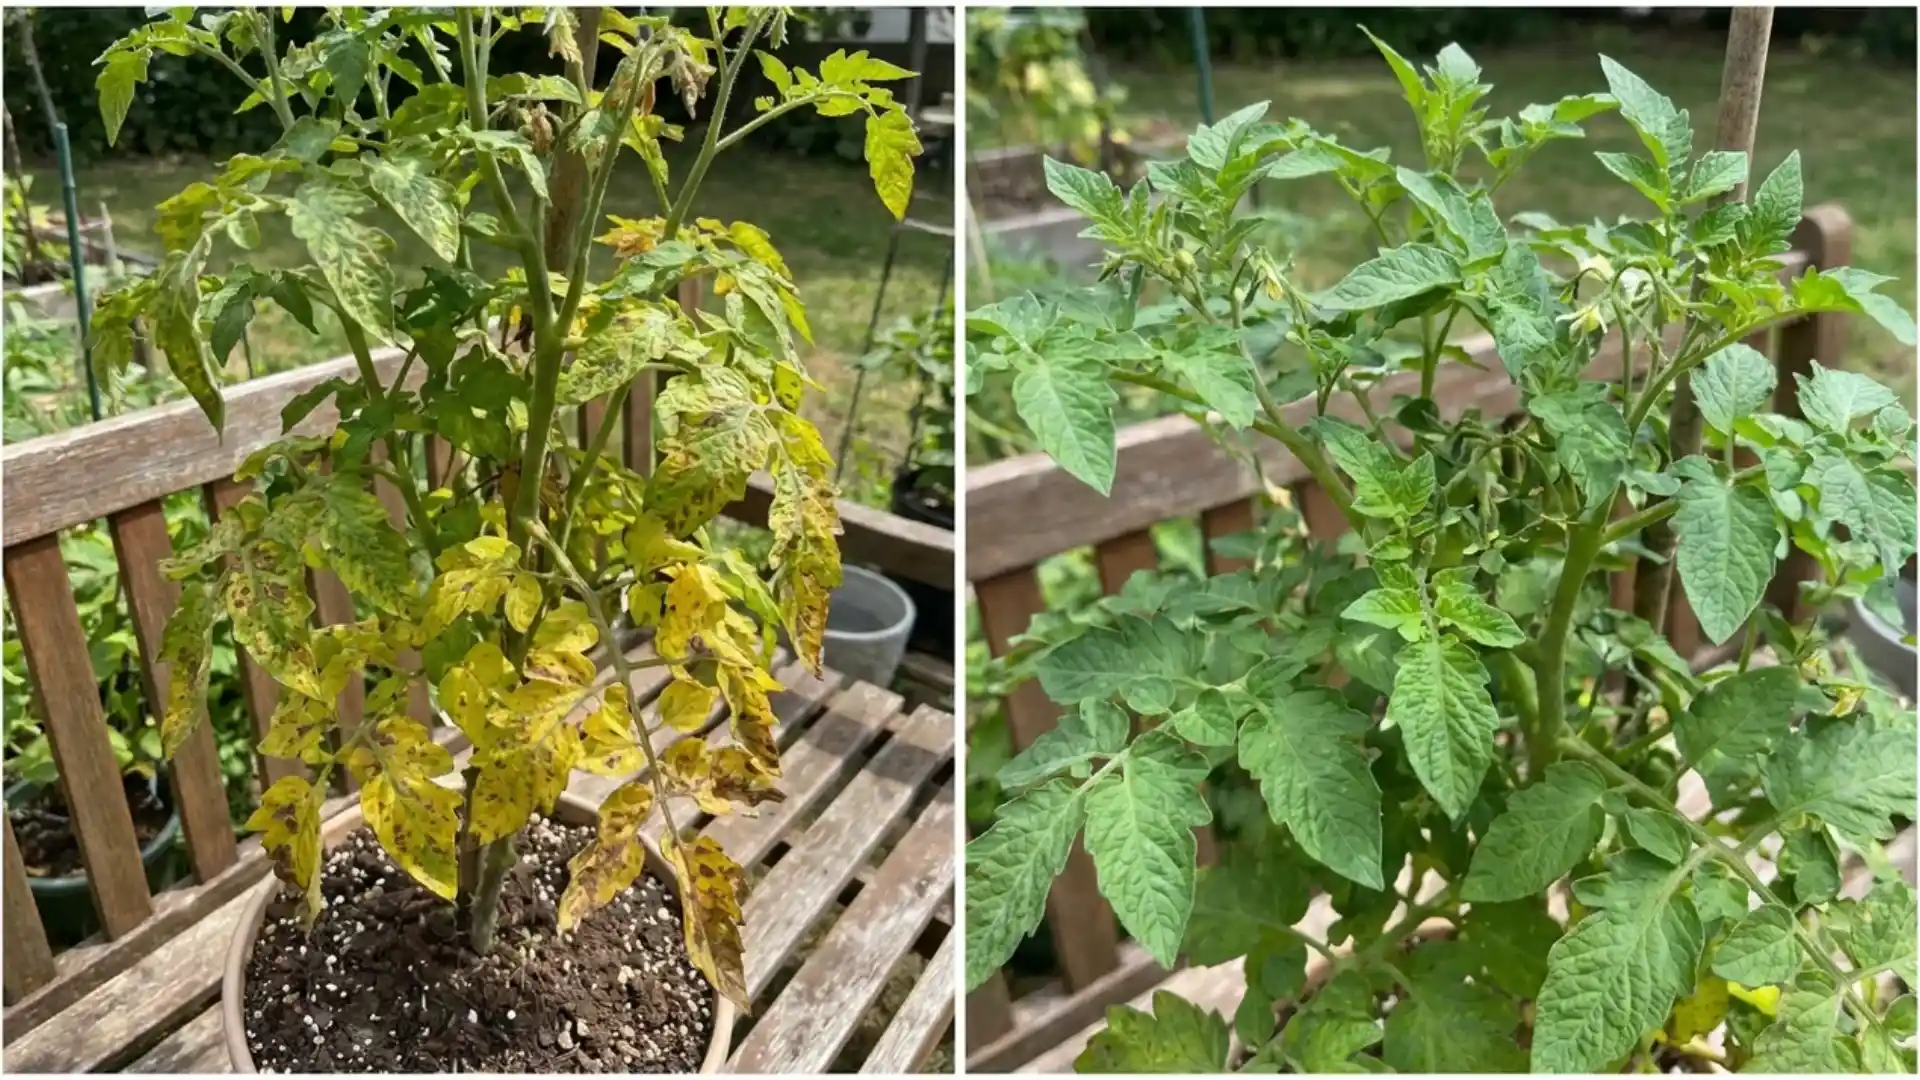
A few quick observations- the location, the pattern, and any symptoms that come with it- can narrow the cause significantly before you reach for a treatment.
Where on The Plant Is the Yellowing?
Location on the plant is one of the strongest clues to what’s going wrong. Nutrients move through a tomato plant differently depending on which one is lacking, and pests and diseases tend to target specific zones.
Check where the yellowing is concentrated:
|
Yellowing Pattern |
Most Likely Cause |
|
Bottom leaves only |
Nitrogen deficiency or natural aging |
|
Top or new growth |
Iron, calcium, or manganese deficiency |
|
One side or one branch |
Fusarium or Verticillium wilt |
|
Scattered across the plant |
Watering issues, potassium deficiency, or pest activity |
Test soil moisture by pushing a finger about two inches into the soil near the base of the plant. Bone-dry soil indicates underwatering, while soggy soil indicates overwatering.
Are There Other Symptoms?
Look beyond color alone. Accompanying symptoms often confirm the real cause:
- Wilting despite moist soil suggests root damage or vascular disease
- Brown or black spots within yellow areas point to fungal or bacterial infection
- Curling or cupping leaves can indicate a viral infection or herbicide exposure
- Webbing or sticky residue on leaf undersides signals spider mites or aphids
Nutrient Deficiencies That Cause Yellow Leaves
Tomato plants are heavy feeders, and even a minor shortfall in key nutrients shows up quickly as yellowing.
Each deficiency has a distinct pattern, location, and set of accompanying signs, making it possible to identify the culprit without guesswork.
The table below breaks down the five most common nutrient deficiencies side by side.
Use this table to match what you’re seeing on your plant to the most likely nutrient gap and correction:
|
Nutrient |
Where It Appears |
Symptoms |
How to Fix It |
|
Nitrogen |
Older, lower leaves |
Uniform yellowing |
Apply a balanced 5-10-5 fertilizer or nitrogen-rich feed. |
|
Potassium |
Leaf edges, especially newer leaves |
Yellow margins that turn brown |
Use a liquid fertilizer with added potassium. |
|
Magnesium |
Older leaves, between veins |
Yellow blotches with green veins |
Apply Epsom salt or a micronutrient-rich fertilizer. |
|
Iron |
Younger, upper leaves |
Pale yellow leaves with green veins |
Use a chelated iron supplement and check soil pH. |
|
Calcium |
New growth |
Yellowing leaves, often with blossom-end rot |
Maintain consistent watering and add calcium amendments. |
Once a deficiency is corrected, new growth should appear noticeably greener within one to two weeks- if it doesn’t, the cause may lie elsewhere.
Nutrient corrections work best once you’ve also got the basics of tomato plant care dialed in, things like spacing, sunlight, and a consistent feeding schedule through the season.
Watering & Environmental Stress
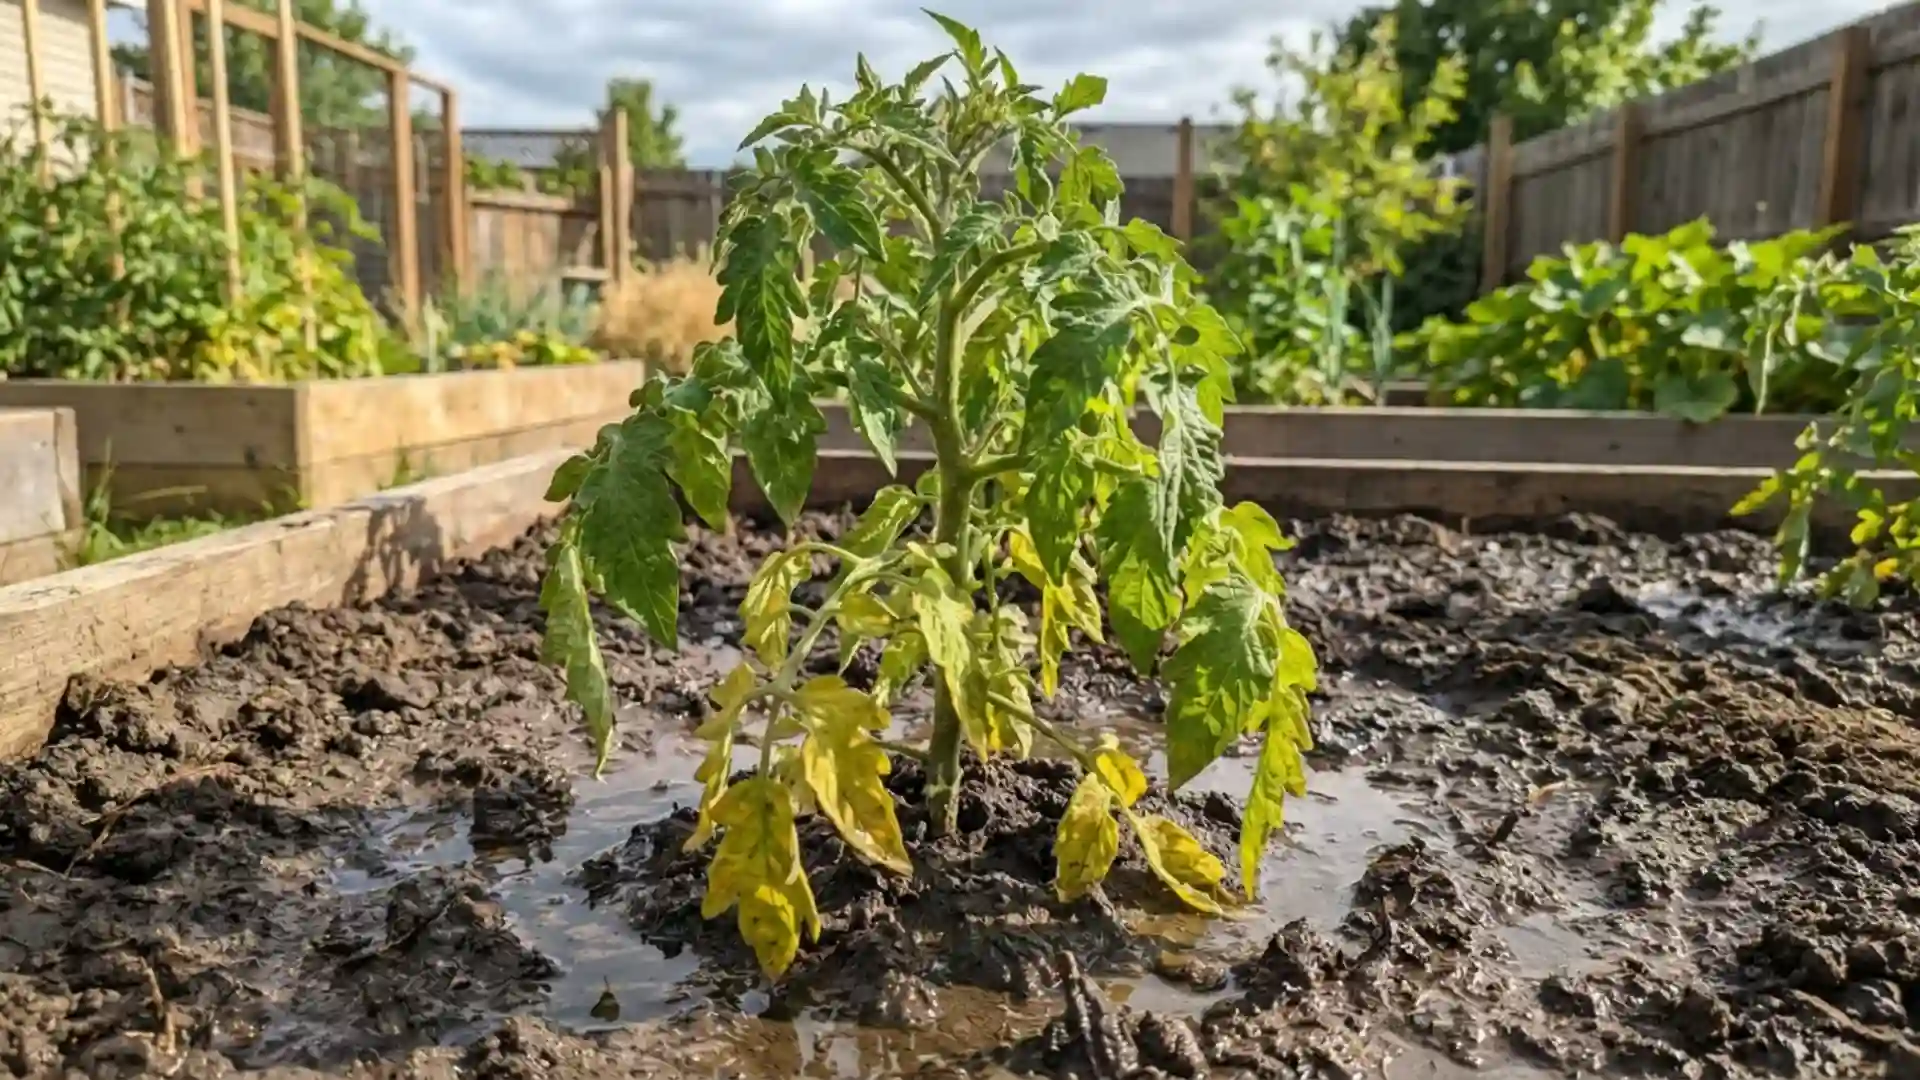
Beyond nutrients, how you water your tomato plants and the conditions they’re growing in play a major role in leaf color.
Both too much and too little water stress the roots, while environmental factors compound the problem.
Here’s what to look for:
- Overwatering and root oxygen deprivation: Saturated soil pushes air out of the root zone, suffocating roots and preventing them from absorbing nutrients properly, which shows up as yellowing, often paired with soft, drooping stems.
- Underwatering and dehydration stress: Insufficient water causes leaves to yellow, curl, and feel dry or crispy to the touch, since the plant can’t take up nutrients or maintain healthy cell function without moisture.
- Temperature extremes and poor sunlight exposure: Cold snaps slow root activity and nutrient uptake, while too little sunlight limits chlorophyll production, both of which can lead to pale or yellowing foliage even in otherwise healthy soil.
- Poor drainage and soil compaction: Dense or poorly draining soil traps excess water around roots, creating the same low-oxygen conditions as overwatering, which weakens roots and triggers yellowing over time.
- Overcrowded or pot-bound roots: Plants spaced too closely or roots that have outgrown their container struggle to absorb nutrients and water, triggering stress-related yellowing.
Getting the water-soil-light balance right often resolves yellowing faster than any fertilizer can, since it addresses the root environment the plant depends on to absorb nutrients in the first place.
Diseases That Cause Yellow Spots on Tomato Leaves
Unlike diffuse yellowing from nutrient or watering issues, disease-related yellowing usually features distinct spots, lesions, or discoloration patterns.
Fungal, bacterial, and viral pathogens each leave behind recognizable signatures.
The table below outlines the most common tomato diseases and exactly what they target on the plant.
|
Disease |
What It Attacks |
Key Symptoms |
|
Early Blight |
Lower leaves, stems, and fruit |
Brown lesions with yellow halos and concentric rings |
|
Septoria Leaf Spot |
Lower leaves, spreading upward |
Small tan spots with dark margins |
|
Bacterial Spot & Speck |
Leaves, stems, and fruit |
Small dark spots with yellow halos; raised specks on fruit |
|
Cercospora Leaf Spot |
Upper and lower leaf surfaces |
Yellow spots that develop into brown, dead patches |
|
Fusarium & Verticillium Wilt |
Vascular system, often on one side of the plant |
One-sided yellowing and wilting despite adequate moisture |
|
Tomato Yellow Leaf Curl Virus (TYLCV) |
New growth and leaf margins |
Upward-curled leaves, yellow edges, and stunted growth |
|
Leaf Mold & Powdery Mildew |
Upper leaf surfaces |
Yellow-green spots with mold or white powder underneath |
Identifying which disease matches your plant’s symptoms is the first step toward containing it. The next section covers the pests that can trigger similar yellow spotting
Pests Behind Yellowing and Spotted Leaves
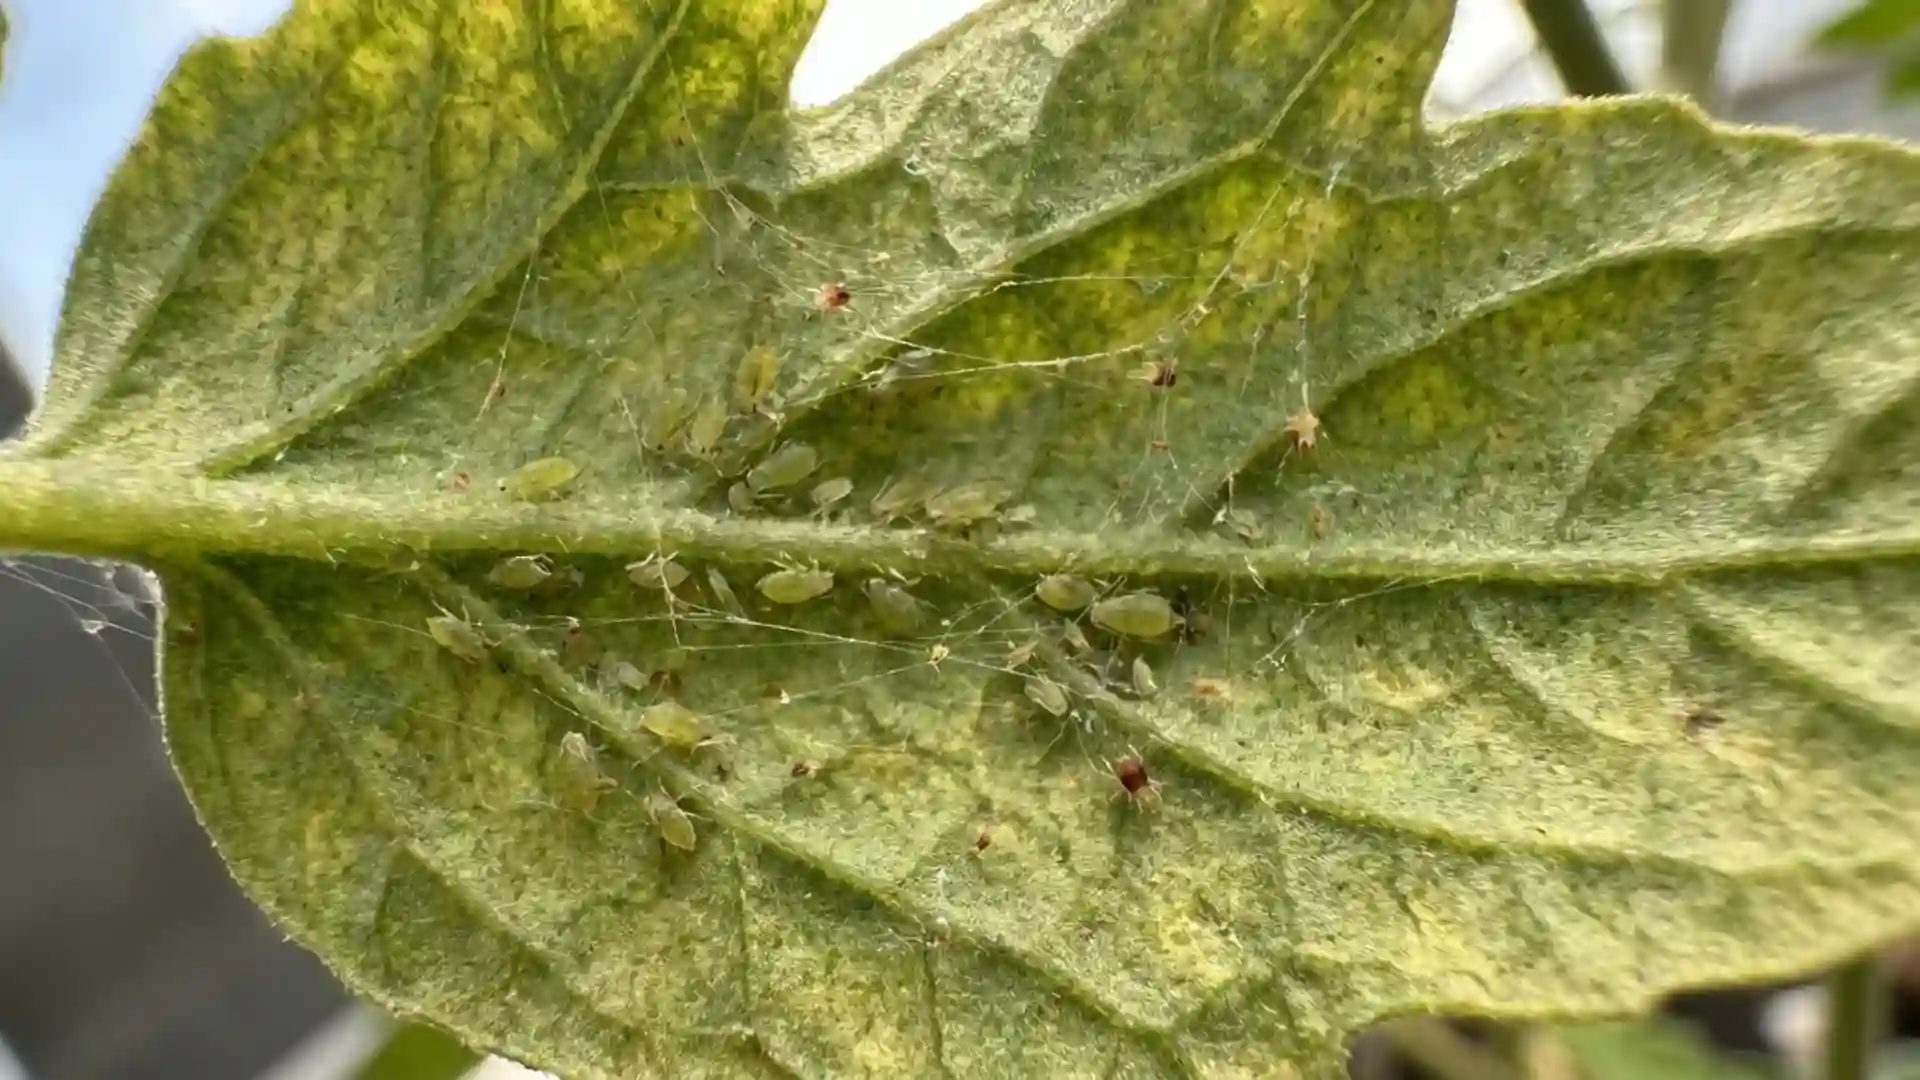
Insects are another major cause of yellowing, often leaving subtle clues such as webbing, sticky residue, or stippled spots before the damage becomes obvious.
Here’s what to look for with each:
- Aphids: Small, soft-bodied insects clustering on leaf undersides, leaving sticky residue that stresses the plant and causes yellowing.
- Spider mites: Tiny pests that spin fine webbing and cause stippled, yellow-speckled leaves as they feed.
- Whiteflies: Small white flying insects that spread disease while feeding, leading to yellowing and weakened growth.
- Thrips: Slender insects that feed on chlorophyll, leaving leaves pale, yellow, and eventually scarred.
If you’re not sure what’s actually causing the damage, narrowing down which aphid you’re dealing with can help you confirm the culprit before treating.
How to Treat Yellow Tomato Leaves (Organic-First Approach)
Once you’ve identified the likely cause, treatment usually starts with the gentlest option first.
Most yellowing issues respond well to simple adjustments before any chemical intervention is needed.
Correcting Care and Growing Conditions
Start by fixing the basics that address most causes of yellowing at the root:
- Adjust watering: Water deeply and less frequently at the base of the plant, allowing soil to dry slightly between waterings to avoid both over- and under-watering stress. Most watering adjustments show visible improvement within 3–5 days.
- Fertilize appropriately: Use fish emulsion or a high-nitrogen organic feed to address nitrogen gaps, or wood ash to address potassium deficiency, switching to liquid feeds for faster uptake when symptoms are severe. New, greener growth typically appears within 7 to 10 days.
- Treat pests early: Apply neem oil or insecticidal soap directly to the undersides of leaves every 5–7 days until activity stops, especially for aphids, whiteflies, and spider mites.
- Prune affected foliage: Remove yellowed or spotted leaves promptly using clean, sharp pruners, cutting close to the main stem to prevent the spread of disease and redirect the plant’s energy toward healthy growth.
- Improve spacing and mulching: Space plants to promote good airflow, and mulch around the base to reduce soil-borne fungal splash and regulate moisture.
Treating Persistent Disease or Pest Problems
If cultural fixes and pruning don’t resolve the yellowing, targeted treatment may be necessary:
|
Treatment |
Best Used For |
|
Fungicides or Bactericides |
Control fungal and bacterial diseases such as early blight and Septoria leaf spot when applied early. |
|
Insecticidal Soap |
Eliminates aphids, whiteflies, and spider mites, especially on leaf undersides. |
|
Remove Infected Plants |
Prevents the spread of viral diseases like TYLCV and advanced wilt by discarding affected plants. |
Beyond sprays, a few natural pest deterrents placed around the bed can keep populations from building back up once you’ve knocked them down.
Preventing Yellow Leaves Next Season
Prevention is far easier than treatment.
A few adjustments to soil, watering, plant selection, and growing setup can significantly reduce yellowing before it starts, keeping your tomato plants healthier throughout the entire season.
Soil Prep and Crop Rotation
Healthy soil is the foundation of disease-free tomatoes.
Enrich beds with compost before planting to boost nutrient availability, and avoid planting tomatoes in the same spot where they (or related crops) grew the previous year, since many pathogens overwinter in soil.
Best tip: Rotate tomatoes to a new bed every year, waiting at least two to three seasons before replanting in the same spot
Watering Schedule and Mulching
Consistent watering prevents the stress spikes that trigger yellowing.
Water deeply once or twice a week rather than shallow daily watering, and always water at the base to keep foliage dry and reduce the spread of fungus.
Best tip: Install drip irrigation or soaker hoses for even, consistent moisture at the root zone
Disease-Resistant Tomato Varieties
Choosing resistant varieties dramatically reduces recurring disease problems.
Look for tomato labels marked with resistance codes like “V,” “F,” or “N,” which indicate resistance to Verticillium, Fusarium, and nematodes.
Best tip: Choose varieties labeled with multiple resistance codes for broader protection
Container vs. In-Ground Considerations
Growing setup affects drainage, airflow, and disease exposure differently.
Containers offer better control over soil quality and drainage but dry out faster, while in-ground plants have more stable moisture levels but are more exposed to soil-borne diseases.
Best tip: Use fresh, sterile potting mix each season for container-grown tomatoes to avoid disease carryover
Final Thoughts!
Tomato leaves turning yellow can feel alarming at first, but it’s rarely a mystery once you know what to look for.
Location, pattern, and any symptoms tied to it tell you almost everything you need to diagnose the cause, whether it’s a nutrient gap, a watering issue, a pest, or a disease.
Fix the root cause early, and most plants bounce back within a couple of weeks.
I’ve pulled more panicked tomato plants back from a yellow-leaf scare than I can count, and the fix is almost never as bad as it first looks.
With a little attention, your tomatoes will stay green, productive, and thriving all season.
What’s causing the yellowing on your plants right now? Drop a comment with what you’re seeing, the location, the pattern, and any other symptoms, and I’ll help you narrow it down.
Frequently Asked Questions(FAQ’s)
Can Yellow Tomato Leaves Turn Green Again?
No, a leaf that’s fully yellowed won’t turn green again, but new growth should appear healthy once the underlying cause is corrected.
Should I Remove Yellow Leaves from My Tomato Plant?
Yes, removing yellow leaves helps prevent the spread of disease and redirects the plant’s energy toward healthy foliage and fruit production.
Can Transplant Shock Cause Tomato Leaves to Turn Yellow?
Yes, transplant shock temporarily disrupts root function, causing yellowing that usually resolves within a week or two as roots establish.
Are Tomatoes Safe to Eat if The Plant Has Yellow Leaves?
Yes, in most cases, the fruit remains safe to eat unless the plant shows severe disease affecting the tomatoes themselves.
Can Yellow Leaves Spread Disease to Nearby Plants?
Yes, fungal and bacterial diseases can spread through soil splash, wind, or watering, so isolating or removing affected plants helps.