There’s something deeply satisfying about changing a space with your own two hands, especially when it doesn’t require a workshop full of tools or an entire weekend.
Quick DIY projects have captured hearts everywhere because they deliver that fresh, personalized touch without the commitment of major renovations.
If you’re working around a tight budget, living in a rental, or simply carving out time between life’s endless to-do lists, these approachable updates prove that beautiful changes don’t need to be complicated.
With minimal supplies and maximum impact, you can create spaces that feel entirely, authentically yours, one simple project at a time.
What Makes a DIY Project “Quick & Easy”?
The best quick DIY projects share a few key qualities that make them accessible to everyone. They require only basic tools you likely already own, like a hammer, scissors, or paintbrush, and materials that won’t break the bank.
There’s no need for advanced skills like carpentry or electrical work, just simple techniques anyone can master. These updates are gentle on your space, making them perfect for renters who need damage-free solutions.
Best of all, they deliver stunning visual results that make your effort feel incredibly worthwhile.
It’s about working smarter, not harder, to create a home that reflects your style and personality.
17 Easy DIY Projects for Home (Fast & Beginner-Friendly)
These projects are designed to fit into your real life, not take over your entire weekend. Each one brings instant charm without requiring a toolbox full of specialty equipment.
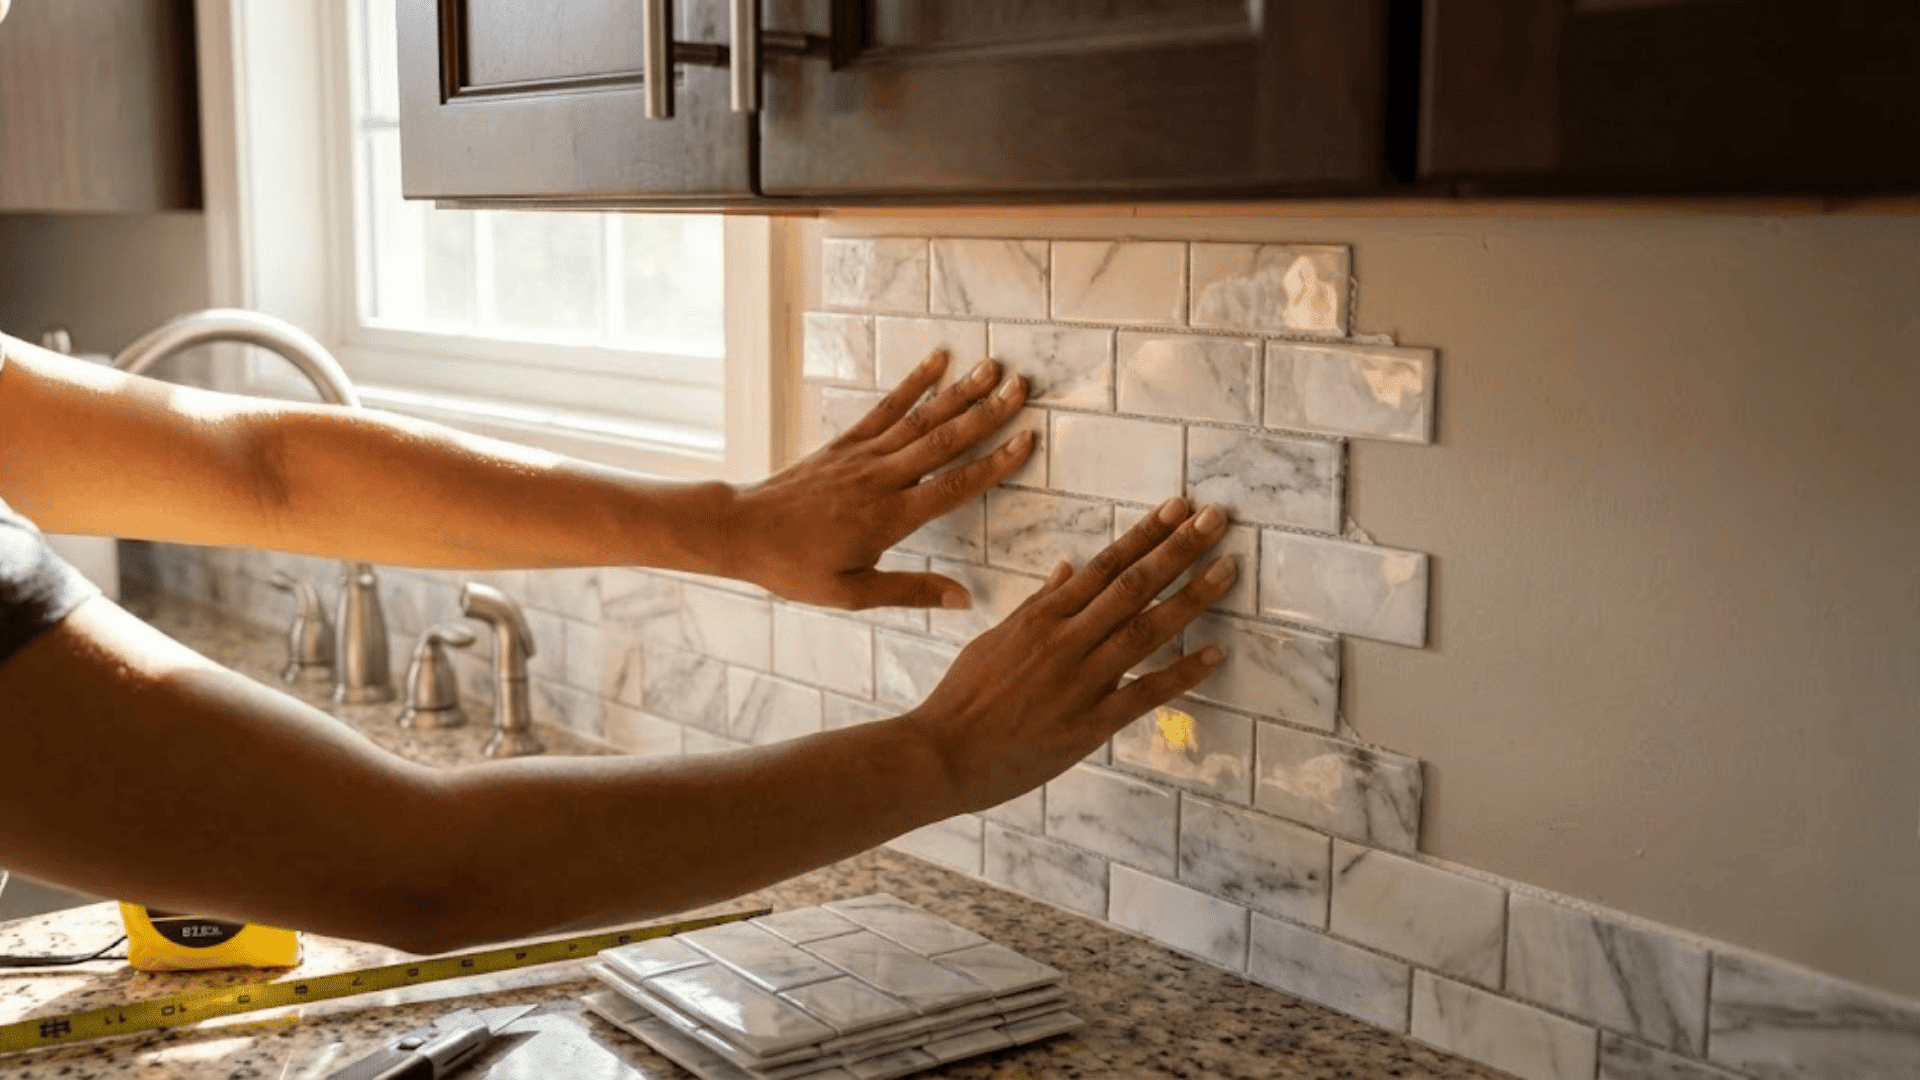
1. Peel-and-Stick Backsplash Upgrade
Estimated Time: 1 hour
Peel-and-stick tiles have completely changed the backsplash game for renters and budget-conscious decorators alike.
Simply measure your space, cut tiles to fit around outlets, and press them into place. They work beautifully in kitchens and bathrooms, adding texture and color without grout or permanent adhesive.
The visual impact is remarkable, and removal is just as easy when you’re ready for a change. It’s one of those projects that feels almost too simple for how polished it looks.
2. Painted Accent Wall
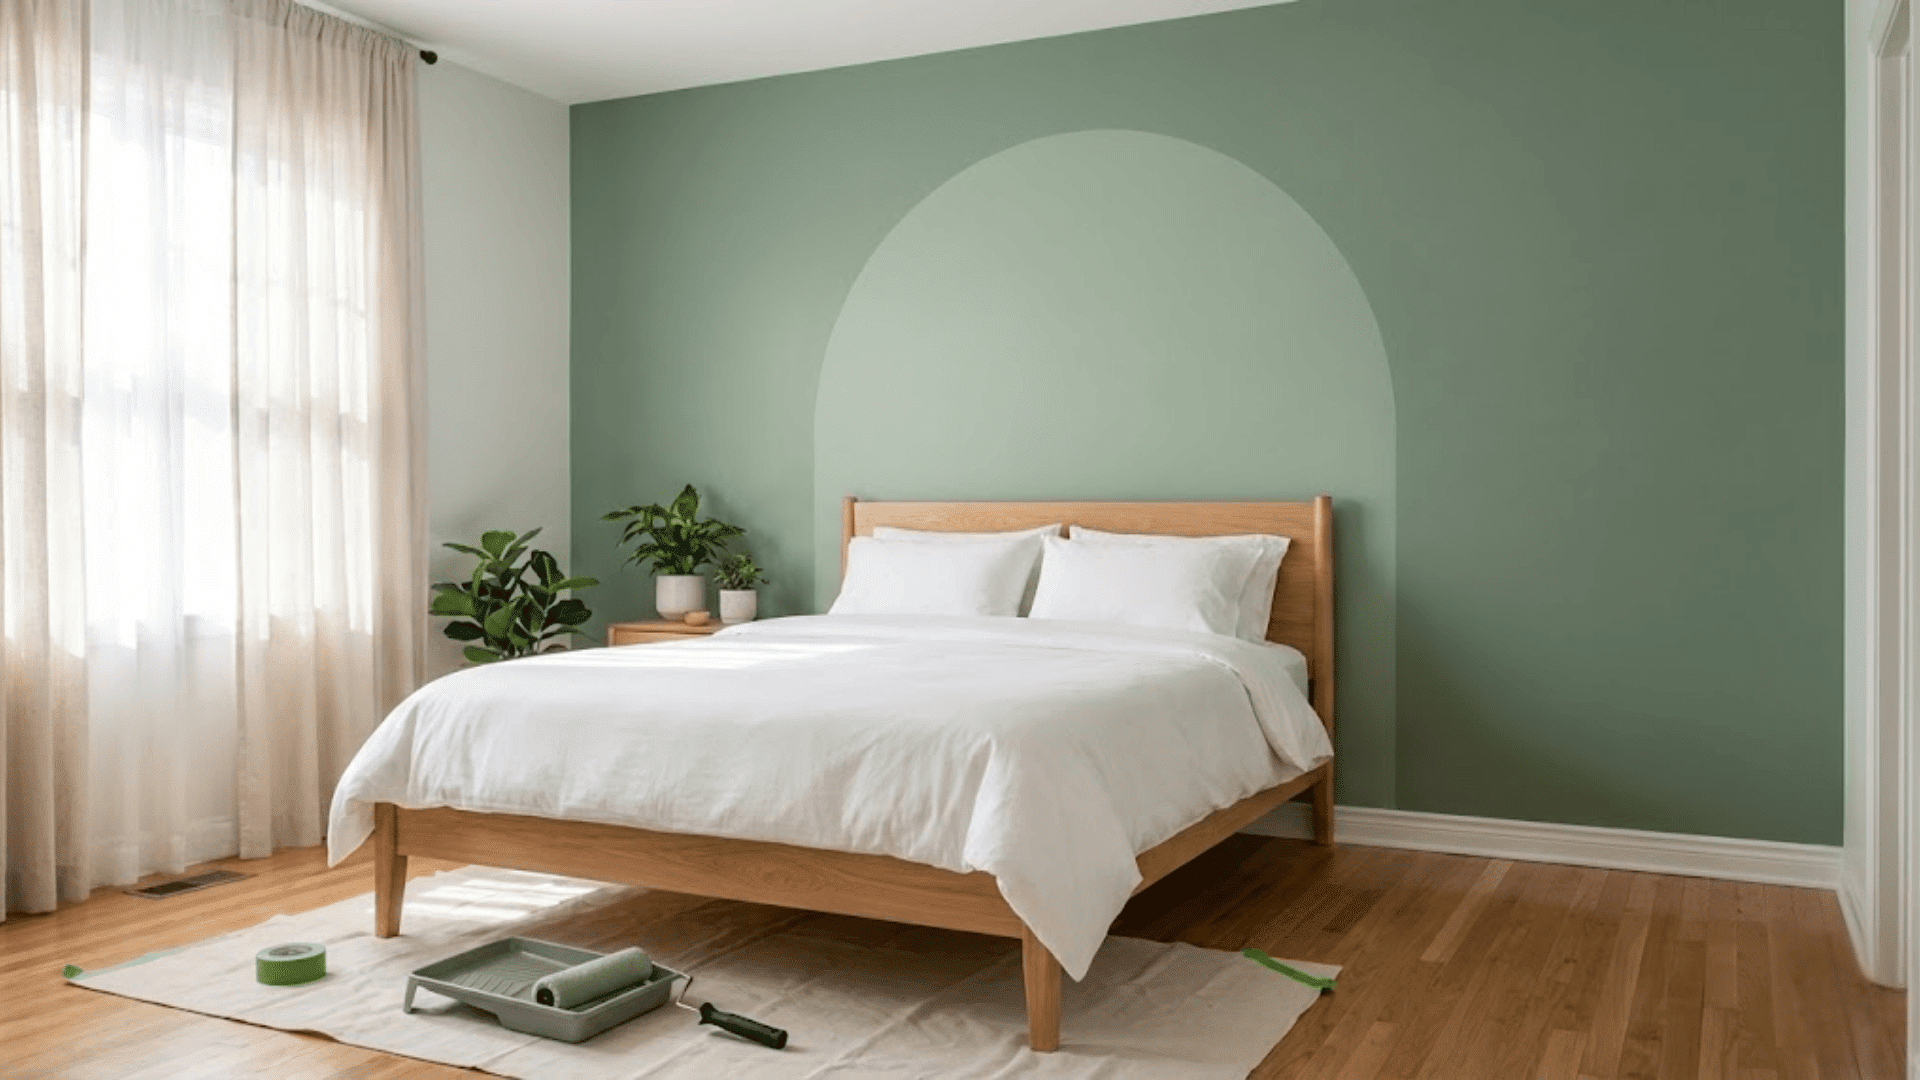
Estimated Time: 2 hours
An accent wall can redefine an entire room with just a gallon of paint and an afternoon.
Choose a bold color for drama or a soft neutral for subtle poise. Arch designs have become especially popular, adding architectural interest to otherwise plain spaces. Living rooms and bedrooms are ideal candidates.
The key is good painter’s tape and patience while it dries. This is a low-cost makeover that makes your space feel intentionally designed.
3. DIY Floating Shelves
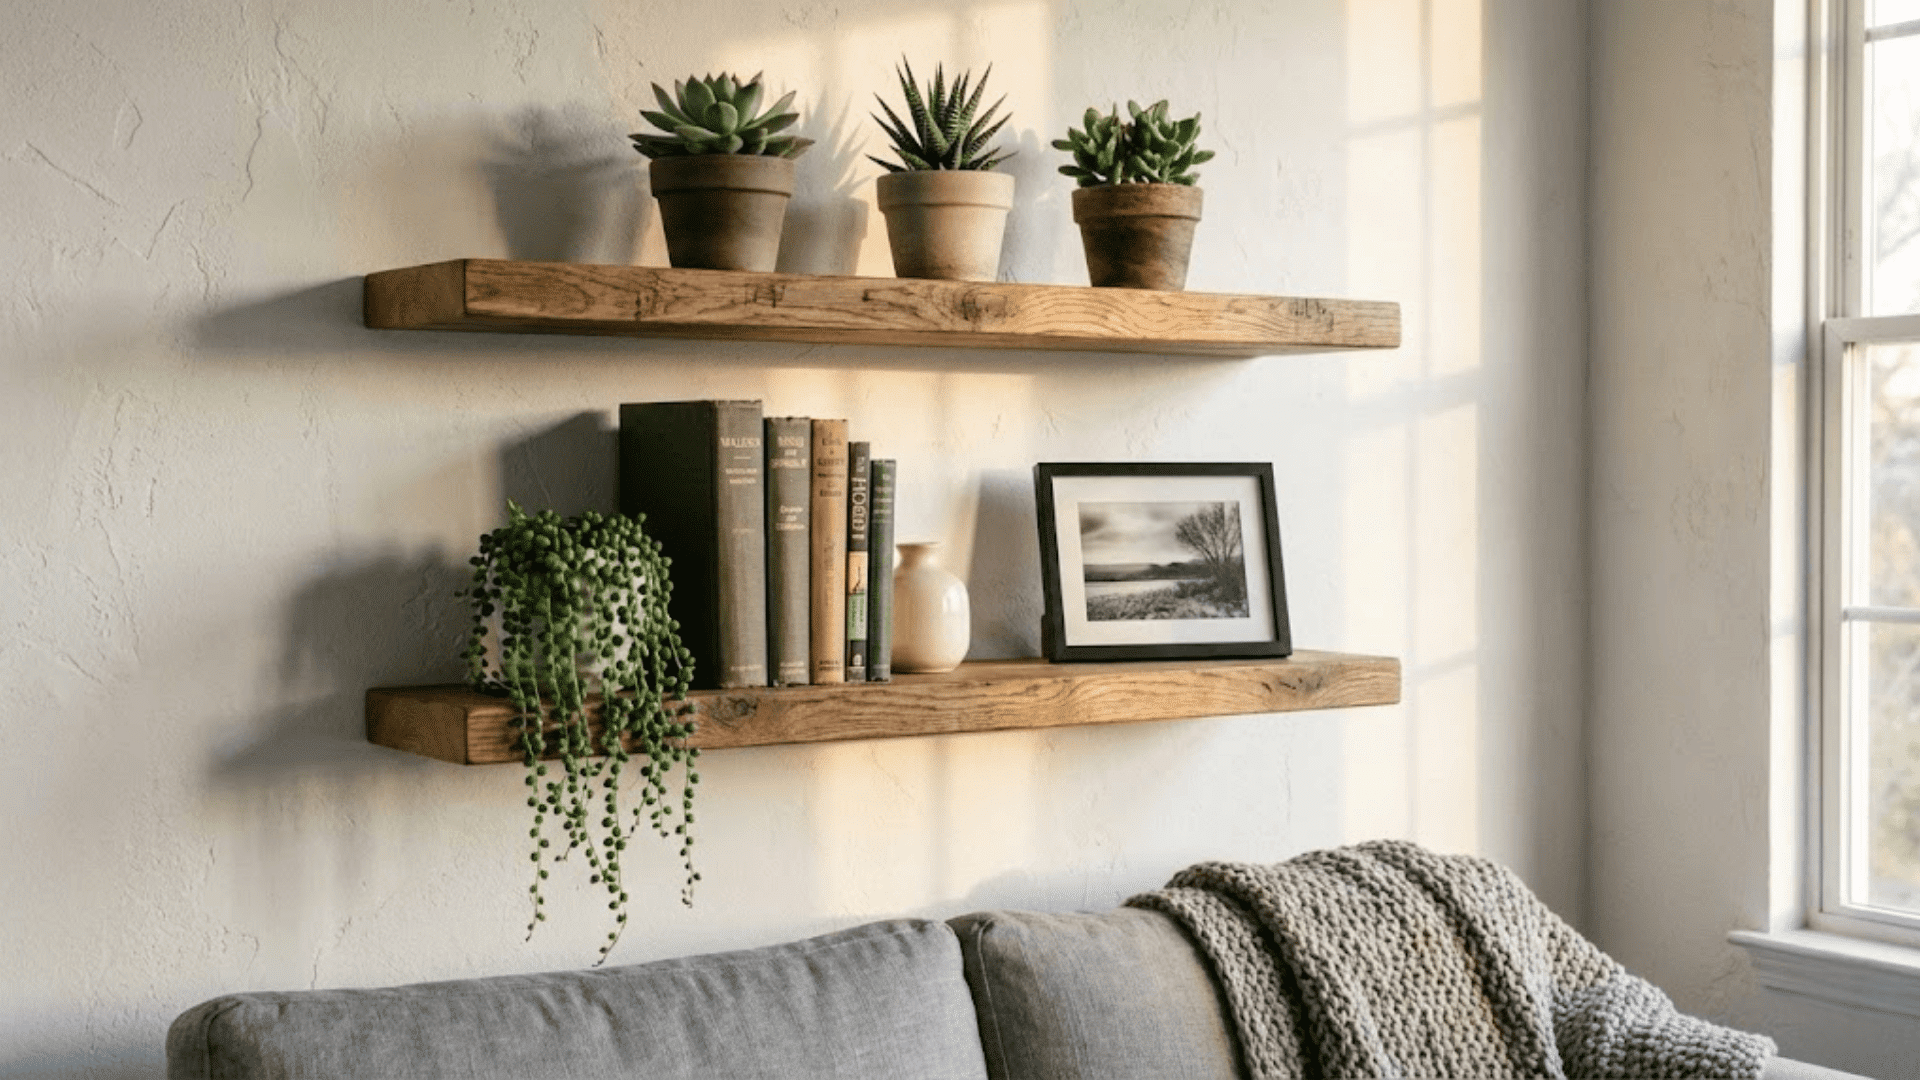
Estimated Time: 1 hour
Floating shelves combine function and style in the most effortless way. Use simple brackets or wall-mounted ledges that attach directly to studs for stability.
They’re perfect for displaying books, plants, or collected treasures while freeing up floor space. Kitchens, bathrooms, and living rooms all benefit from this extra storage.
I’ve added floating shelves in nearly every room I’ve lived in, and they always make the space feel more curated and personal.
4. Framed Fabric or Wallpaper Art

Estimated Time: 30 minutes
Turn leftover fabric scraps or wallpaper samples into custom wall art with inexpensive frames. This no-paint option adds color and pattern without any commitment.
Choose complementary prints for a cohesive gallery look or mix styles for eclectic charm. It’s an especially smart solution for renters who want personality without wall damage.
Plus, you can swap out the fabric seasonally to refresh your space.
5. Cabinet Hardware Swap
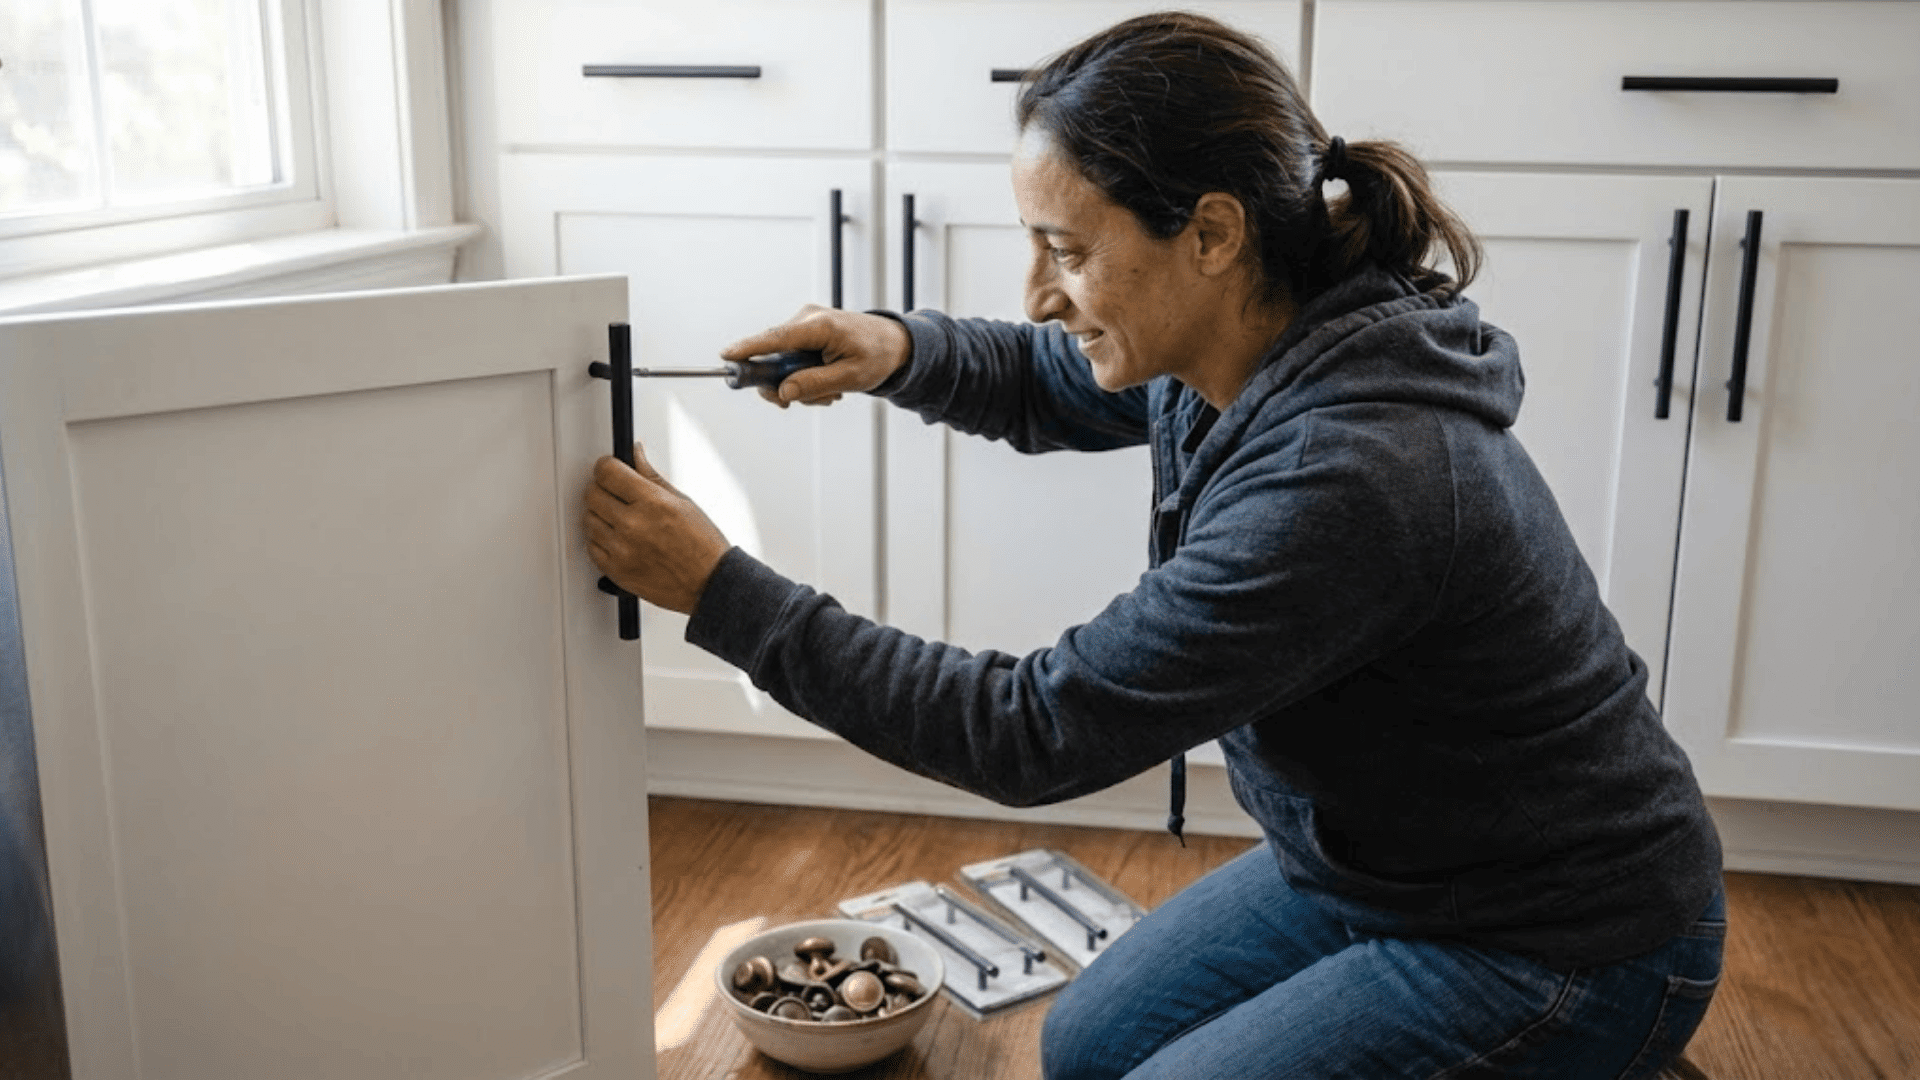
Estimated Time: 45 minutes
Replacing old knobs and pulls is possibly the fastest way to modernize cabinetry. This works wonders in kitchens, bathrooms, and on bedroom dressers.
Choose finishes like matte black, brushed gold, or polished nickel, depending on your aesthetic.
Most hardware installs with just a screwdriver, and the difference is immediately noticeable. It’s a small detail that elevates the entire feel of a room.
6. Stick-On Floor Tiles for Small Spaces
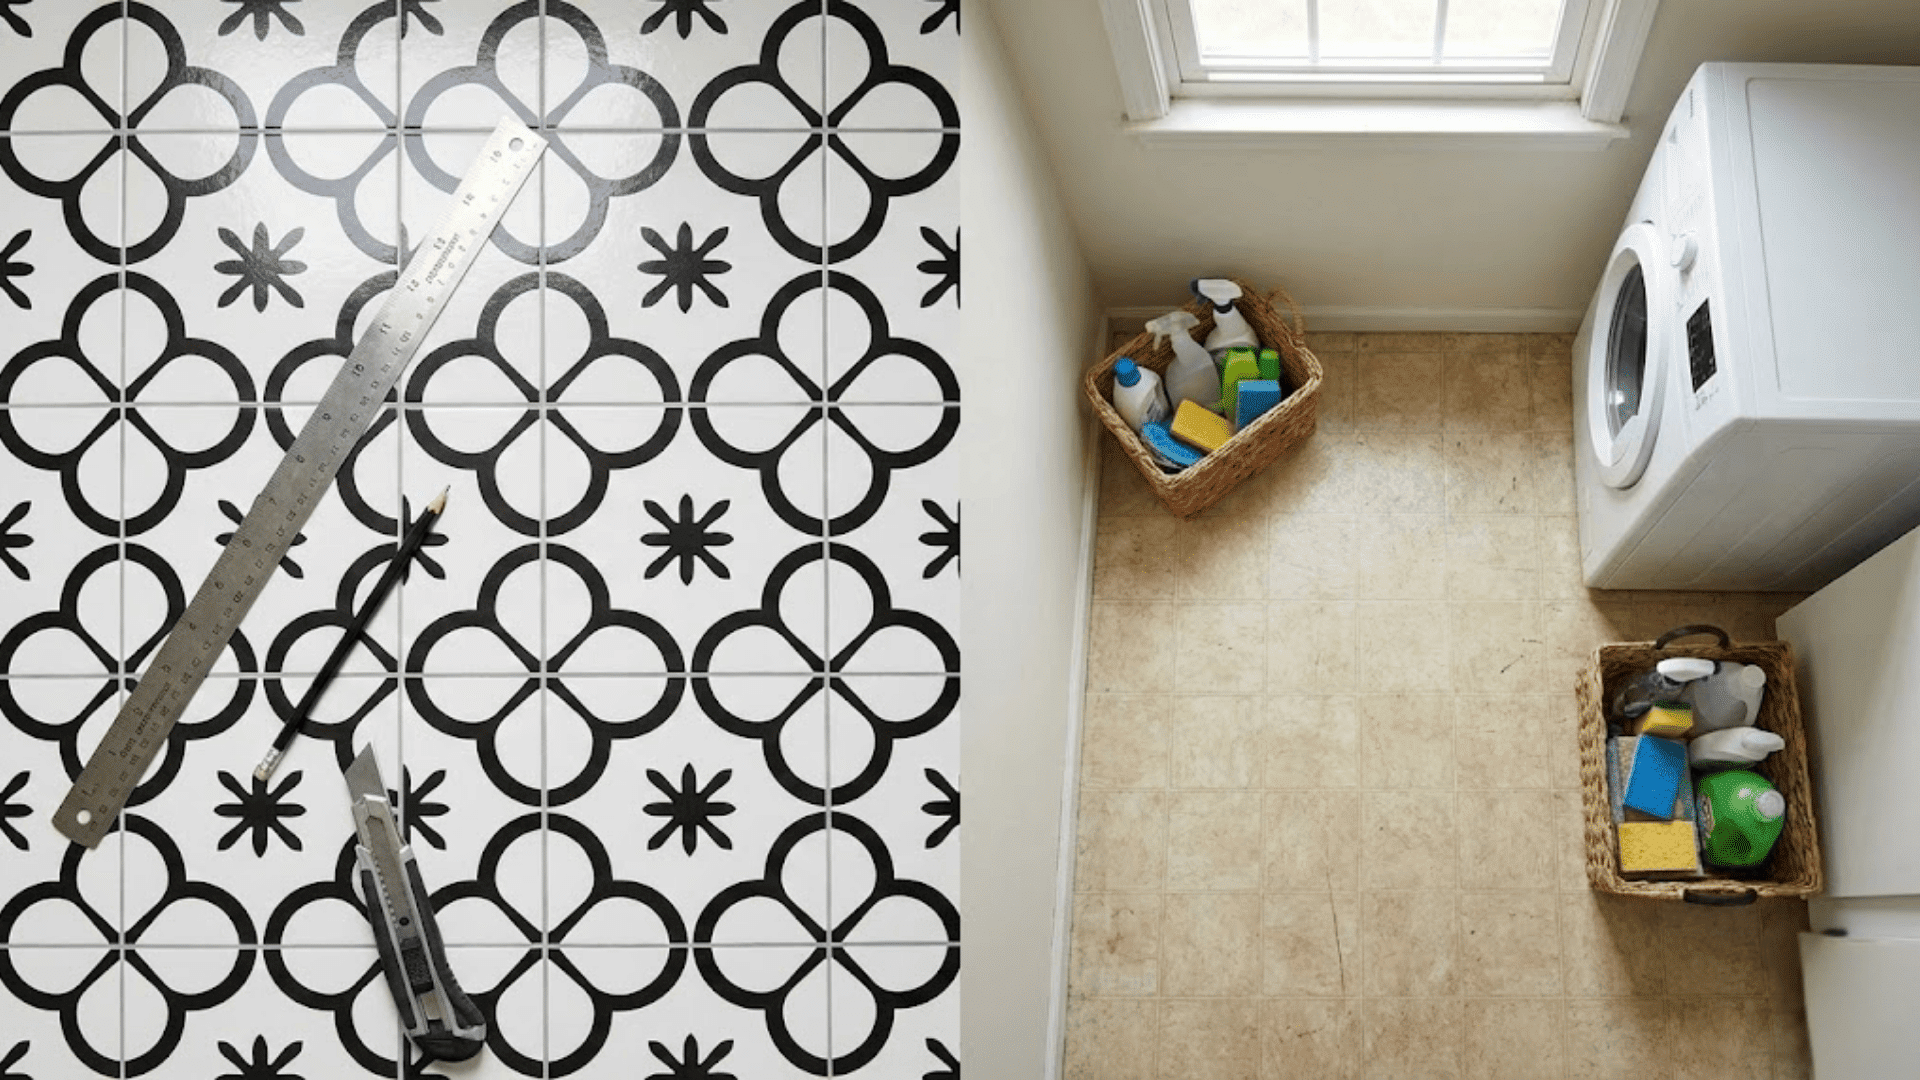
Estimated Time: 1.5 hours
Peel-and-stick floor tiles bring pattern and polish to entryways, laundry rooms, and powder baths without the mess of traditional tile installation.
No grout means no waiting and no professional help required. Clean your floor thoroughly first, then lay tiles starting from the center and working outward.
The adhesive is strong but removable, making this ideal for temporary updates. It’s shocking how much a new floor can change the vibe of a small space.
7. DIY Mirror Frame Upgrade
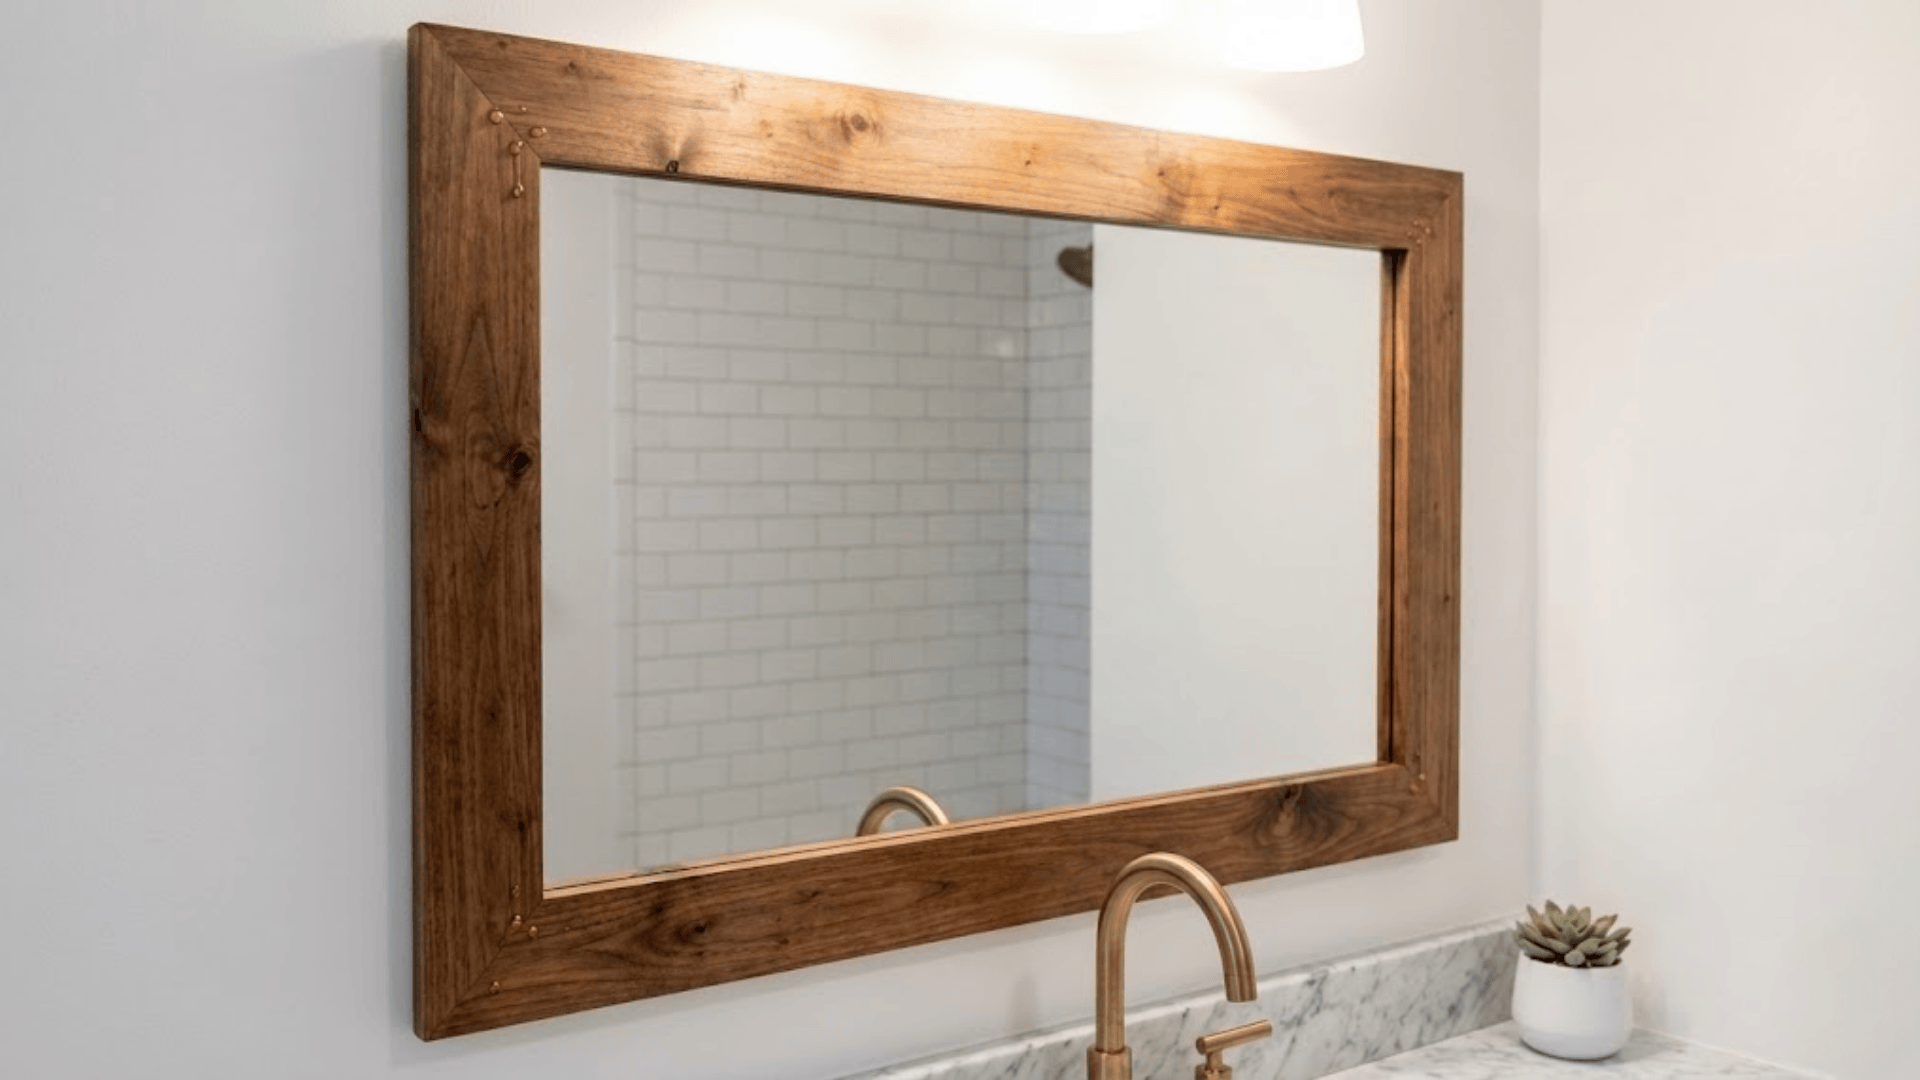
Estimated Time: 1 hour
Builder-grade mirrors get an instant upgrade with wood trim or peel-and-stick molding around the edges.
Measure carefully, miter corners if using wood, and attach with construction adhesive. This works beautifully in bathrooms and entryways, giving generic mirrors a custom, finished look.
Choose a stain or paint color that coordinates with your existing decor. The makeover feels almost too easy for how professional it appears.
8. Rope or Fabric-Wrapped Planters
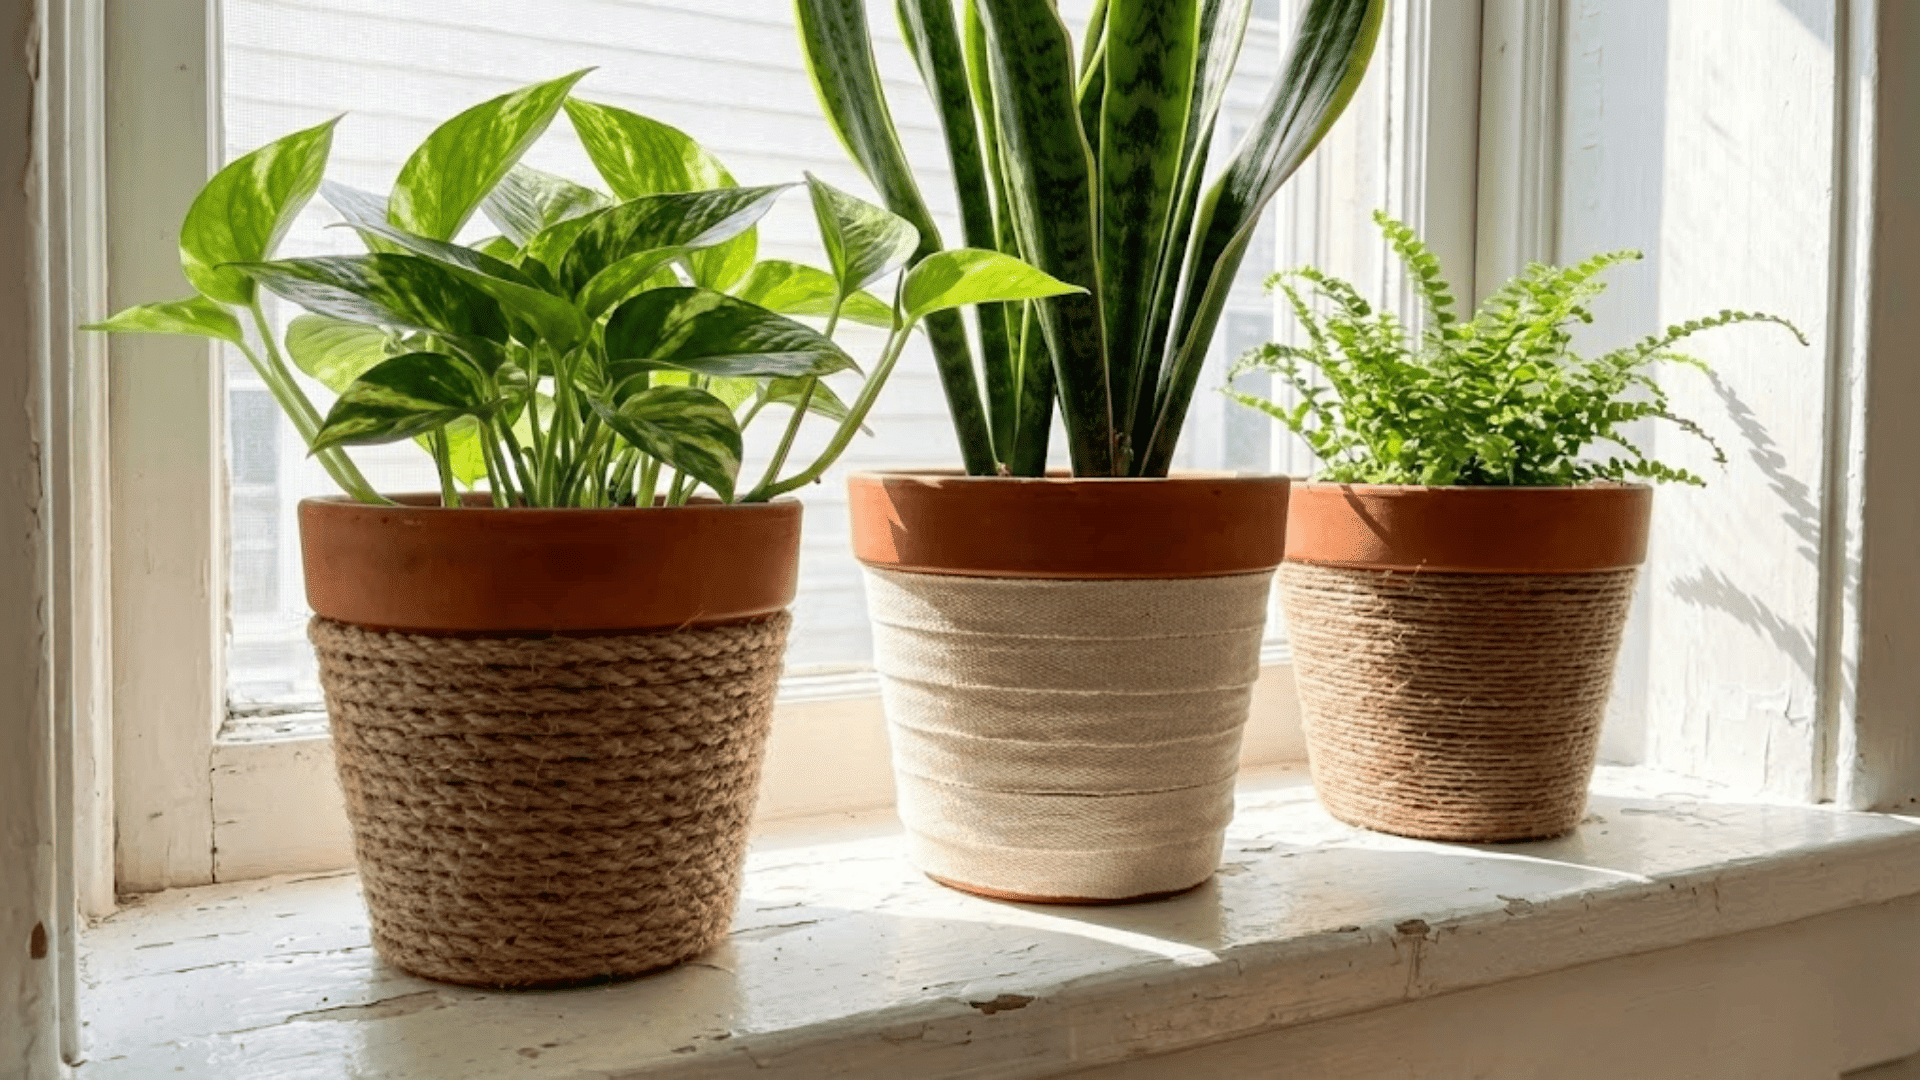
Estimated Time: 30 minutes
Give plain terra cotta or plastic planters a textured makeover using rope, twine, or fabric strips.
Secure one end with hot glue, then wrap tightly around the planter, adding glue as you go. This adds warmth and visual interest to your indoor greenery.
Balconies and windowsills instantly feel more styled and intentional. It’s a perfect project while listening to music or a podcast.
9. Wall-Mounted Key & Mail Organizer
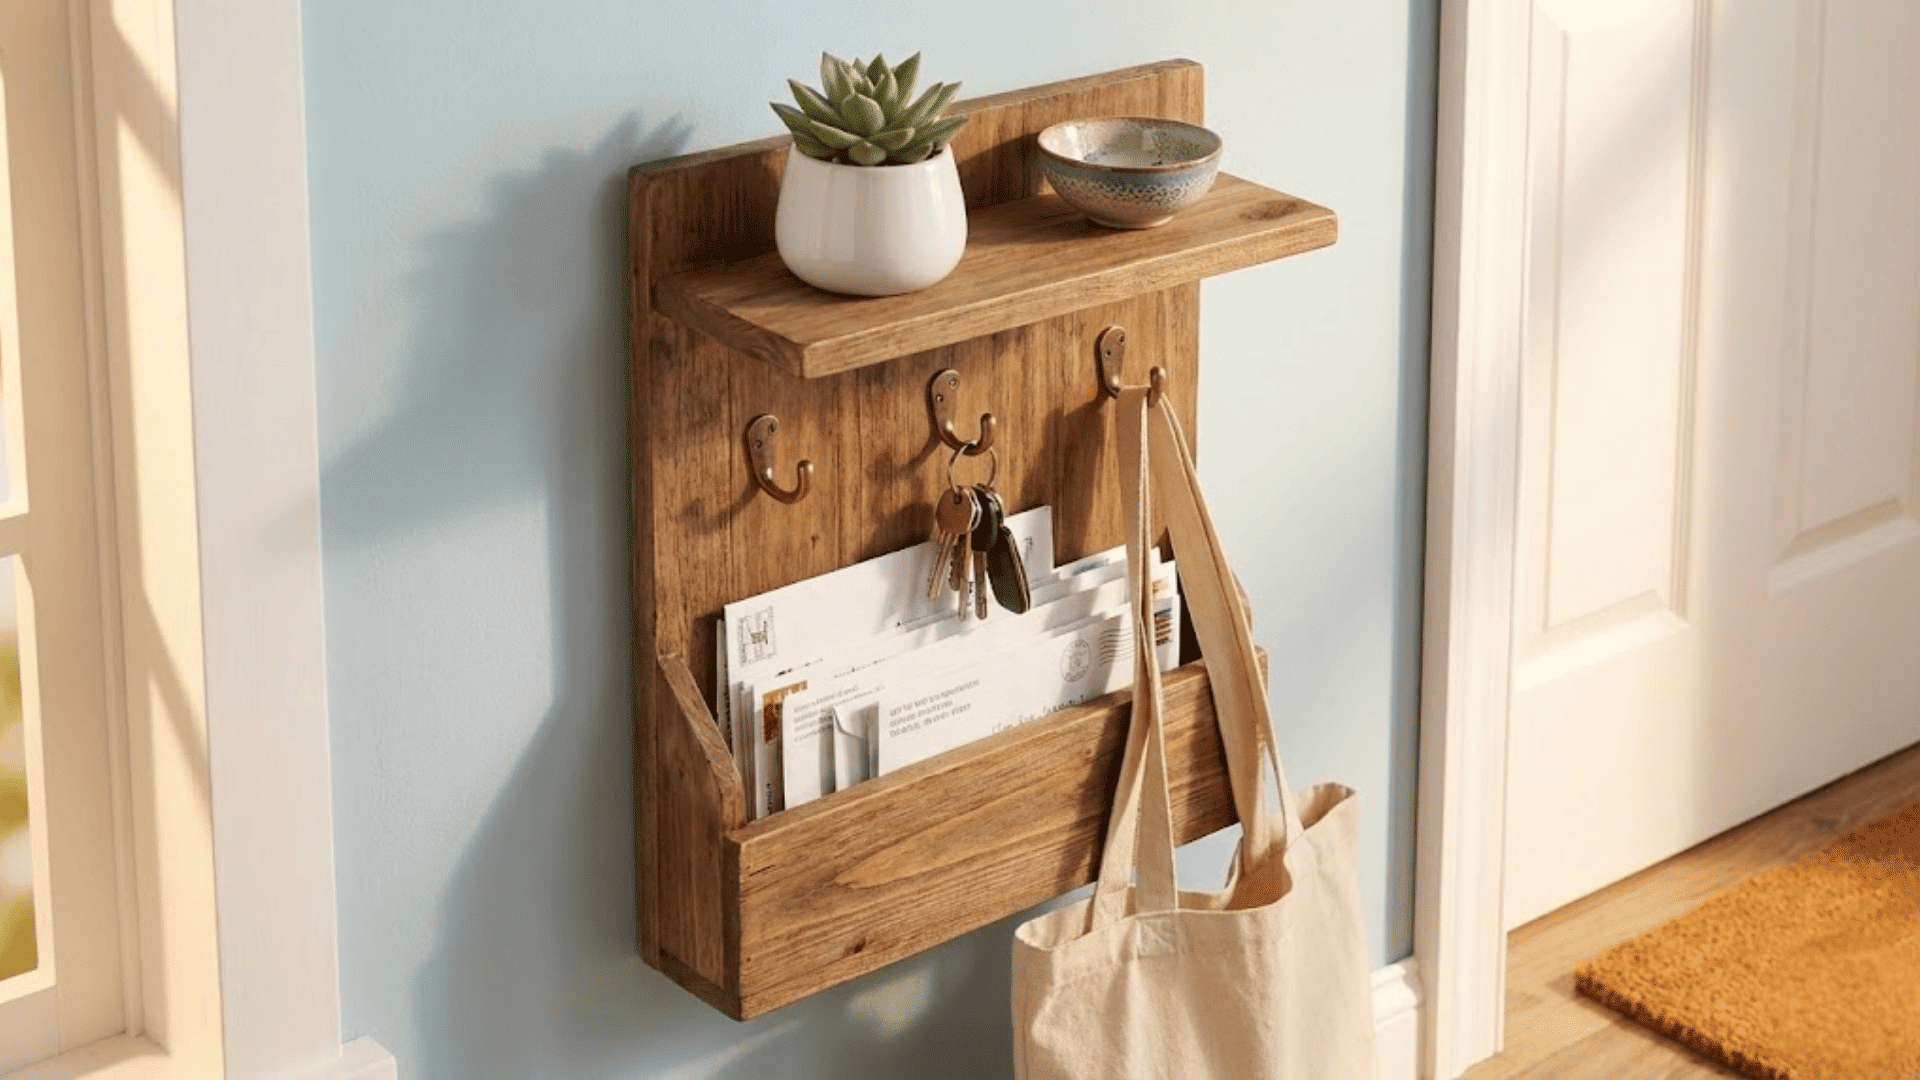
Estimated Time: 45 minutes
A dedicated spot for keys, mail, and everyday essentials keeps entryways tidy and functional. Use a small shelf with hooks underneath or a decorative board with pockets and clips.
Mount it at eye level near your door for maximum convenience. This project combines organization with decor, and you’ll appreciate it every single day.
Choose a style that complements your entryway aesthetic for a cohesive look.
10. Simple DIY Headboard
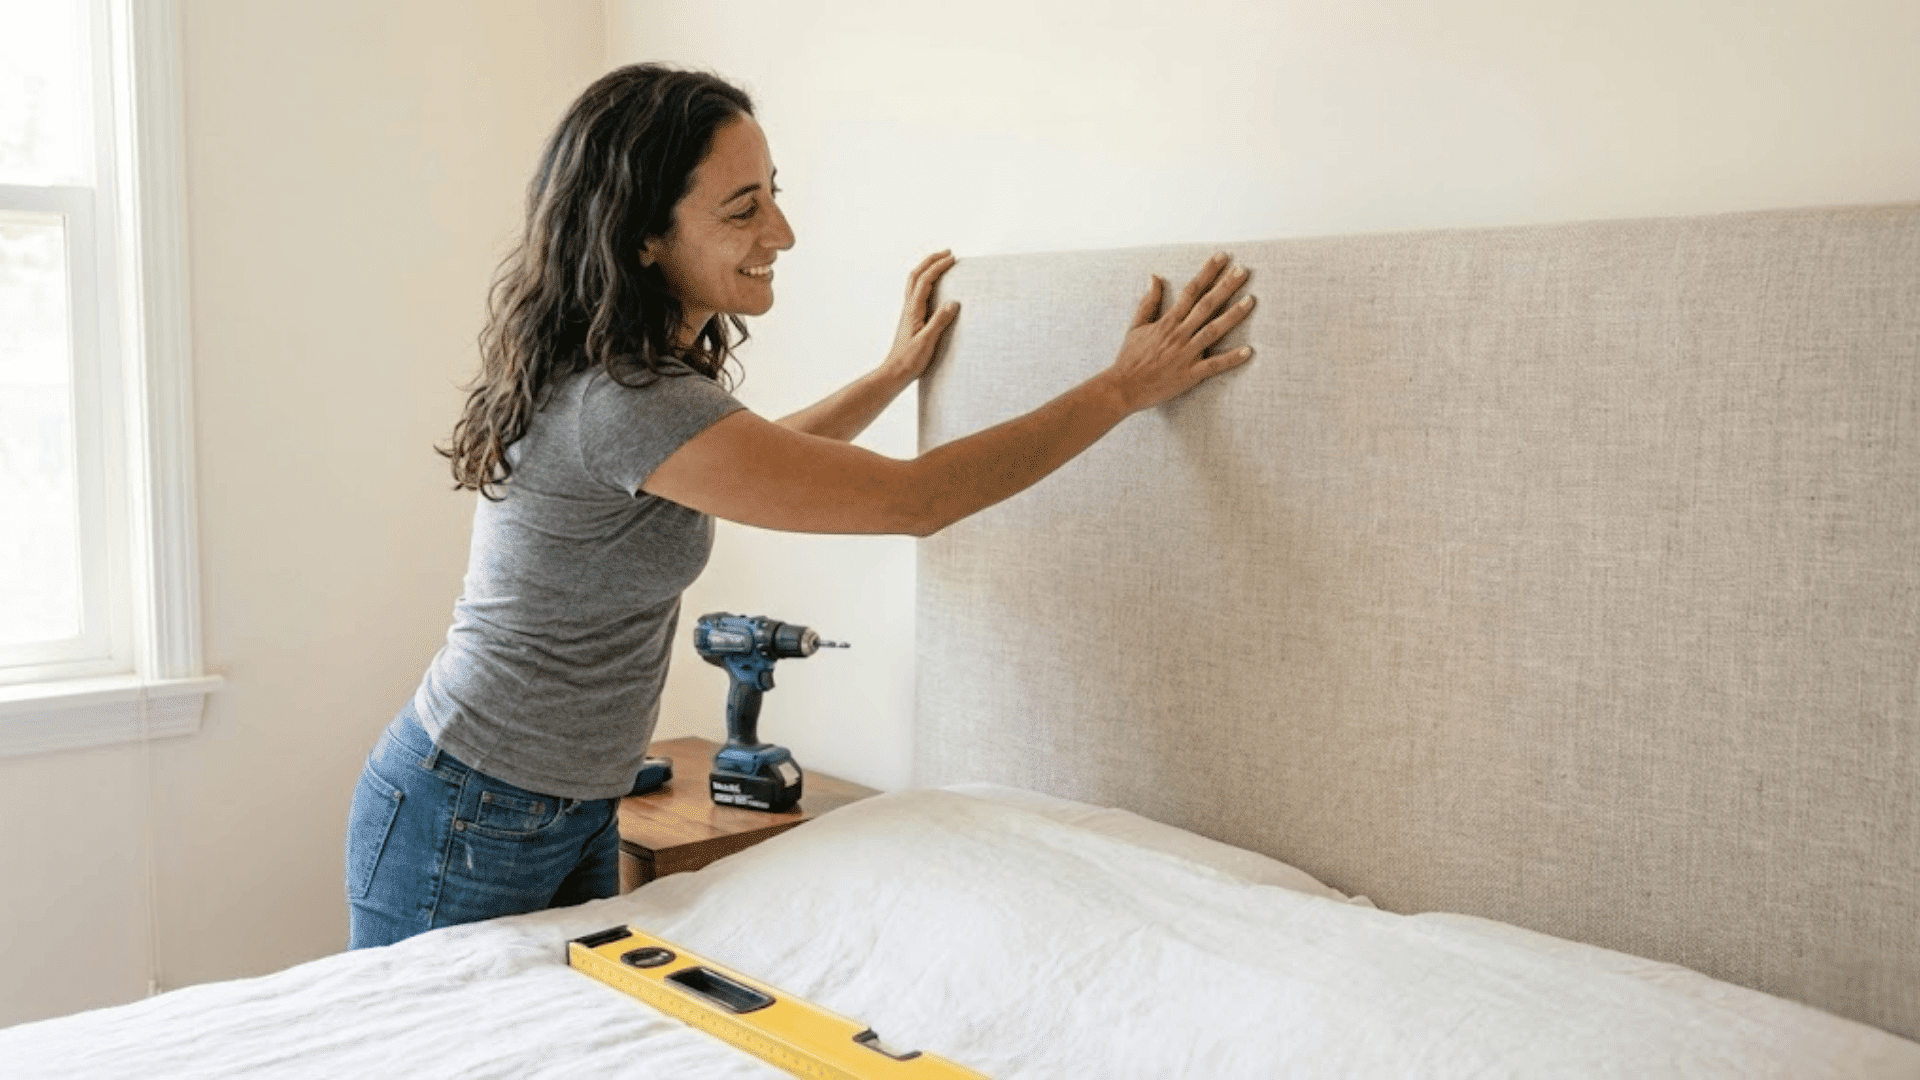
Estimated Time: 1.5 hours
Create a custom headboard using fabric-wrapped plywood, a wall-mounted panel, or even a large piece of decorative molding.
This bedroom refresh doesn’t require buying new furniture and can be tailored to your exact style preferences. Mount securely to the wall or attach directly to your bed frame.
Upholstered versions add softness, while painted wood brings modern minimalism. Either way, your bedroom instantly feels more complete and designed.
11. Picture Ledge Gallery Wall
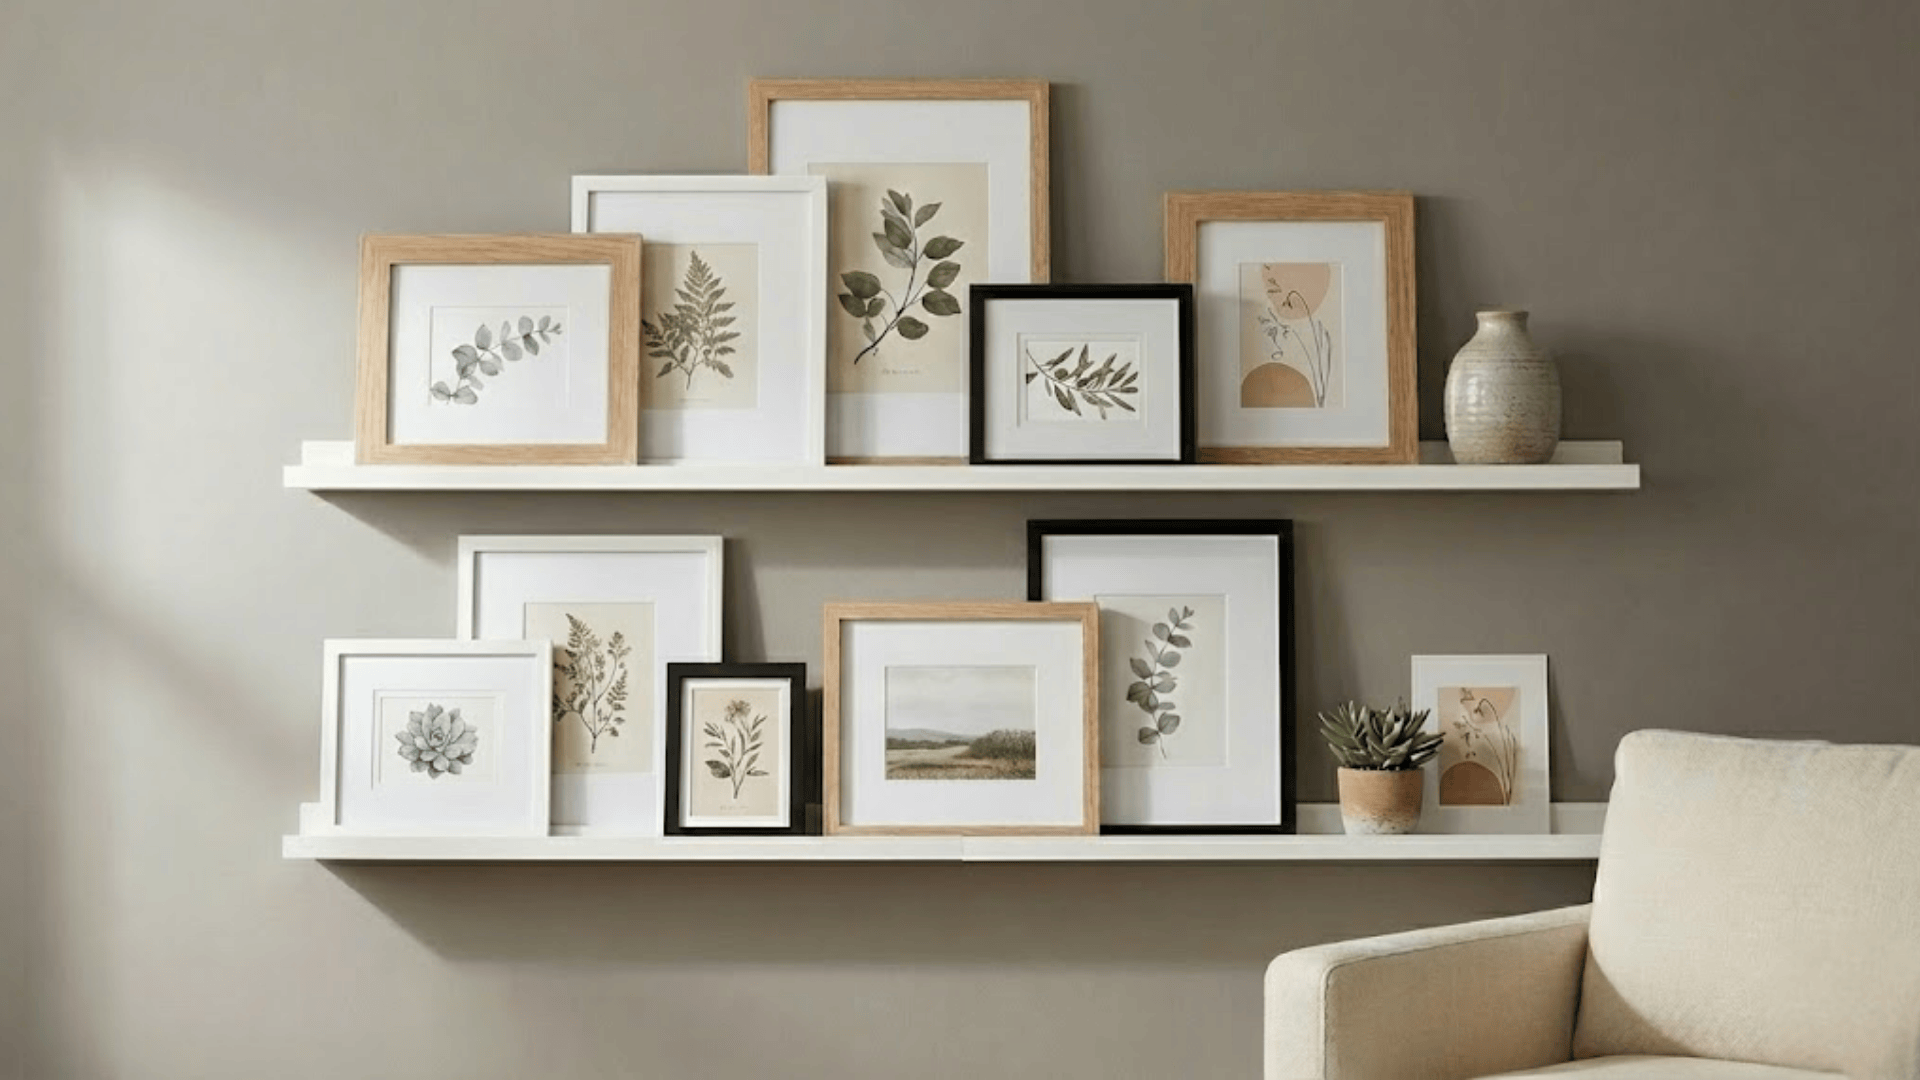
Estimated Time: 1 hour
Picture ledges offer all the visual impact of a traditional gallery wall with none of the commitment.
Simply mount shallow shelves to display framed photos, artwork, and small objects. The beauty is in the flexibility to rearrange pieces whenever inspiration strikes.
No nail holes beyond the initial shelf installation, making this extremely renter-friendly. Layer frames in different sizes for depth and visual interest.
12. DIY Light Fixture Makeover
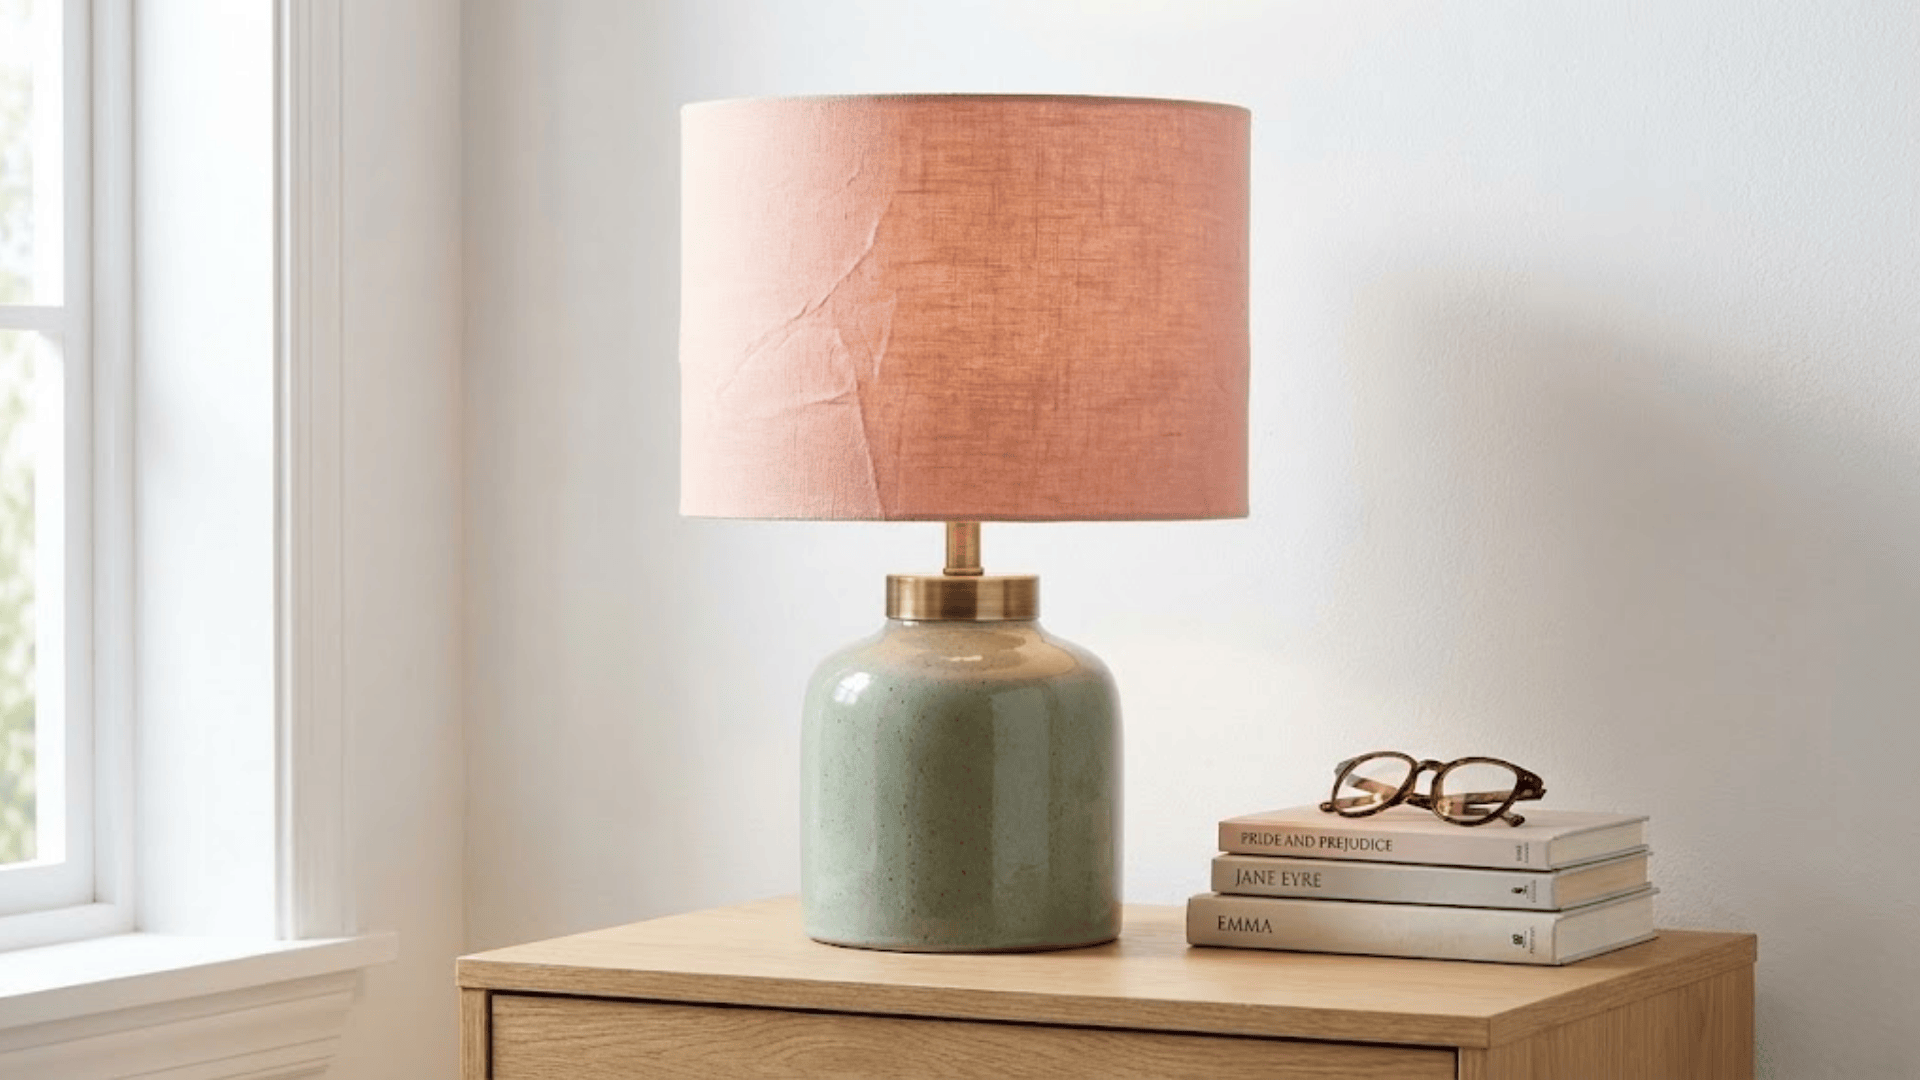
Estimated Time: 30 minutes
Update outdated light fixtures without any rewiring by simply swapping lampshades or adding decorative pendant covers.
This works for table lamps, floor lamps, and even some ceiling fixtures. Choose shades in colors or patterns that complement your room’s palette.
The change in lighting quality and style can dramatically shift a room’s ambiance. It’s amazing what a difference the right shade makes.
13. Chalkboard or Dry-Erase Wall Section
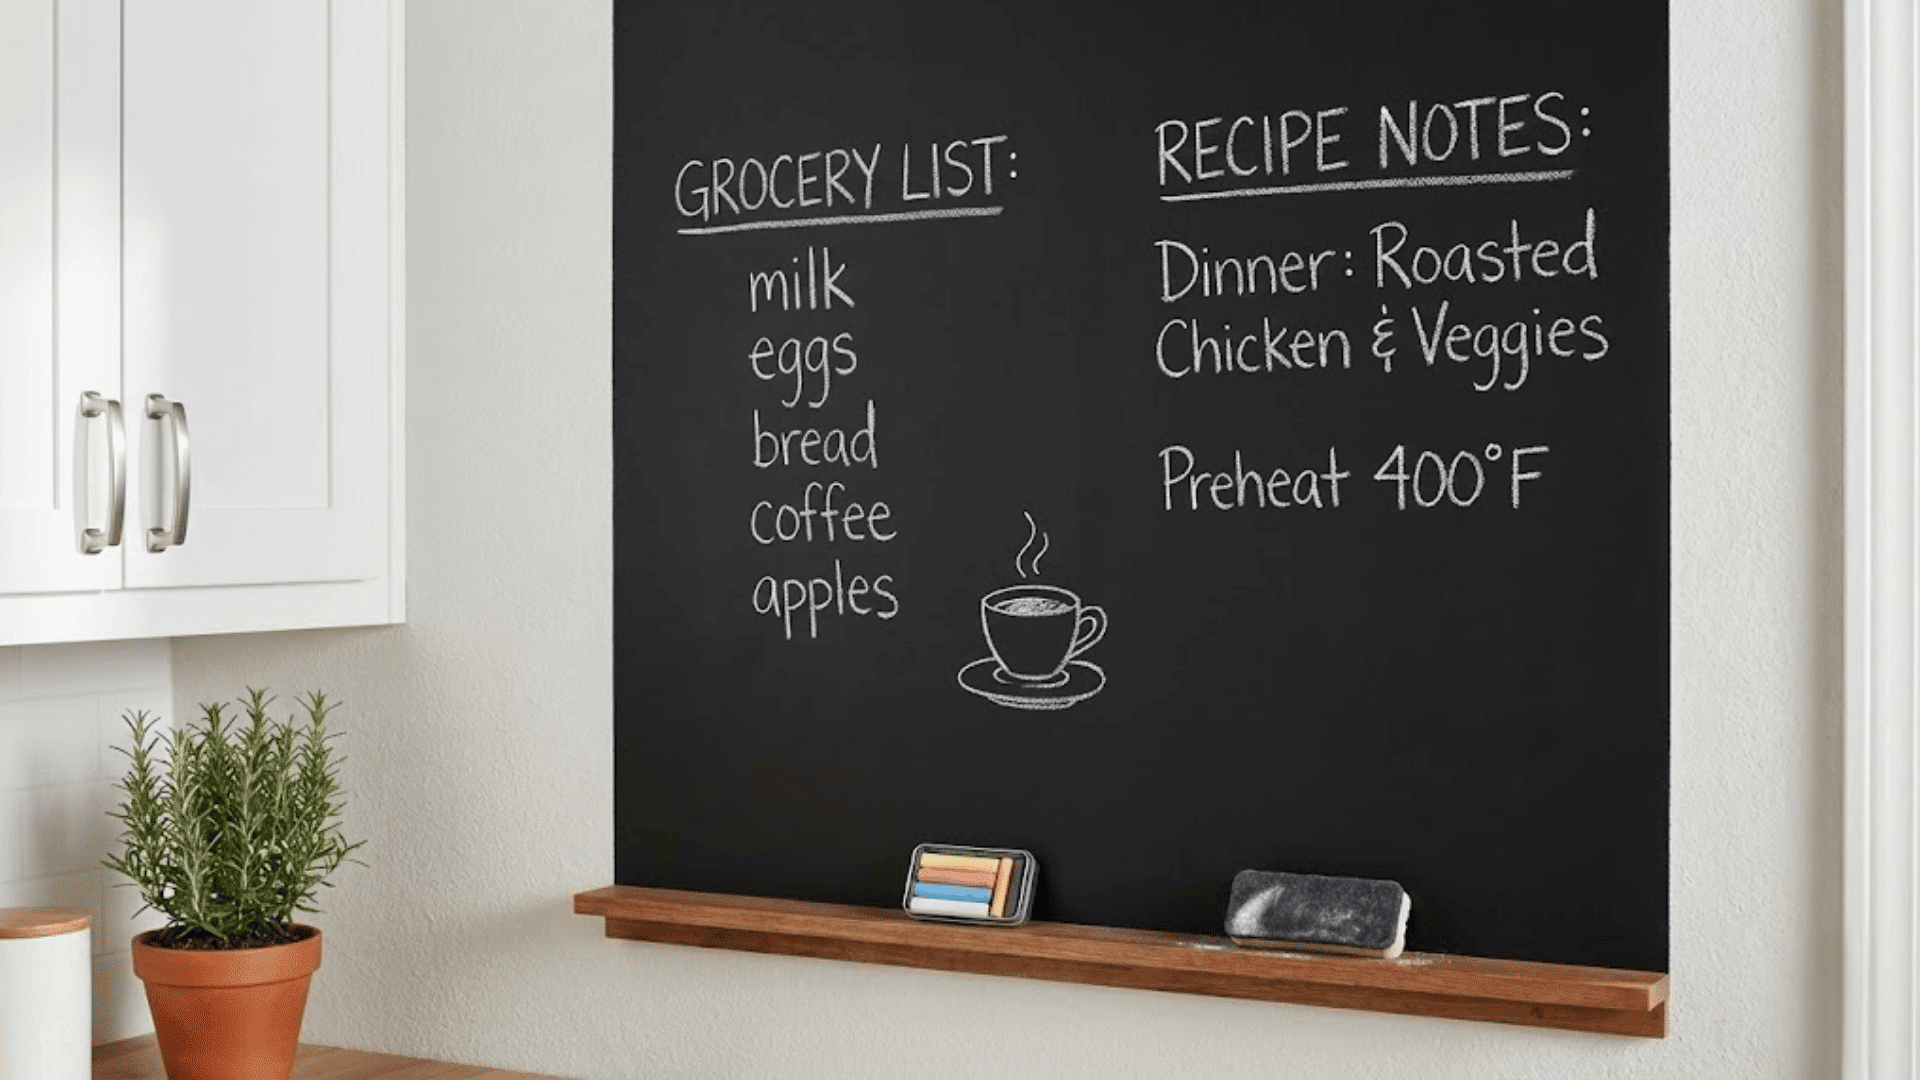
Estimated Time: 1 hour (plus drying)
Designate a wall section in your kitchen, home office, or kids’ room as a functional message center using specialty paint.
Chalkboard paint creates a matte finish perfect for lists and doodles, while dry-erase paint offers a sleek, wipeable surface. Apply two coats with a foam roller for smoothness, then let it cure according to package directions.
This practical addition keeps everyone organized while adding a playful design element.
14. Drawer & Cabinet Organization Inserts
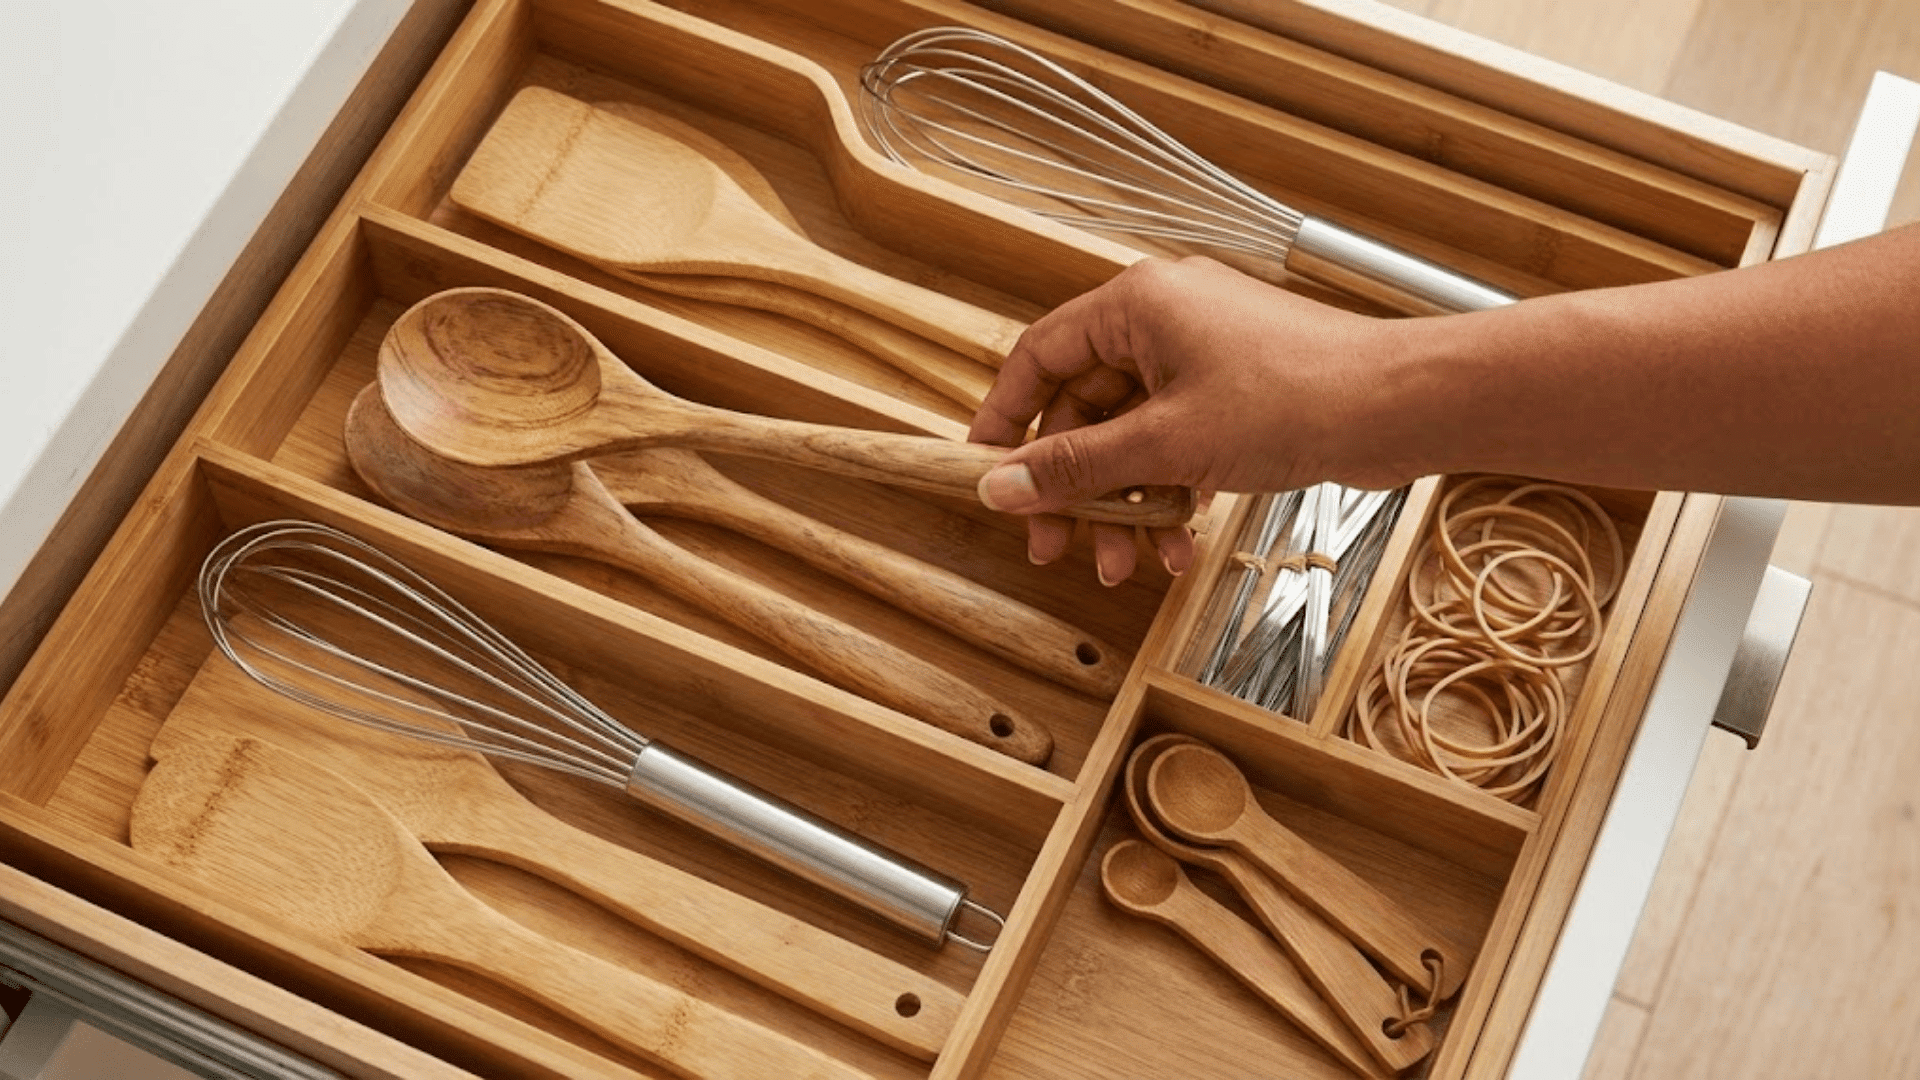
Estimated Time: 45 minutes
Turn chaotic drawers into organized zones using trays, dividers, or simple DIY wood inserts cut to size. This improves daily usability in kitchens, bathrooms, and closets instantly.
Measure your drawer dimensions first, then arrange inserts to create designated spots for everything.
The satisfaction of opening a perfectly organized drawer never gets old. It’s one of those projects that keeps giving back every single day.
15. Decorative Door Upgrade
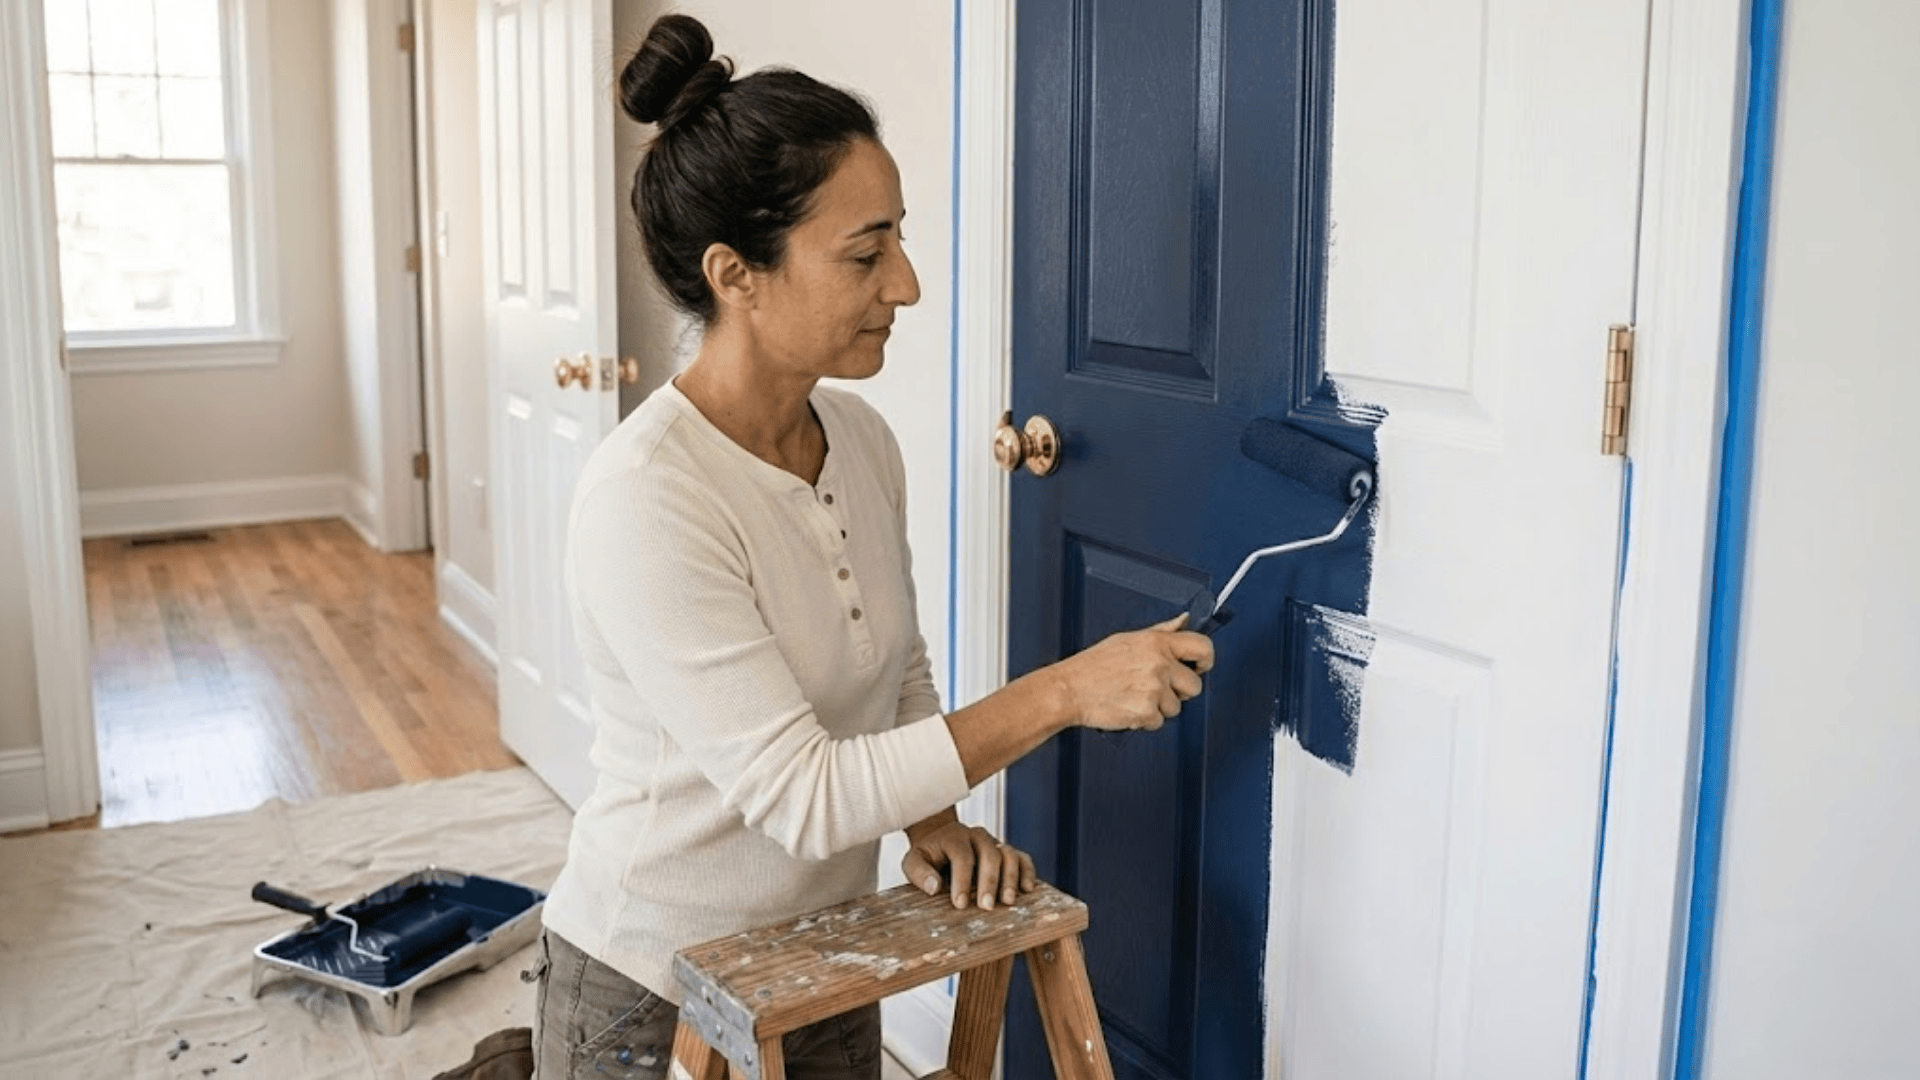
Estimated Time: 1.5 hours
Interior doors often get overlooked, but a fresh coat of paint or applied decorative panels can make them statement pieces.
Try a bold color on closet doors or add peel-and-stick molding to create faux panel details. This subtle upgrade adds architectural interest throughout your home.
Focus on high-traffic areas like bedroom and bathroom doors for maximum impact. The difference is understated but absolutely noticeable.
16. DIY Bench Cushion or Seat Pad

Estimated Time: 1 hour
Create custom cushions for window seats, entry benches, or dining benches using foam and fabric.
Measure your surface, cut foam to size, then wrap tightly with your chosen fabric and secure underneath with a staple gun or fabric glue. This adds comfort and color to hard seating surfaces.
Choose durable, washable fabrics for high-use areas. It’s a cozy addition that makes furniture feel more inviting.
17. Indoor Plant Styling Corner
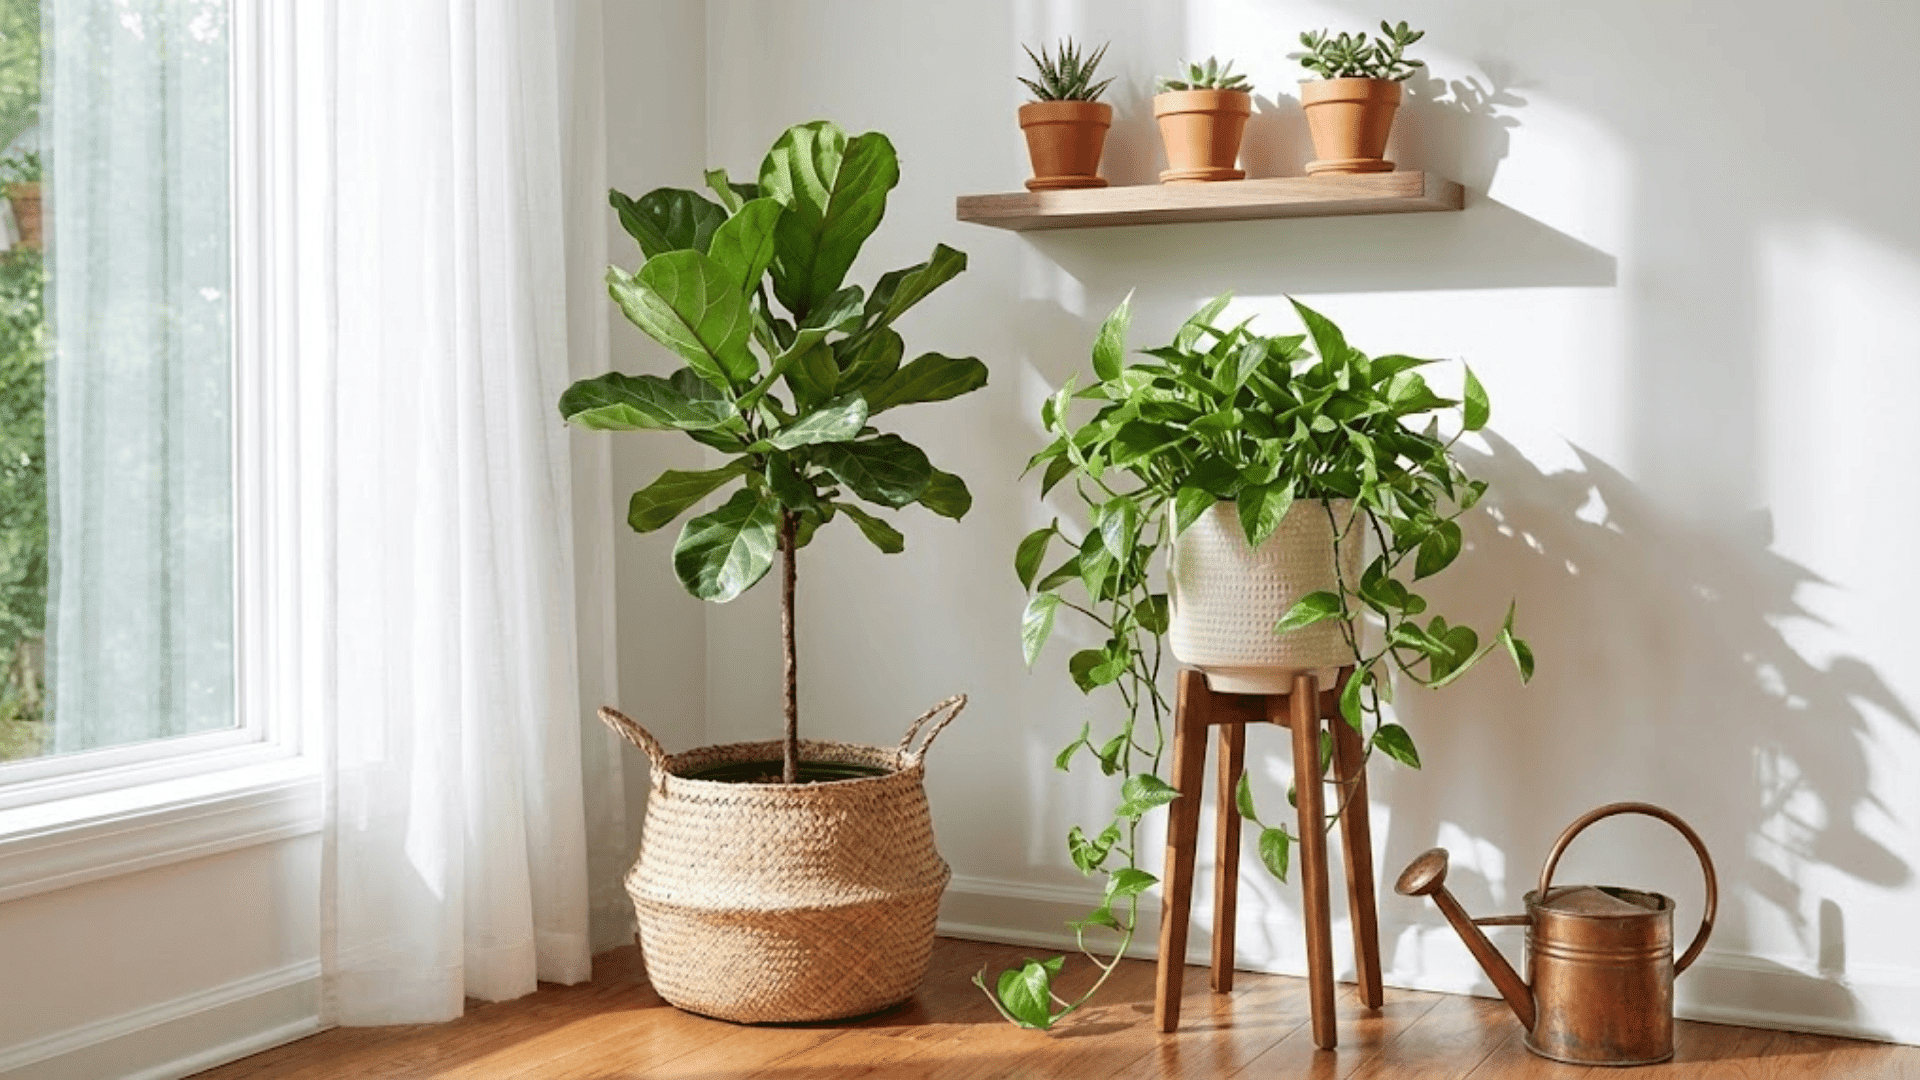
Estimated Time: 30 minutes
Curate a dedicated plant display using stands, baskets, and decorative pots you already own or can easily find.
Group plants at varying heights for visual interest and arrange them in a corner or along a windowsill. This styling-only project requires zero construction but creates a lush, trend-forward focal point.
Rotate plants seasonally or as they grow for an ever-evolving display. I find myself constantly rearranging my plant corner, and it never stops bringing me joy.
Best Rooms for Quick DIY Home Projects
Not all rooms in your home require equal effort, and certain spaces tend to change more quickly. Focusing your DIY energy on high-impact areas means you’ll see and enjoy the results every single day.
Here’s where to start when you’re ready to refresh your space.
- Living rooms benefit from floating shelves, picture ledges, accent walls, and updated light fixtures that create an immediate visual impact.
- Bedrooms change quickly with DIY headboards, painted accent walls, framed fabric art, and updated dresser hardware.
- Kitchens and bathrooms shine with peel-and-stick backsplashes, new cabinet pulls, mirror frame upgrades, and drawer organizers.
- Entryways and hallways feel more welcoming with wall-mounted organizers, stick-on floor tiles, painted doors, and curated plant corners.
- Small spaces like laundry rooms and powder baths are perfect testing grounds for bold tile patterns and organizational solutions.
Each of these spaces offers unique opportunities for quick wins that make your daily routine feel more intentional. Choose the room where you spend the most time or the one that’s been bothering you lately, and start there.
DIY Home Projects: Tools & Supplies You’ll Use Most
Fortunately, most quick DIY upgrades require only a handful of basics you might already own.
Here’s what you’ll reach for again and again.
| Tool/Supply | What It’s For | Why You Need It |
|---|---|---|
| Painter’s Tape | Clean paint lines, surface protection | Creates precise edges for accent walls and door painting without damage |
| Level & Measuring Tape | Straight installations, accurate spacing | Prevents crooked shelves and uneven gallery walls |
| Adhesive Hooks & Strips | Hanging lightweight items, temporary setups | Renter-friendly solution for art, decor, and organization without nail holes |
| Peel-and-Stick Materials | Backsplashes, floor tiles, wallpaper | High-impact conversion with zero permanent commitment |
| Basic Drill (Optional) | Installing shelves, mounting hardware | Makes projects faster and sturdier than manual screwdrivers |
Common DIY Mistakes to Avoid
Even the simplest projects can go sideways when you skip a few crucial steps. Learning from common pitfalls saves you time, money, and the frustration of having to redo your work.
Here are the mistakes that trip up beginners most often.
- Skipping measurements leads to crooked shelves, misaligned hardware, and wasted materials that don’t fit your space.
- Ignoring drying or curing time results in smudged paint, shifted tiles, and installations that fail prematurely.
- Overloading walls without anchors causes damage, fallen shelves, and safety hazards in homes with drywall.
- Starting too many projects at once leaves you with half-finished rooms and lost momentum instead of completed wins.
- Rushing through prep work, like cleaning surfaces or taping edges, shows in the final result and undermines your effort.
The good news is that all of these mistakes are completely avoidable with just a little patience and planning. Take your time with the unglamorous steps, and your finished project will look polished and intentional.
Remember, even quick DIY projects deserve your full attention while you’re working on them.
Budget & Time Breakdown for Quick DIY Projects
Understanding the investment required for each project helps you choose what fits your current schedule and wallet.
Here’s how these projects break down by cost, time commitment, and living situation.
| Category | Projects | What to Expect |
|---|---|---|
| Under $25 Projects | Framed fabric art, wrapped planters, drawer organizers, and hardware swap | Minimal investment with materials on hand or affordable finds |
| Under 1-Hour Projects | Hardware swap, framed art, planters, picture ledge | Quick wins perfect for busy weeknights |
| Weekend-Friendly DIYs | Accent walls, floating shelves, backsplash, headboard | A few hours, including prep and drying time |
| Renters vs. Homeowners | Renters: peel-and-stick, adhesive solutions; Homeowners: painted walls, drilled installations | Choose reversible or permanent based on your situation |
Final Thoughts
Your home deserves to feel like yours, and these DIY projects for the home prove that meaningful change doesn’t require weeks of work or a hefty budget.
Start with a single room or refresh your entire space one project at a time, knowing that each small improvement builds confidence and brings you closer to the aesthetic you’ve been dreaming about.
Pick one project that excites you, gather your supplies, and spend an afternoon creating something beautiful.
Which project will you tackle first? Share your favorites or your own quick DIY wins in the comments below.