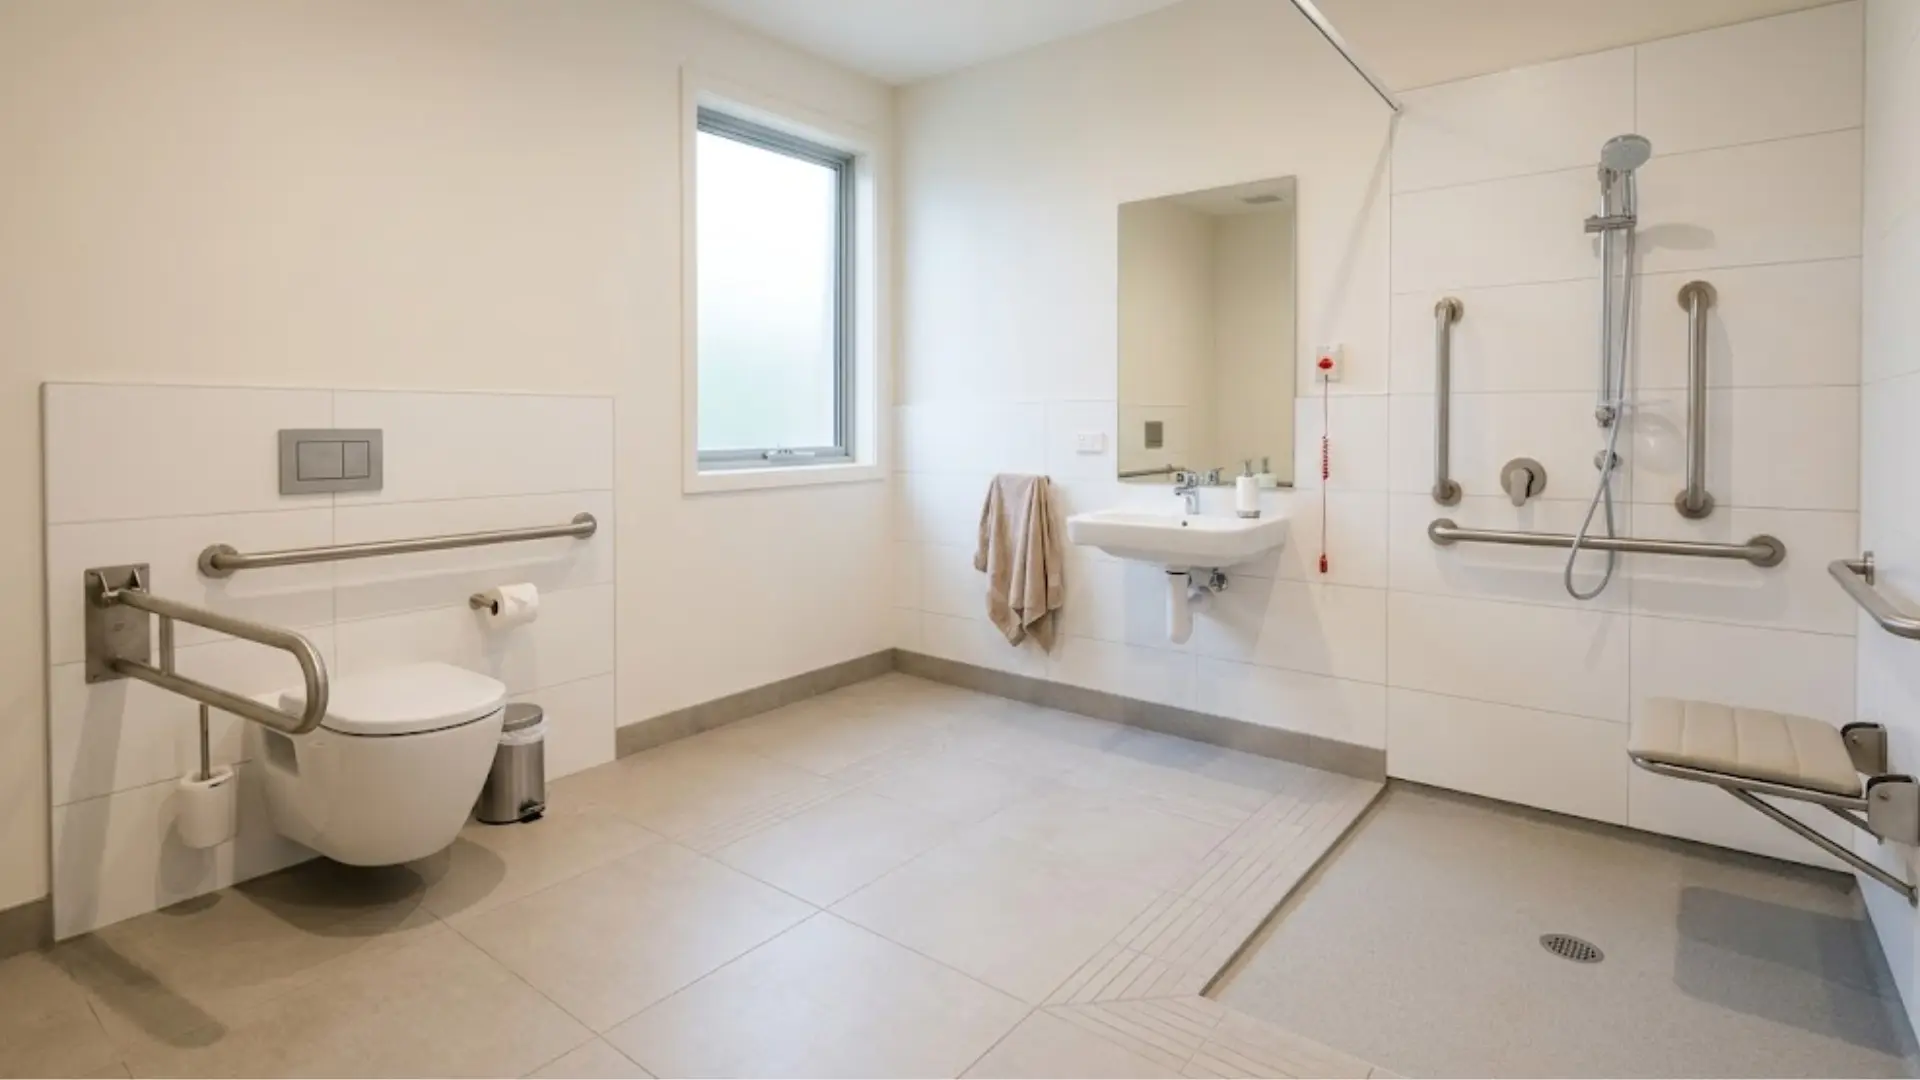
An ADA bathroom layout is not just a matter of adding a grab bar or a wider door.
It is a full set of measurements covering clear floor space, turning radius, fixture placement, and reach ranges, all working together so a person using a wheelchair
Whether you are designing a commercial restroom, planning a healthcare facility, or trying to make a small home bathroom more accessible
Understanding these requirements from the start prevents costly rework later.
This breaks down the exact dimensions, shows labeled floor plans for common configurations
clarifies where ADA rules apply versus where they do not.
What Makes a Bathroom Layout “ADA Compliant”
A bathroom layout is ADA compliant when every required measurement works together, not just when individual fixtures happen to meet code on their own.
This means the turning space, doorway width, and clearances around the toilet, sink, and shower all have to coexist without overlapping in ways the standard prohibits.
A layout can look accessible at a glance and still fail compliance if a door swing cuts into a clearance zone or a grab bar sits outside its required height range.
True compliance comes from checking the full set of ADA Standards for Accessible Design together, not treating each fixture as a separate checklist item
ADA Fixture Requirements
Each ADA fixture has its own set of measurements, but seeing them together helps in planning a layout that works as a whole.
1.Toilet Height, Centerline, and Clearance
Toilet placement affects both comfort and how easily a wheelchair user can transfer on and off the seat
- Seat height: 17–19 inches from the floor
- Centerline: 16–18 inches from the side wall
- Clearance in front: at least 60 inches wide, 56–59 inches deep
2.Grab Bar Height, Length, and Placement
Grab bars provide the support needed for safe transfers, but only when mounted at the correct height and length
Grab bars provide the support needed for safe transfers, but only when mounted at the correct height and length
- Mounting height: 33–36 inches above the floor
- Side bar: extends at least 54 inches from the rear wall
- Rear bar: minimum of 24 inches
3.Sink and Vanity Knee Clearance
A sink is only usable for a wheelchair user if there is enough open space underneath to pull in close
- Knee clearance: 27 inches high, 30 inches wide, 19 inches deep
- Mounting height: no higher than 34 inches
- Allows a wheelchair user to pull in close without straining
4.Mirror Mounting Height
Mirror height determines whether someone seated in a wheelchair can actually see their reflection
- Bottom edge: no higher than 40 inches from the floor
- Tilting mirrors optional for improved visibility
5.Shower and Tub Minimums (Roll-In vs. Transfer)
The right shower type depends on available space and whether a direct wheelchair entry or a seated transfer works better
- Roll-in shower: minimum 30 by 60 inches, no curb
- Transfer shower: minimum 36 by 36 inches, with fold-down seat
6.Flooring, Slip Resistance, and Surface Requirements
Flooring choices affect safety throughout the bathroom, not just inside the shower
- Slip-resistant flooring required, especially in wet areas
- Surfaces must be firm, stable, and level
- No more than a half-inch change in height at transitions
- Thresholds beveled or eliminated to prevent tripping hazards
7.Lighting, Switches, and Reach Ranges for Controls
Controls and lighting need to be both reachable and usable for people with limited mobility or grip strength
- Controls positioned 15–48 inches from the floor
- Usable without tight grasping or twisting
- Adequate lighting near mirrors, switches, and pathways
ADA Bathroom Floor Plan Layouts
Each diagram below shows how ADA measurements translate into an actual working floor plan, from single-user restrooms to specialized transfer and companion care spaces.
1. Single-User Commercial Restroom
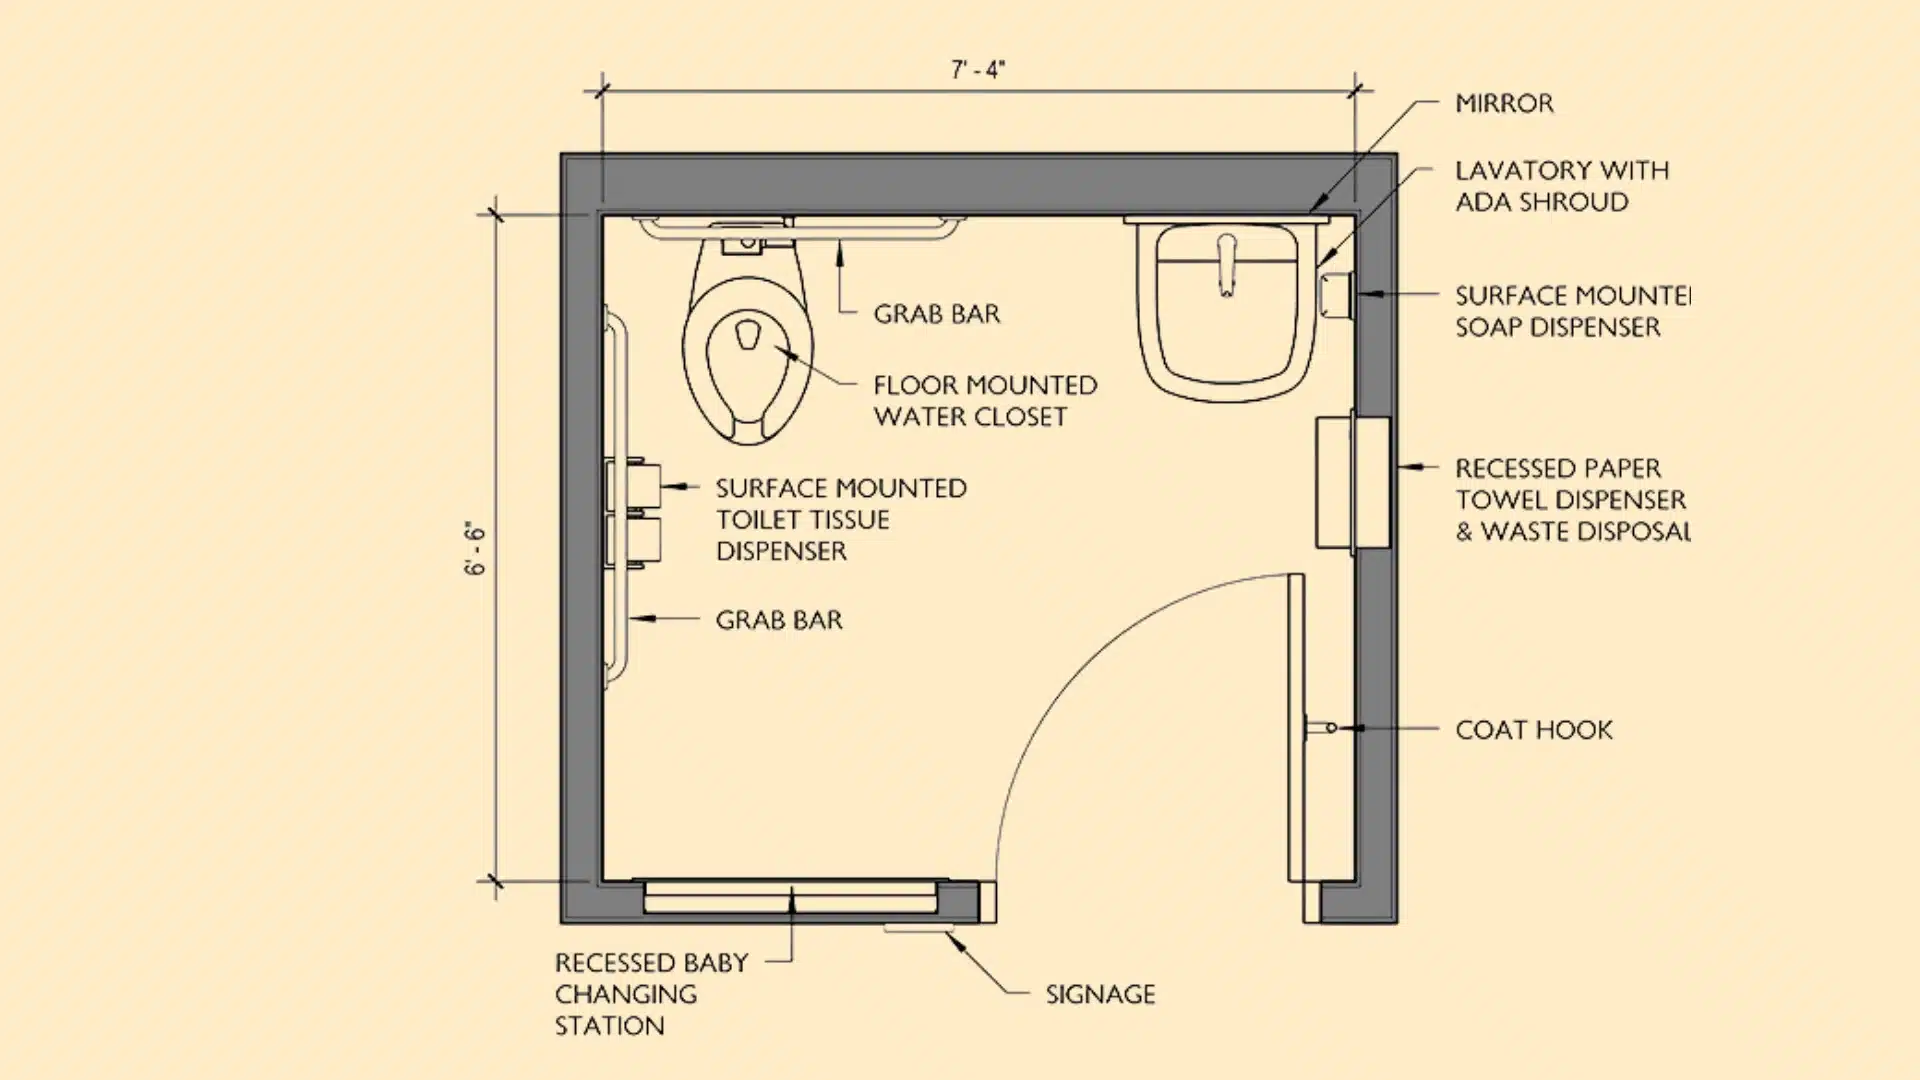
This layout places the toilet along one wall with grab bars positioned for a side transfer, while the sink sits on the opposite wall with clear knee space underneath.
The center of the room stays open to accommodate a full 60-inch turning circle.
Door swing is planned so it does not intrude into the clearance zone in front of the toilet or sink, keeping the entire path from entry to fixtures unobstructed for a wheelchair user.
2. Multi-User Public Restroom
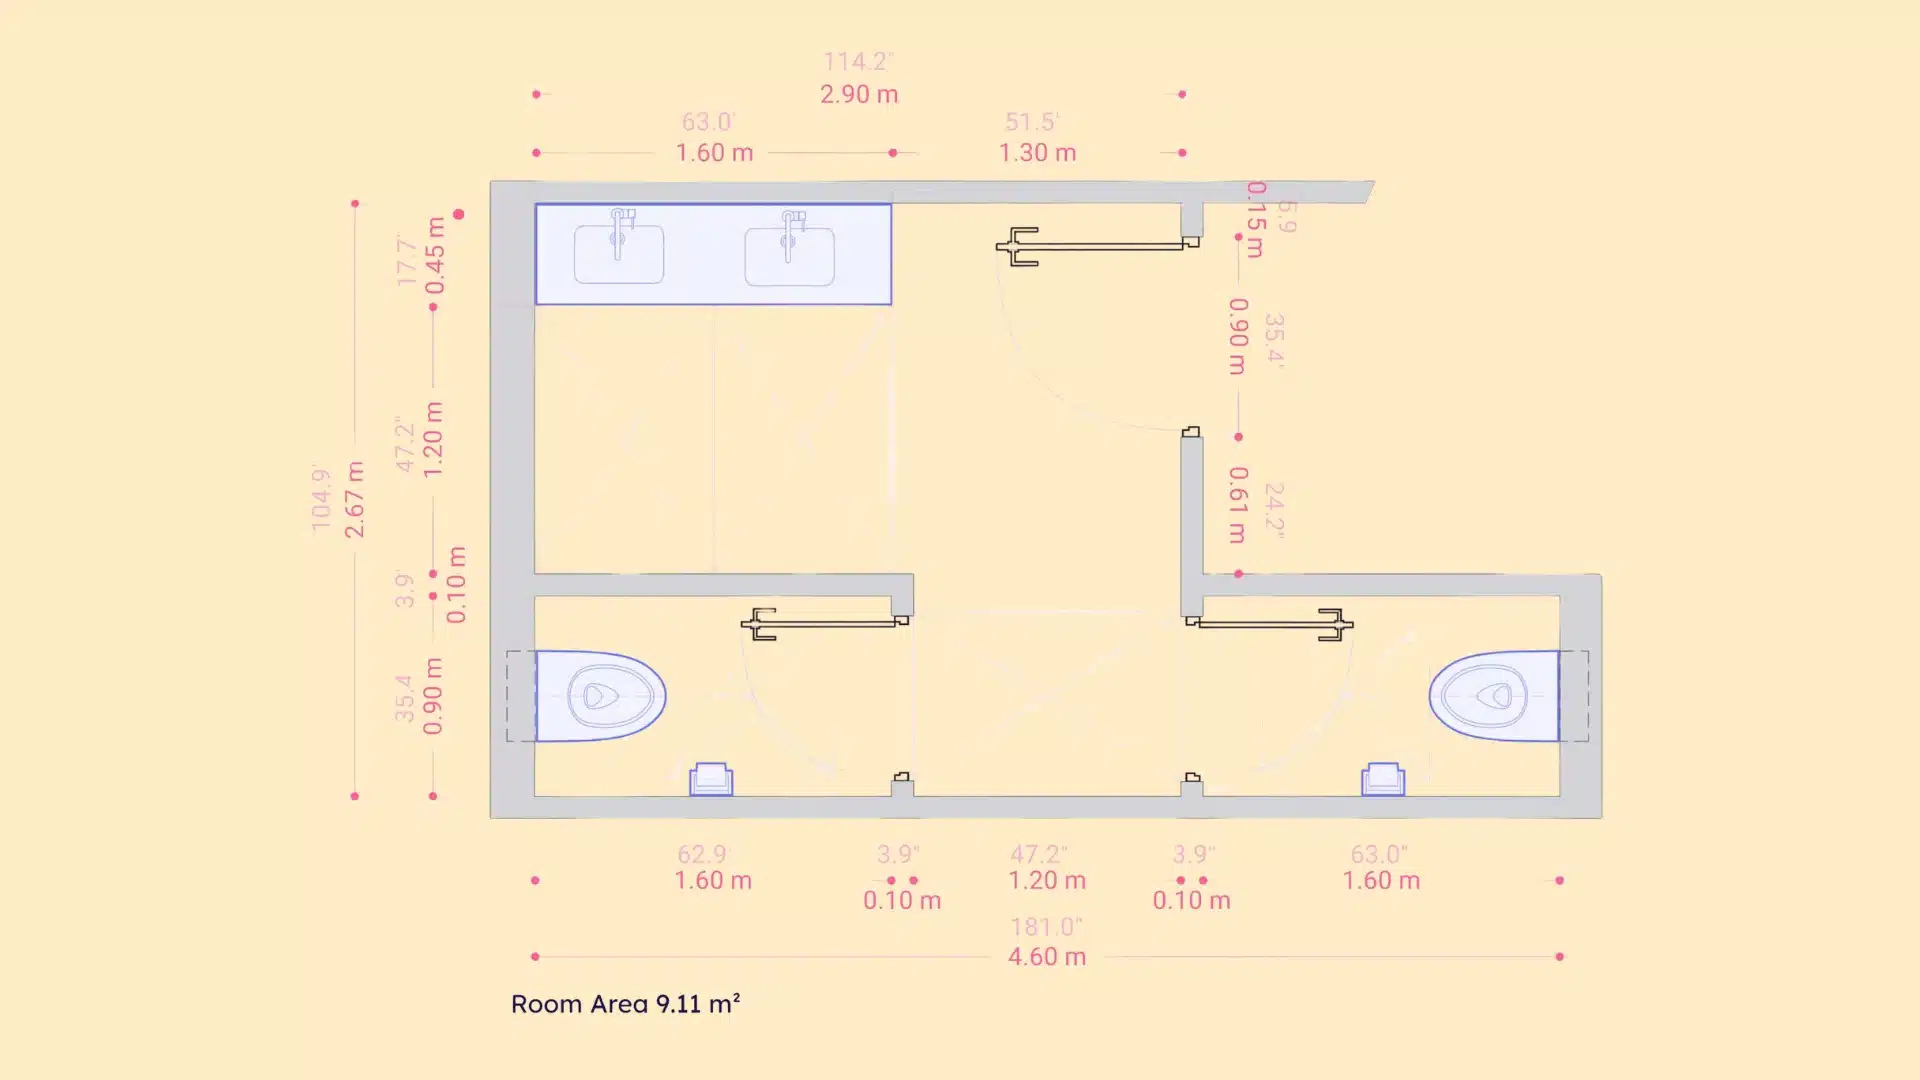
This configuration includes separate accessible stalls within each restroom, sized to the required 60 by 60 inches, along with at least one compliant sink and, in the men’s room, one accessible urinal.
Standard stalls and sinks fill the remaining space for ambulatory users.
The accessible stall is typically placed nearest the entrance to minimize travel distance, while maintaining clear floor space at each fixture and along the path connecting them.
3. Small Residential Bathroom (5×8) Adapted Layout
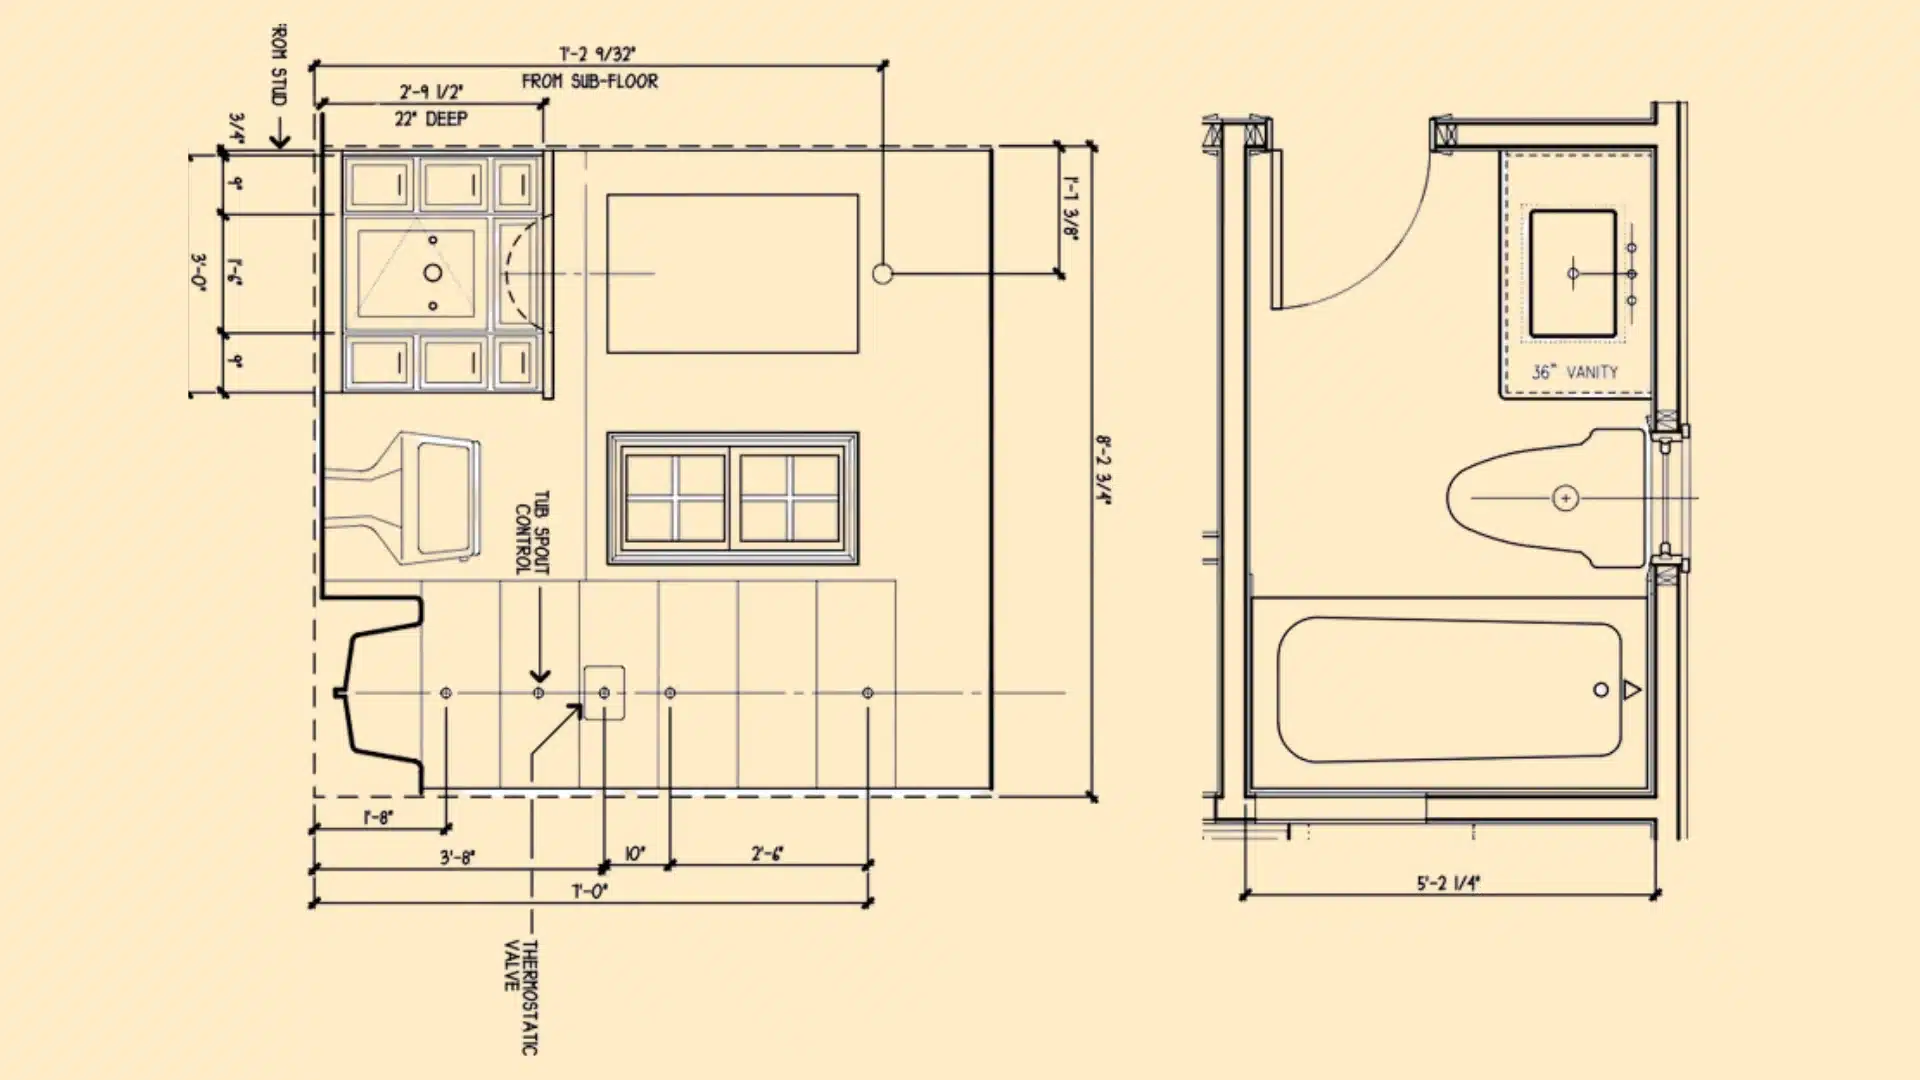
In a compact 5×8 footprint, a wall-hung toilet and corner sink free up floor area that a standard vanity would consume.
The door is often repositioned or swapped for a pocket door to eliminate swing clearance conflicts.
A T-shaped turning space replaces the full 60-inch circle where the room cannot accommodate one, showing how a small home bathroom can still support real accessibility with the right fixture choices.
4. Corner Toilet Stall Configuration
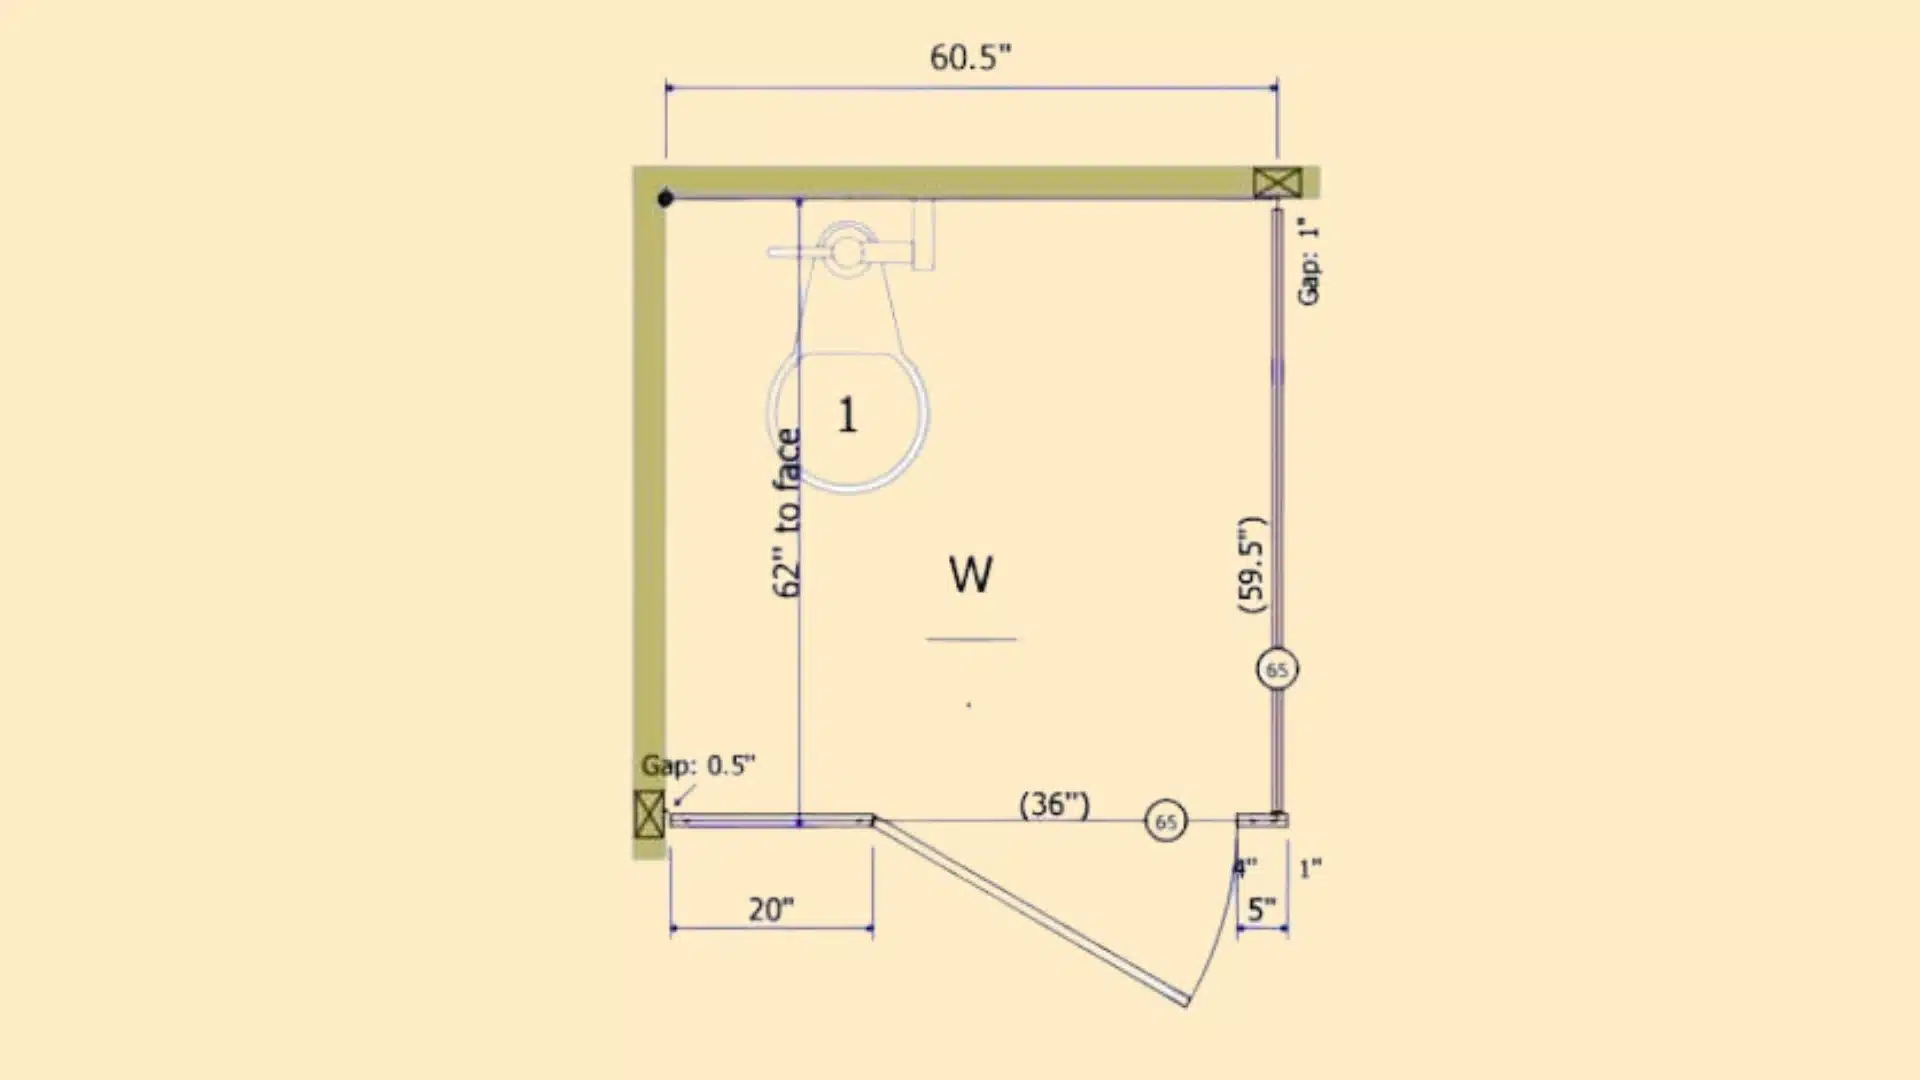
This layout angles the toilet into a corner rather than against a flat wall, which can help preserve clearance in irregularly shaped rooms or where plumbing is fixed.
Grab bars are mounted on the two adjacent walls instead of one side and the rear, and clear floor space is measured diagonally outward from the fixture.
This configuration is common in retrofit projects where relocating plumbing is not practical.
5. Roll-In Shower Layout
A roll-in shower spans a minimum of 30 by 60 inches with a completely curbless entry, allowing a wheelchair to enter directly without a transfer.
The floor slopes gently to a drain rather than relying on a raised threshold, and grab bars line the interior walls.
This layout works best in bathrooms with enough overall square footage to dedicate a larger, open shower zone.
6. Transfer Shower Layout
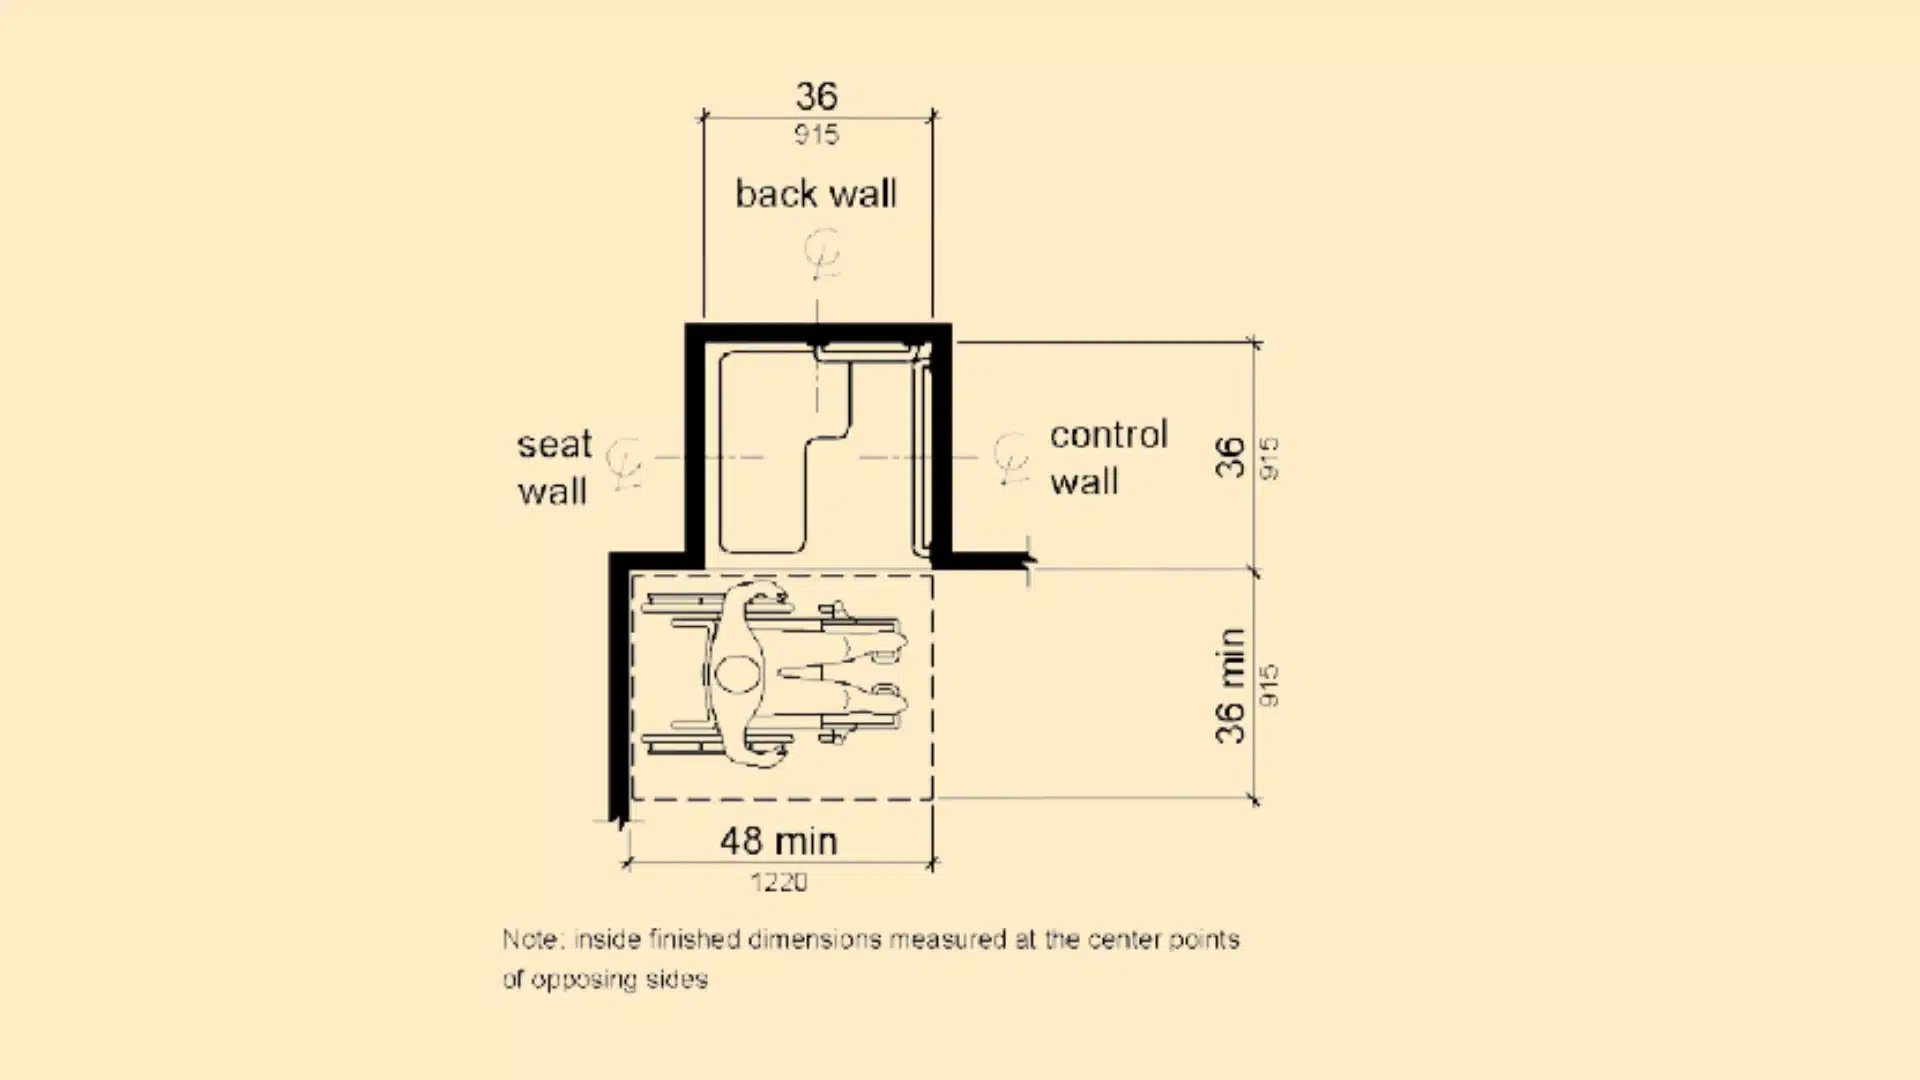
Sized at a minimum of 36 by 36 inches, this layout suits bathrooms where a full roll-in shower will not fit.
A fold-down seat is mounted along one wall, allowing a user to transfer from a wheelchair positioned just outside the shower threshold.
Grab bars are placed on the walls surrounding the seat, and the compact footprint makes this a practical option for smaller renovations.
7. T-Shaped Turning Space Layout
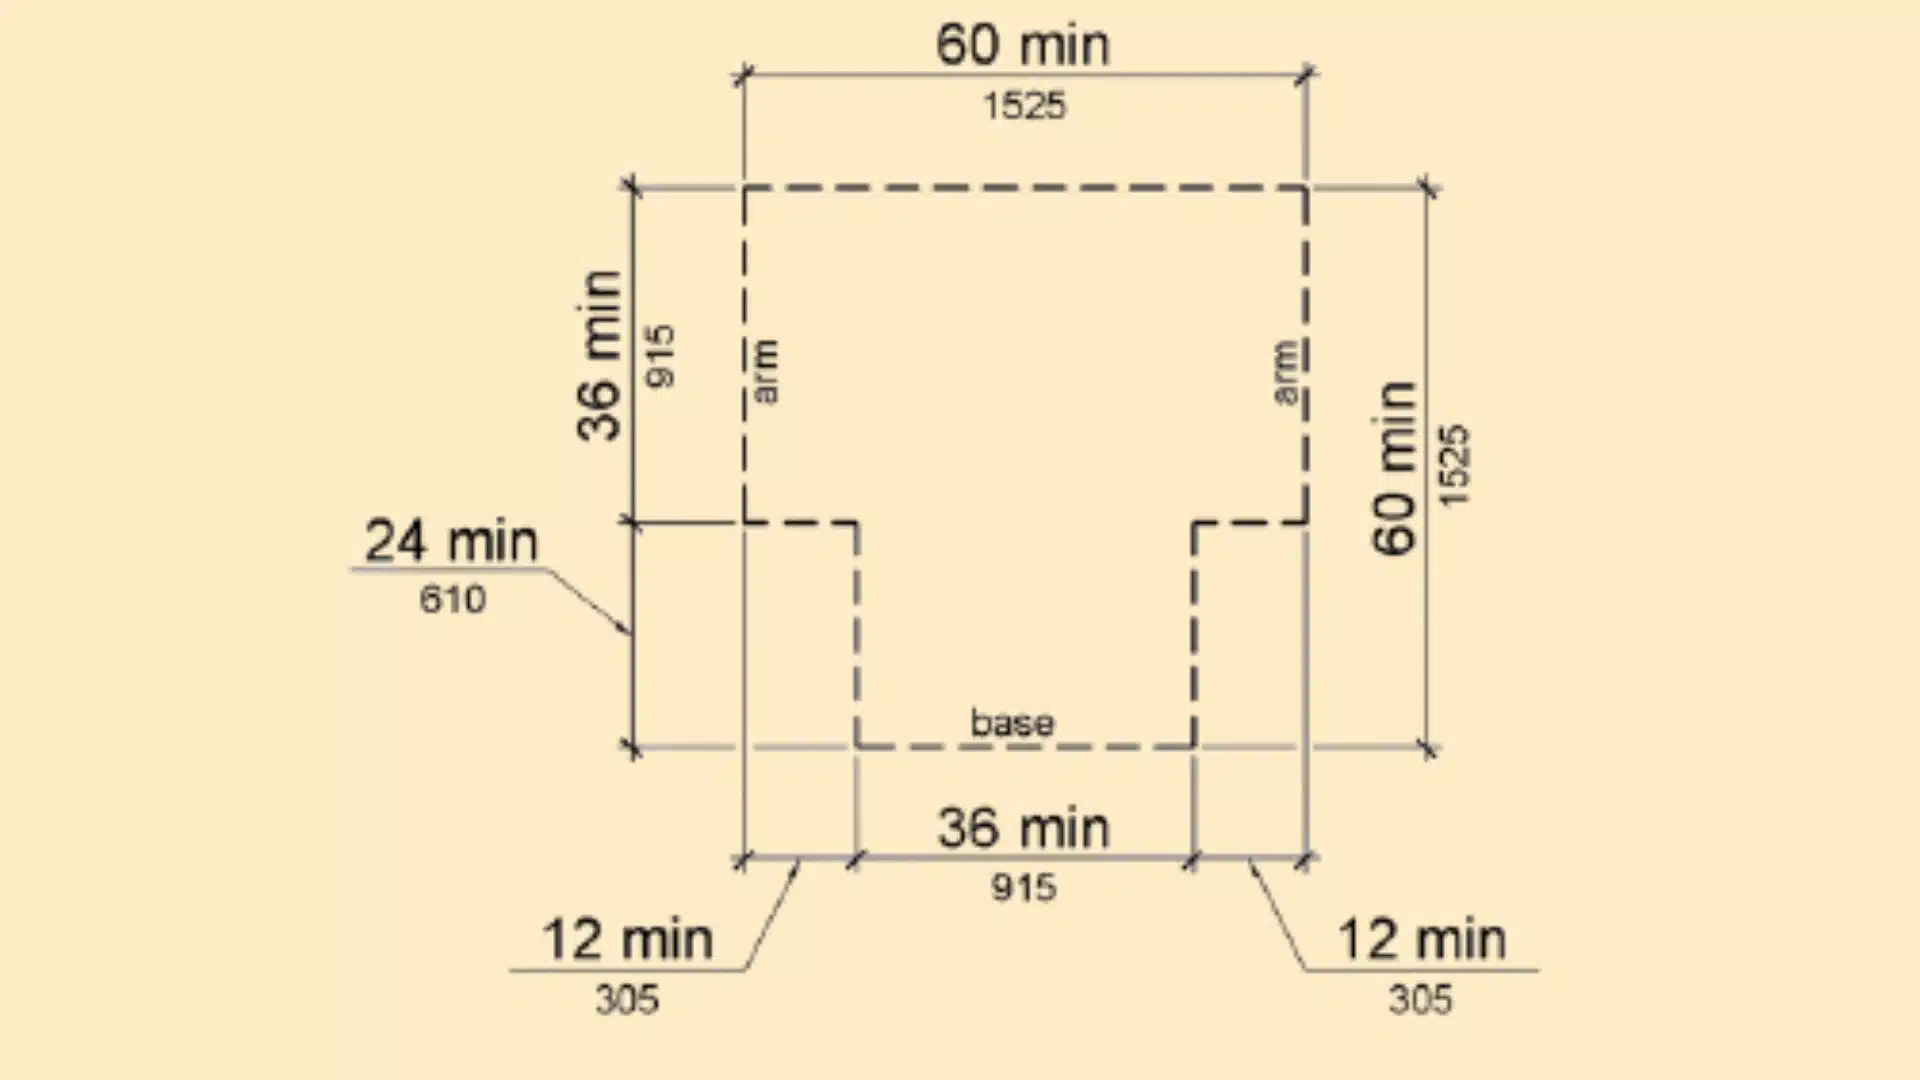
Where a full 60-inch circle cannot fit, this layout uses a T-shaped clearance zone instead, with each arm of the T measuring at least 36 inches wide.
This allows a three-point turn rather than a continuous pivot.
The T-shape can overlap with fixture clearances in one arm, but the remaining two arms must stay completely open for the configuration to remain compliant.
8. Ambulatory Stall Layout
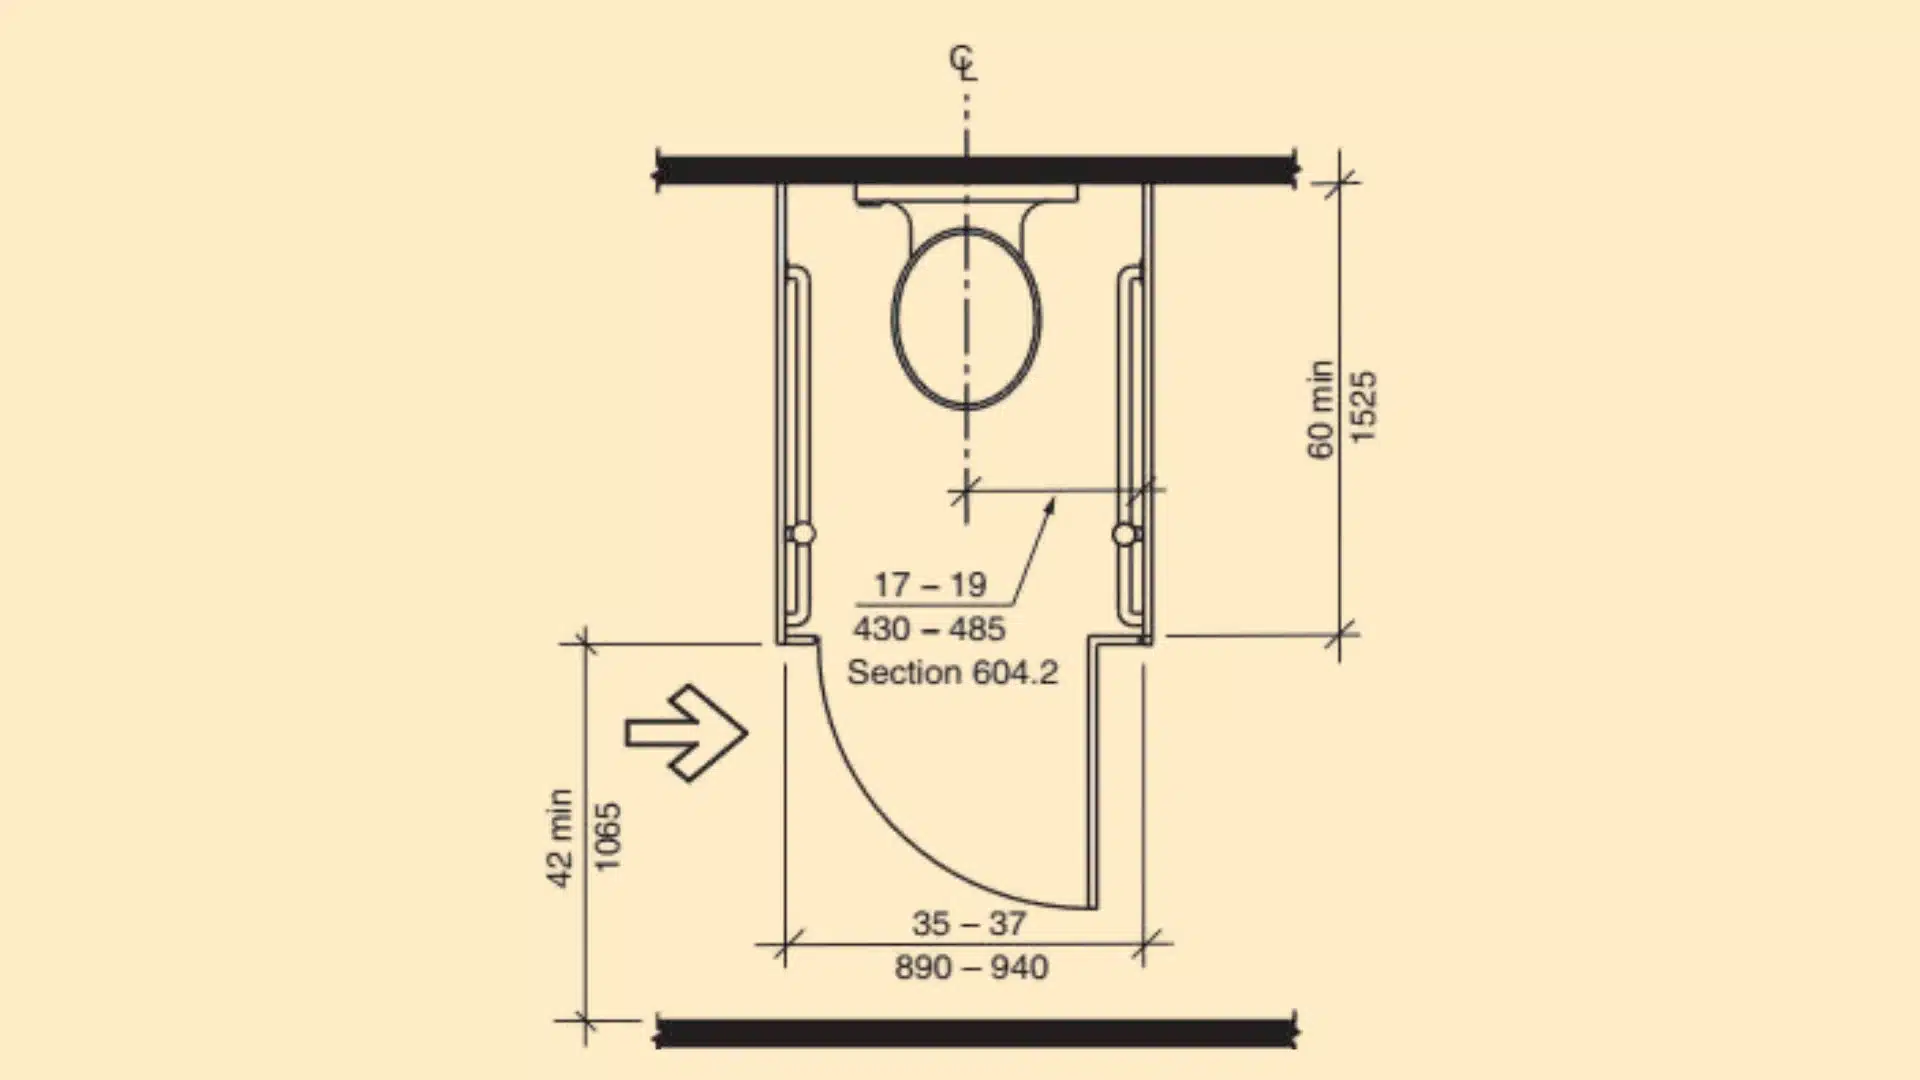
Designed for people who walk with a cane, walker, or similar support rather than use a wheelchair, this stall is narrower than a standard accessible stall, typically no more than 37 inches wide.
Parallel grab bars run along both side walls to provide support on either side while seated.
This layout is often placed alongside a full wheelchair-accessible stall in larger multi-user restrooms.
9. Family/Companion Care Restroom
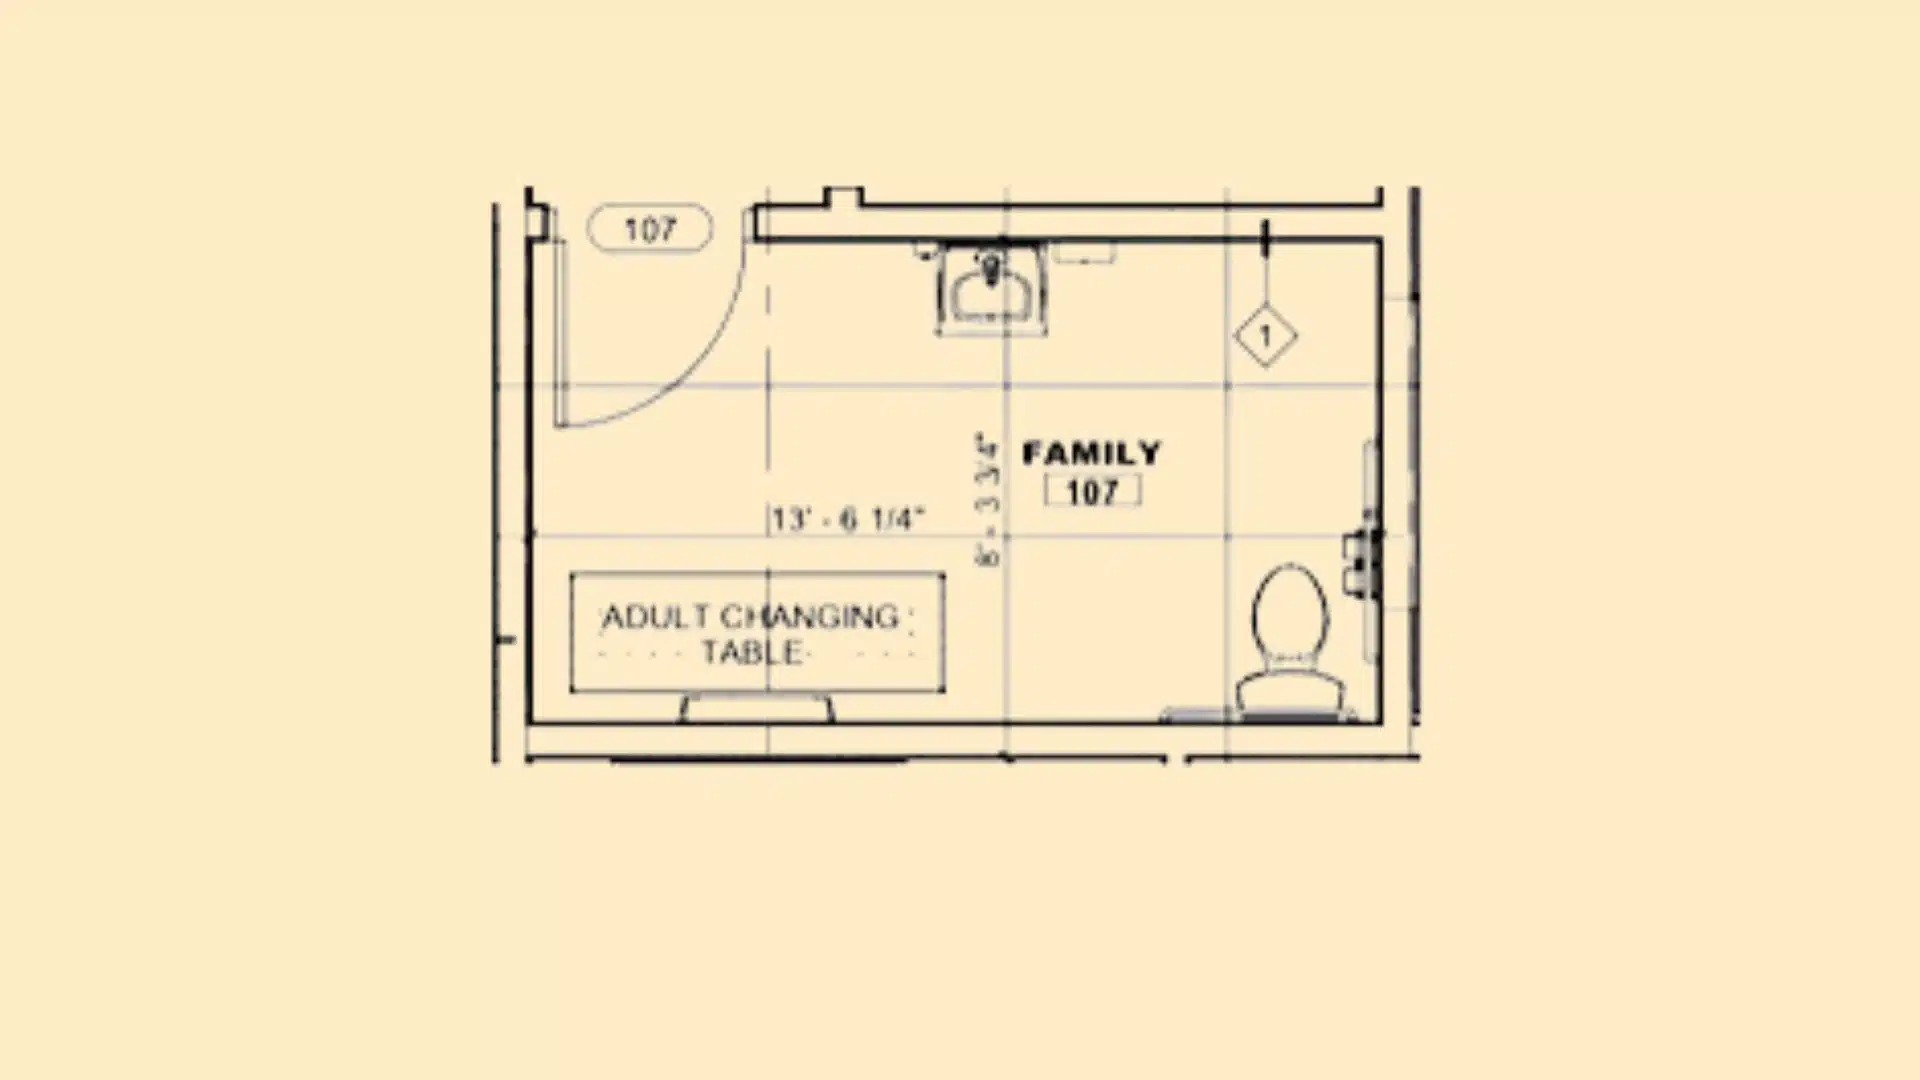
This layout provides significantly more open floor space than a standard accessible restroom, along with a fold-down companion seat or bench to assist someone who needs help during use.
It typically includes a single toilet, sink, and sometimes a changing table, all arranged with wide clearances that accommodate a caregiver working alongside a wheelchair user rather than just the user alone.
Can a 5×8 Bathroom Meet ADA Standards?
A standard 5×8 bathroom can be difficult to bring into full ADA compliance without significant changes.
The room needs to fit a 60-inch turning space, 32-inch door clearance, and clearances around the toilet and sink all at once, which rarely lines up in a stock layout.
Wall-hung fixtures, a repositioned or pocket door, and a T-shaped turning space instead of a full circle can make it possible, but often mean giving up storage or accepting a tighter feel.
If the toilet drain or vent stack cannot move, options shrink further. In many cases, the more realistic goal is meaningful accessibility rather than strict ADA-level compliance.
ADA vs. Residential Accessible Bathrooms
The term “ADA bathroom” gets used loosely in home renovations, but the legal standard and a residential accessible design are not the same thing. The table below breaks down where they differ.
| Feature | ADA (Public/Commercial) | Residential Accessible |
|---|---|---|
| Legal basis | Americans with Disabilities Act | Fair Housing Act, local codes; ADA doesn’t apply to homes |
| Compliance | Mandatory | Voluntary |
| Turning space | 60″ circle or T-shape required | Recommended, flexible |
| Door width | 32″ minimum, enforced | Wider encouraged, not required |
| Toilet height | 17–19″, fixed | Comfort-height common, flexible |
| Grab bars | Required | Optional |
| Enforcement | Inspections, complaints, lawsuits | None formal |
| Goal | Legal compliance | Comfort and aging-in-place safety |
Knowing this difference matters most when planning a remodel, since a home bathroom can be highly accessible without meeting every strict ADA measurement.
Common ADA Bathroom Layout Mistakes
Even well-intentioned designs can fall short of compliance when small details get overlooked. Here are some of the most frequent mistakes:
- Blocking the turning space with fixtures or trash cans
- Measuring the toilet centerline from the wrong wall
- Door swings that cut into sink or toilet clearance zones
- Grab bars mounted outside the 33–36 inch height range
- Assuming one accessible stall is enough in larger restrooms
- Treating “ADA” and “accessible” as interchangeable at home
- Skipping the 27 inches of knee clearance under sinks
Final Thoughts
An ADA-compliant bathroom layout comes down to getting the details right together, not just checking off individual fixtures one by one.
Clear floor space, turning room, and correct fixture placement all have to work in coordination, since a compliant sink or toilet means little if the path to reach it is blocked.
Whether you are designing a commercial restroom or adapting a small home bathroom.
Starting with these core measurements early in the planning process helps avoid costly changes later and results in a space that is genuinely usable for everyone who needs it.
Frequently Asked Questions
What is the minimum ADA bathroom size?
The ADA does not specify one fixed room size. Instead, it requires a 60-inch turning space, 32-inch doorway clearance, and specific clearances around each fixture, which together determine the minimum usable footprint.
How much space is required around a toilet?
A toilet needs at least 60 inches of clear width and 56 to 59 inches of depth in front, with the centerline positioned 16 to 18 inches from the side wall.
What is the ADA turning radius for a wheelchair?
ADA standards require a 60-inch diameter turning circle, or a T-shaped turning space with each arm at least 36 inches wide, where a full circle will not fit.
Do residential bathrooms need to be ADA compliant?
No. The ADA applies to public accommodations and commercial facilities, not private homes. Homeowners may choose to apply similar principles voluntarily for safety or aging-in-place needs.
Is a walk-in shower considered ADA compliant?
Only if it meets specific dimensions. A roll-in shower needs at least 30 by 60 inches with a curbless entry, while a transfer shower needs at least 36 by 36 inches with a fold-down seat.