There’s something deeply rewarding about growing new fiddle leaf figs from the plant you already own.
You can root cuttings in water and watch the roots develop right before your eyes, nestle them directly into soil for a more hands-off approach, or experiment with air layering to create mature plants faster.
We’ll walk through each propagation method with step-by-step instructions, practical tips that actually work, and troubleshooting advice for when things don’t go as planned.
Ready to multiply your collection and share these beauties with friends? Here’s everything you need to know about fiddle leaf fig propagation.
Getting Started: How Fiddle Leaf Fig Propagation Actually Works?
Propagation is simply creating new plants from cuttings of your existing fiddle leaf fig.
The process relies on stem cuttings because they contain nodes, those small bumps along the stem where roots and new growth emerge.
Without a node, your cutting won’t develop into a full plant. This is why one common myth needs clearing up: a single leaf stuck in water might look pretty, but it won’t grow roots or become a new plant.
You need that stem section with at least one node for successful propagation.
Understanding this foundation sets you up for better results with any method you choose.
Gather Your Propagation Essentials
Before you start taking cuttings, having the right tools on hand makes the process smoother and increases your success rate.
Here’s what you’ll need, depending on which propagation method you choose:
| Item | Purpose | Notes |
|---|---|---|
| Sharp, sterile pruning shears or knife | Making clean cuts on stems | Sterilize with rubbing alcohol to prevent infection |
| Clean glass containers or jars | Holding water propagation cuttings | Clear glass lets you monitor root development |
| Well-draining potting mix | Planting rooted cuttings or soil propagation | Look for mixes with perlite or bark for drainage |
| Pots with drainage holes | Preventing root rot | Essential for the soil propagation method |
| Rooting hormone (powder or gel) | Encouraging faster root growth | Optional but helpful for quicker results |
| Sphagnum moss | Air layering technique | Retains moisture around the rooting area |
| Plastic wrap or ties | Securing moss for air layering | Keeps humidity high during root development |
Method 1: How to Propagate a Fiddle Leaf Fig in Water?

Water propagation is the easiest way to start your fiddle leaf fig process. You get to watch roots develop through the glass, which makes it perfect for first-timers who want visual confirmation that things are working.
- Pros: You can monitor root growth daily and spot any issues early. No soil mess involved, and it’s satisfying to see progress.
- Cons: The process can take longer than soil propagation, and cuttings risk rotting if leaves touch the water or if water isn’t changed regularly.
Step 1: Select and Prepare Your Cutting
Look for a healthy stem section with two to four leaves attached and at least one visible node. Using sharp, sterilized shears, make your cut just below a leaf node at a 45-degree angle.
This angled cut increases the surface area for water absorption. Remove lower leaves to expose nodes; keep top leaves intact. These leaves photosynthesize and supply energy as the roots grow.
Step 2: Set Up Your Water Container
Fill a clean glass jar with filtered or room-temperature water. Tap water works if you let it sit out overnight to allow chlorine to dissipate. Place the cutting in the jar with exposed nodes submerged and leaves above water.
Position the jar in a spot with bright, indirect light, like near an east-facing window. Avoid direct sunlight, which can overheat the water and stress the cutting.
Step 3: Maintain and Monitor Growth
Change the water every three to five days to keep it fresh and prevent bacterial growth. Check that leaves remain above water and trim any that start yellowing.
Root development typically begins within 4 to 6 weeks, though some cuttings take longer. Be patient and consistent with water changes. Once the roots are several inches long and healthy with multiple branches, your cutting is ready for the next step.
Step 4: Transplant to Soil
When roots are at least 3 to 4 inches long with good branching, it’s time to move your cutting to soil. Fill a small pot with well-draining potting mix and create a hole for the roots.
Gently place the cutting in and fill around it, being careful not to damage the delicate new roots. Water lightly and keep the soil moist for the first few weeks as the plant adjusts. Gradually reduce watering as it adapts to its new home.
Tip: Use filtered or aged tap water and keep your cutting away from sunlight. If you notice cloudy water or any foul smell, change it immediately. Clear glass containers are ideal for monitoring root growth without disturbing cuts.
Method 2: How to Propagate a Fiddle Leaf Fig in Soil?
Soil propagation skips the water stage entirely, letting your cutting develop roots in its permanent growing medium.
This method often produces stronger, more robust root systems that adapt better to pot life from the start.
- Pros: Roots develop directly in soil, so there’s no transplant shock. The root system tends to be stronger and more established once the cutting takes hold.
- Cons: You can’t see root development happening, which means you’ll need to trust the process and watch for signs of growth above the soil line.
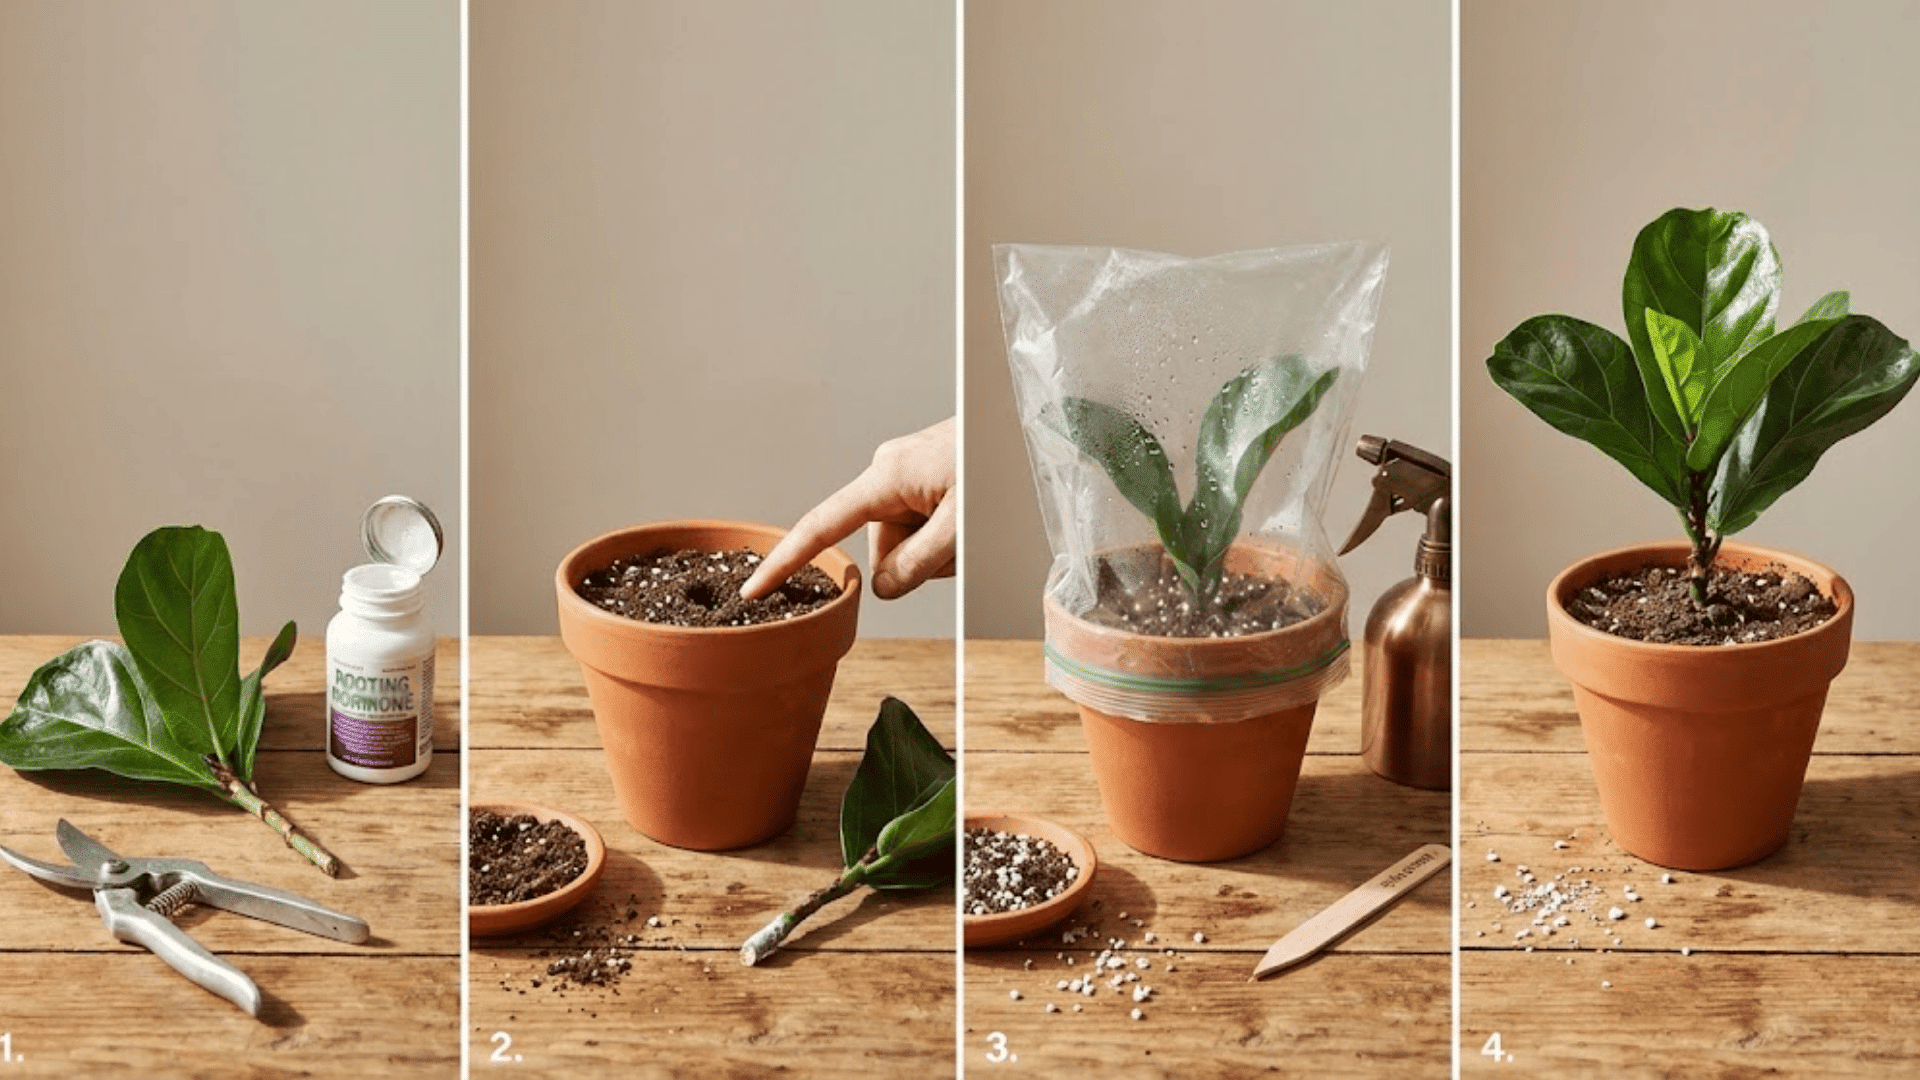
Step 1: Prepare Your Cutting
Select a healthy stem that’s 6 to 8 inches long with at least two to three leaves. Make a clean cut just below a node using sterilized shears. Remove any lower leaves so you have a bare stem section to plant.
Dip the cut end into rooting hormone powder or gel, coating about an inch of the stem. This step is optional but significantly improves your success rate by encouraging faster root development.
Step 2: Plant in Soil
Fill a small pot with well-draining potting mix and moisten it thoroughly. Create a hole about 1 to 2 inches deep using your finger or a pencil. Insert the cutting into the hole, ensuring at least one node is buried beneath soil.
Firm the soil gently around the stem to hold it upright. The cutting should feel stable but not packed too tightly, which could damage developing roots.
Step 3: Create a Humid Environment
Mist the soil surface and the leaves lightly with water. Cover the entire pot and cut with a clear plastic bag or humidity dome to trap moisture and create a mini greenhouse effect.
This high-humidity environment helps the cutting retain moisture while it develops roots. Place the setup in a warm location with bright, indirect light. Keep the soil consistently moist but not waterlogged by misting every few days.
Step 4: Monitor and Test for Roots
Check your cutting weekly for signs of new growth, like emerging leaves or upright posture. Roots typically form within 4 to 8 weeks, though timing varies. After about 6 weeks, give the cutting a very gentle tug.
If you feel resistance, roots have developed. Once established, gradually remove the plastic covering over several days to acclimate the plant to normal humidity levels. Then care for it like a mature fiddle leaf fig.
Tip: Choose a pot with drainage holes to prevent waterlogging, and remove the plastic cover for a few minutes daily to allow air circulation. If you see mold forming on the soil, increase ventilation and reduce misting frequency.
Method 3: How to Propagate a Fiddle Leaf Fig in Air Layering?

Air layering might sound complex, but it’s actually one of the most reliable propagation methods available.
The cutting stays attached to the parent plant while developing roots, which means it continues receiving nutrients and water throughout the rooting process.
- Pros: Very high success rate since the cutting remains connected to the parent plant. You can create a larger, more mature plant right from the start.
- Cons: Requires more materials and patience than other methods. The process takes longer, and you need to maintain moisture levels consistently for several weeks.
Step 1: Make Your Cut and Prepare the Stem
Choose a healthy, thick stem on your fiddle leaf fig, ideally one that’s semi-mature and firm. Using a clean, sharp knife, make a shallow upward cut just below a node, slicing about one-third into the stem.
The cut should be roughly 1 to 2 inches long. Insert a toothpick or a small piece of matchstick into the wound to keep it open. This prevents the cut from healing closed and encourages root development at the site.
Step 2: Apply Rooting Hormone and Moss
Lightly dust the exposed cut area with rooting hormone powder if you have it on hand. This step is optional but helps speed up root formation.
Take a handful of sphagnum moss, soak it thoroughly in water, then squeeze out the excess moisture until it’s damp but not dripping. Pack moist moss around the cut, covering it with a 2-3 inch layer.
Step 3: Wrap and Secure
Wrap clear plastic wrap around the moss ball several times to create a sealed pocket that holds moisture in. The plastic should be transparent so you can monitor root development without unwrapping.
Secure both the top and bottom edges with twist ties, rubber bands, or plant tape to keep everything in place. Make sure the seal is tight enough to maintain humidity but not so tight that it cuts into the stem.
Step 4: Monitor and Separate
Check the moss weekly to ensure it stays moist. If it looks dry, carefully unwrap one end and add water with a spray bottle, then reseal. Roots typically appear within 6 to 8 weeks, though some stems take longer.
Once you see healthy white roots growing through the moss, use sterilized shears to cut the stem just below the new root ball. Plant your new fiddle leaf fig in a pot with well-draining soil, keeping the moss intact around the roots.
Tip: Keep the moss consistently moist but not soggy throughout the process. Clear plastic wrap lets you monitor root growth without disturbance, and thicker stems yield more established plants after separation.
Best Conditions for Propagating Fiddle Leaf Fig
Creating the right environment can make or break your propagation success. Fiddle leaf fig cuttings need specific conditions to focus their energy on root development rather than survival.
- Warm and stable temperatures between 65-75°F help cuttings root faster and prevent stress that can stall growth or cause rot.
- Bright, indirect light gives cuttings the energy they need without scorching delicate new tissue or overheating water and soil.
- Higher humidity levels around 50-60% keep leaves from drying out while roots develop, so use a humidifier or plastic covering.
- Protection from drafts and temperature fluctuations ensures consistent conditions that encourage steady root growth.
- No direct sunlight on your cuttings, as it can overheat containers, damage tender leaves, and stress the plant during its vulnerable rooting phase.
Getting these conditions right from the start means healthier cuttings and faster root development. Your fiddle leaf fig will thank you with strong growth once it establishes itself.
When Things Don’t Go as Planned
Propagation doesn’t always go smoothly, but most issues have simple fixes.
Here’s how to identify what’s wrong and get your cuttings back on track.
| Issue | Possible Cause | Fix |
|---|---|---|
| No roots after several weeks | Node not submerged or planted properly | Recheck the cutting position and ensure the node has water or soil contact |
| Stem rotting or mushy | Too much water or submerged leaves | Remove affected leaves, change water immediately, or repot in fresh soil |
| Mold growing under plastic | Excess humidity with poor air circulation | Remove cover daily for ventilation and reduce misting frequency |
| Leaves turning yellow | Insufficient light or stress from poor conditions | Relocate to bright, indirect light and check temperature stability |
| Cutting drooping or wilting | Low humidity or inconsistent watering | Increase humidity with a plastic cover and maintain moisture levels |
Most propagation problems catch you early enough to correct. Stay observant during those first few weeks, and you’ll spot issues before they become serious.
Fiddle Leaf Fig Propagation Timeline: What to Expect?
Understanding the typical timeline helps you stay patient and avoid checking your cuttings too often.
Here’s what happens during each stage of the rooting process.
- Weeks 1-2: The cutting focuses on healing the wound and adjusting to its new environment, so don’t expect visible changes yet.
- Weeks 3-6: Root development begins below the surface in both water and soil propagation, though you’ll only see it in clear containers.
- Weeks 6-8 and beyond: Cuttings become ready for transplanting once roots are several inches long with healthy branching.
- Air layering takes 6-8+ weeks for visible roots to form through the moss, requiring more patience than other methods.
- Some cuttings naturally take longer based on temperature, light, and the specific stem you chose, so variations are completely normal.
Remember that propagation isn’t a race. Your fiddle leaf fig will develop roots on its own schedule, and rushing the process by transplanting too early can set you back further than simply waiting.
Final Thoughts
Now you have everything you need to successfully multiply your fiddle leaf fig collection.
Each method has its own rewards and lessons, from monitoring roots in clear glass to planting directly in soil or trying the reliable air layering technique.
Propagating fiddle leaf figs takes time and attention, but seeing that first root or new leaf makes it worthwhile.
Start with one cutting and see which approach feels right for you. Have questions or want to share your propagation wins? Drop a comment below and let’s grow together.