There’s something magical about watching a tiny cactus cutting grow into a thriving plant of its own.
Propagating cacti lets you expand your collection endlessly while saving money and sharing your favorites with fellow plant lovers. It’s surprisingly simple and deeply rewarding.
Cacti offer several gentle propagation methods, each with its own charm, and this guide will walk you through offsets, cuttings, or seeds.
Your sunny windowsill is about to get a lot more interesting, and you’ll wonder why you didn’t start sooner.
Learning how easy it is to multiply your spiky companions means you can create the desert oasis you’ve been dreaming of, one beautiful plant at a time.
What is Cactus Propagation?
Cactus propagation is the art of creating new plants from existing ones, and it’s one of the most satisfying skills any plant parent can master.
Unlike many houseplants that demand precision and patience, cacti are remarkably forgiving. Their natural resilience and ability to store water make them incredibly adaptable to the propagation process.
You can grow new cacti using offsets (those adorable baby plants that sprout around the base), stem cuttings, or even individual pads.
Each method taps into the cactus’s innate ability to regenerate and thrive. It’s nature’s way of making plant parenthood accessible, rewarding, and consistently enjoyable for everyone.
When is the Best Time to Propagate a Cactus?
Timing can make all the difference when propagating cacti, and spring through summer is your golden window.
During these warmer months, cacti enter their active growing phase, which means faster root development and healthier establishment.
The increased daylight and natural warmth encourage cuttings and offsets to callus over quickly and push out new roots with vigor.
While you technically can propagate cacti year-round indoors, choosing the right season sets your new plants up for success.
Cooler months slow growth considerably, leaving cuttings vulnerable to rot before they can establish themselves. Work with nature’s rhythm, and your propagation efforts will flourish effortlessly.
Propagating Cactus: Tools & Materials You’ll Need
Getting your setup right before you begin makes cactus propagation smooth and stress-free. Having the proper tools on hand protects both you and your plants, while quality materials ensure your cuttings root successfully.
Here’s everything you’ll need to get started:
| Tool/Material | Purpose |
|---|---|
| Sharp knife or shears | Clean cuts prevent damage and infection |
| Gloves and tongs | Safe handling of spiny cacti |
| Well-draining cactus soil | Prevents rot and supports healthy roots |
| Pots with drainage holes | Essential for excess water removal |
| Rooting hormone (optional) | Speeds up root development |
| Perlite or pumice (optional) | Improves soil drainage and aeration |
How to Propagate a Cactus: Four Methods That Actually Work
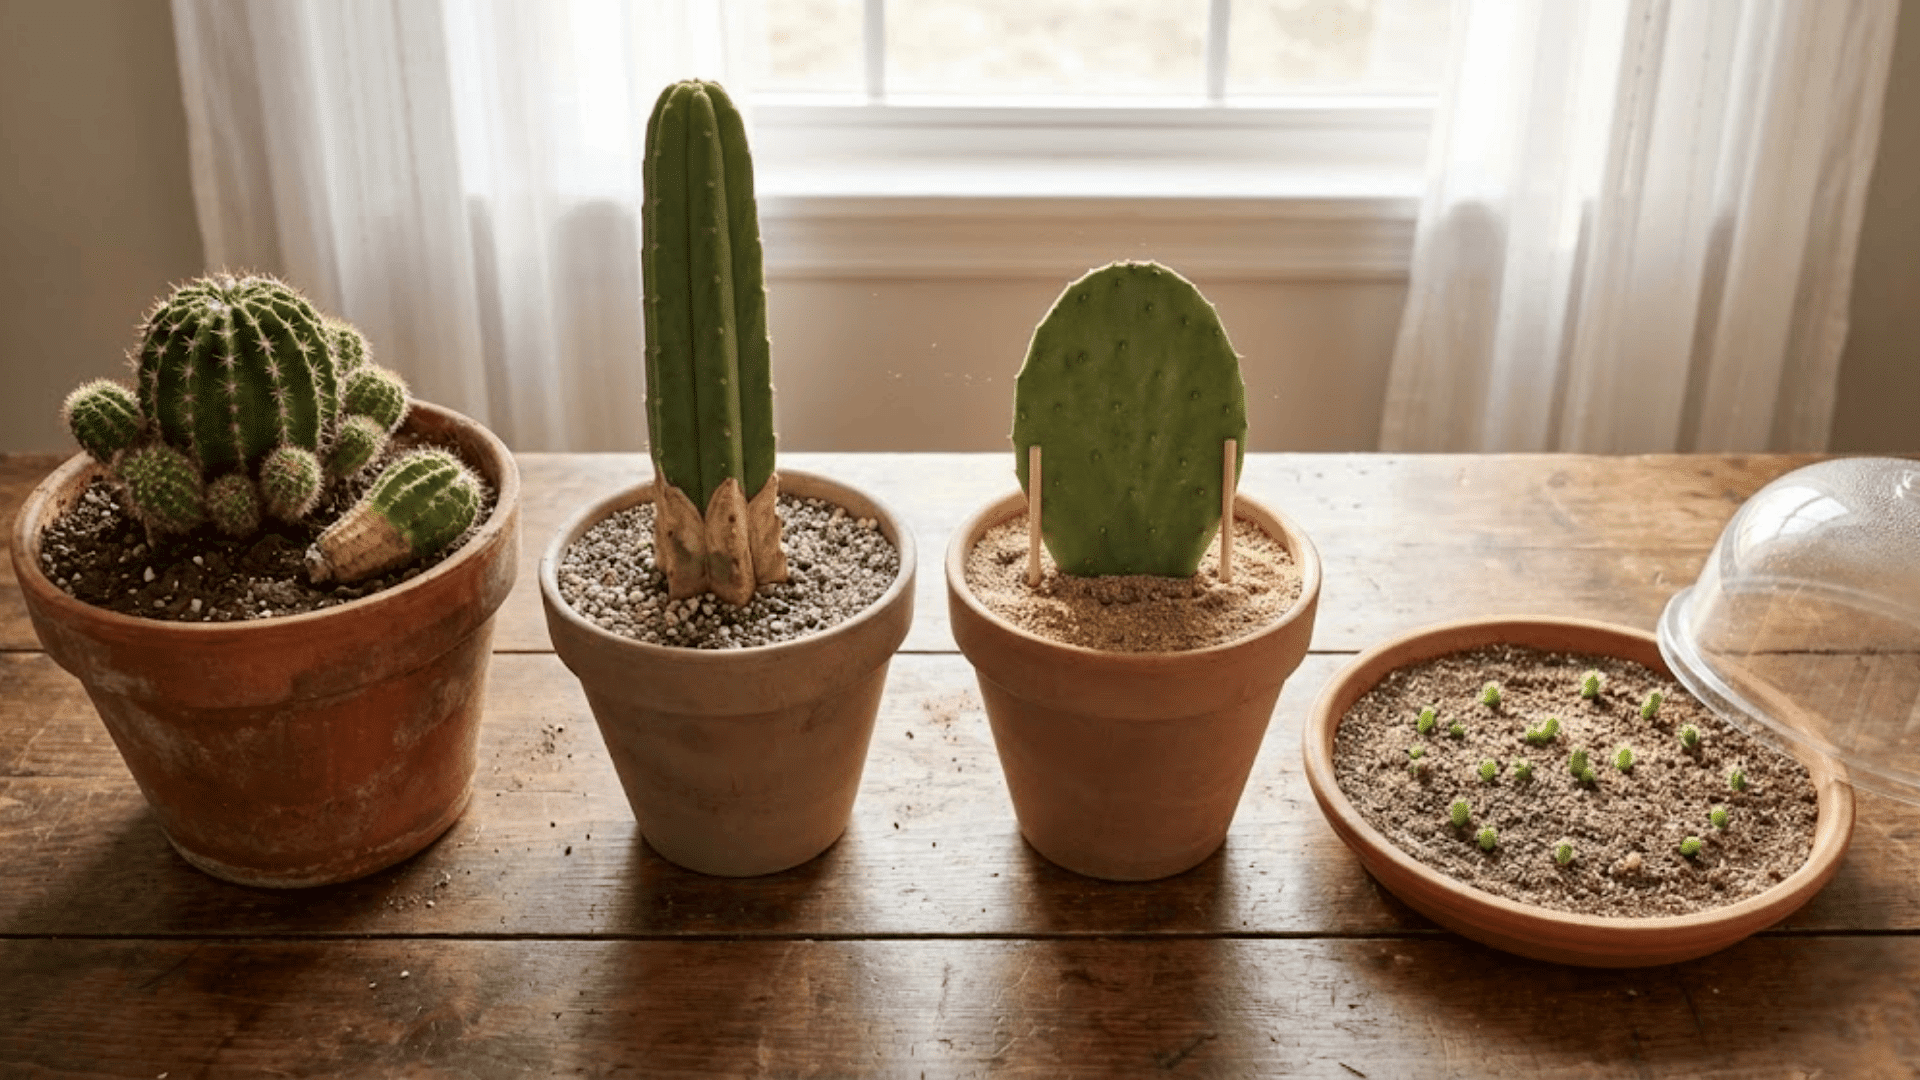
Cacti offer multiple propagation pathways, each suited to different plant types and preferences. Choosing the right method depends on your cactus variety and what feels most comfortable for you.
1. Propagating From Offsets (Pups)
Offsets, affectionately called pups, are those charming baby cacti that naturally grow around the base of mature plants.
Many popular succulents like aloe, echeveria, and barrel cacti produce mini clones easily, making this the simplest propagation method for beginners. The pups have a head start, so your success rate is high.
- Step 1: Identify healthy offsets that are at least one-third the size of the parent plant.
- Step 2: Gently twist the pup away or use a clean knife to separate it at the base.
- Step 3: Allow the cut surface to callus over in a dry location for three to seven days.
- Step 4: Plant in dry cactus soil and resist watering for the first week.
- Step 5: Begin light watering once roots establish, usually after two to three weeks.
This method feels like nature doing most of the work while you simply guide the process along.
2. Stem Cuttings (Most Common Method)
Stem cuttings work beautifully for columnar cacti like San Pedro and segmented varieties such as Christmas cactus or prickly pear.
This versatile technique lets you multiply almost any cactus with an upright or branching growth habit, making it the go-to method for most plant parents.
- Step 1: Select a healthy segment that’s at least four inches long and free of blemishes.
- Step 2: Make a clean cut with sterilized shears at a slight angle.
- Step 3: Let the cutting callus completely in a shaded, dry spot for several days to weeks.
- Step 4: Plant the callused end in well-draining cactus mix, burying about an inch deep.
- Step 5: Water sparingly after two weeks, then gradually increase as roots develop.
Patience during the callusing phase prevents rot and sets your cutting up for strong, healthy growth.
3. Pad Propagation
Pad-type cacti, especially prickly pear varieties, make propagation almost too easy with their flat, oval segments.
Each pad carries the potential to become a full plant, and they root with impressive enthusiasm when given the right conditions.
- Step 1: Choose a mature, healthy pad and cut it cleanly at the joint.
- Step 2: Allow the cut end to dry and callus for one to two weeks.
- Step 3: Place the callused end in well-draining soil, burying just enough to keep it upright.
- Step 4: Support with stakes if needed until the roots anchor the pad firmly.
- Step 5: Water lightly after roots appear, typically within three to four weeks.
Watching a single pad grow into a sprawling cactus is incredibly satisfying and almost foolproof.
4. Seed Propagation
Growing cacti from seed requires more patience than other methods, but it offers the thrill of nurturing plants from their very beginning.
This approach works best when you want rare varieties or simply enjoy the meditative process of watching tiny seedlings emerge and grow.
- Step 1: Sow seeds on the surface of moist cactus soil in early spring.
- Step 2: Cover with a humidity dome or plastic wrap to maintain consistent moisture.
- Step 3: Keep soil temperature between seventy and eighty degrees for optimal germination.
- Step 4: Provide bright, indirect light and wait patiently for two weeks to several months.
- Step 5: Remove the dome once seedlings appear and water with a gentle mist.
Seed propagation connects you to the full life cycle of your cacti in a uniquely rewarding way.
5. Advanced Methods
For those ready to experiment beyond the basics, grafting and water propagation offer intriguing possibilities that push your cactus skills into new territory.
These techniques require more attention but reward you with unique results.
| Method | What It Is | Best For | Key Consideration |
|---|---|---|---|
| Grafting | Joining two cactus species together | Rare or slow-growing varieties | Requires precision and clean alignment |
| Water Propagation | Rooting cuttings in water first | Visible root development | Monitor closely to prevent rot |
These advanced approaches reward curiosity and experimentation with truly one-of-a-kind results.
Detailed Step-by-Step Propagation Walkthrough
Getting the details right can mean the difference between thriving new cacti and disappointing failures.
This section breaks down the critical phases of propagation, from preparing your cutting to nurturing those first delicate roots, so you can approach each step with confidence and clarity.
Preparing the Cutting and Callusing
Before your cactus cutting can root successfully, it needs proper preparation and time to seal its wound. This crucial phase protects against infection and rot, setting the foundation for healthy growth.
- Step 1: Sterilize your knife or shears with rubbing alcohol to prevent bacterial or fungal infection.
- Step 2: Make a clean cut at a slight angle to increase the surface area for rooting.
- Step 3: Aim for cuttings that are four to six inches long for optimal results.
- Step 4: Place the cutting in a dry, shaded spot with good air circulation.
- Step 5: Allow three to seven days for small cuttings or up to two weeks for larger ones to form a dry, hardened callus.
Rushing this process invites rot, while patience here pays off with strong, healthy roots later.
Planting and Aftercare
Once your cutting has callused properly, it’s ready for soil and the gentle care that encourages root development. Getting the environment right during these early weeks determines how quickly your new cactus establishes itself.
- Step 1: Use a well-draining cactus mix with perlite or pumice for optimal aeration.
- Step 2: Choose a pot with drainage holes and plant the cutting about one inch deep.
- Step 3: Wait one to two weeks before the first light watering to avoid rot.
- Step 4: Place in bright, indirect light and gradually introduce more sun as roots develop.
- Step 5: Watch for new growth or firmness in the cutting as signs of successful rooting.
Your new cactus will reward your careful attention with steady growth and eventual independence.
Common Cactus Propagation Problems & How to Fix Them
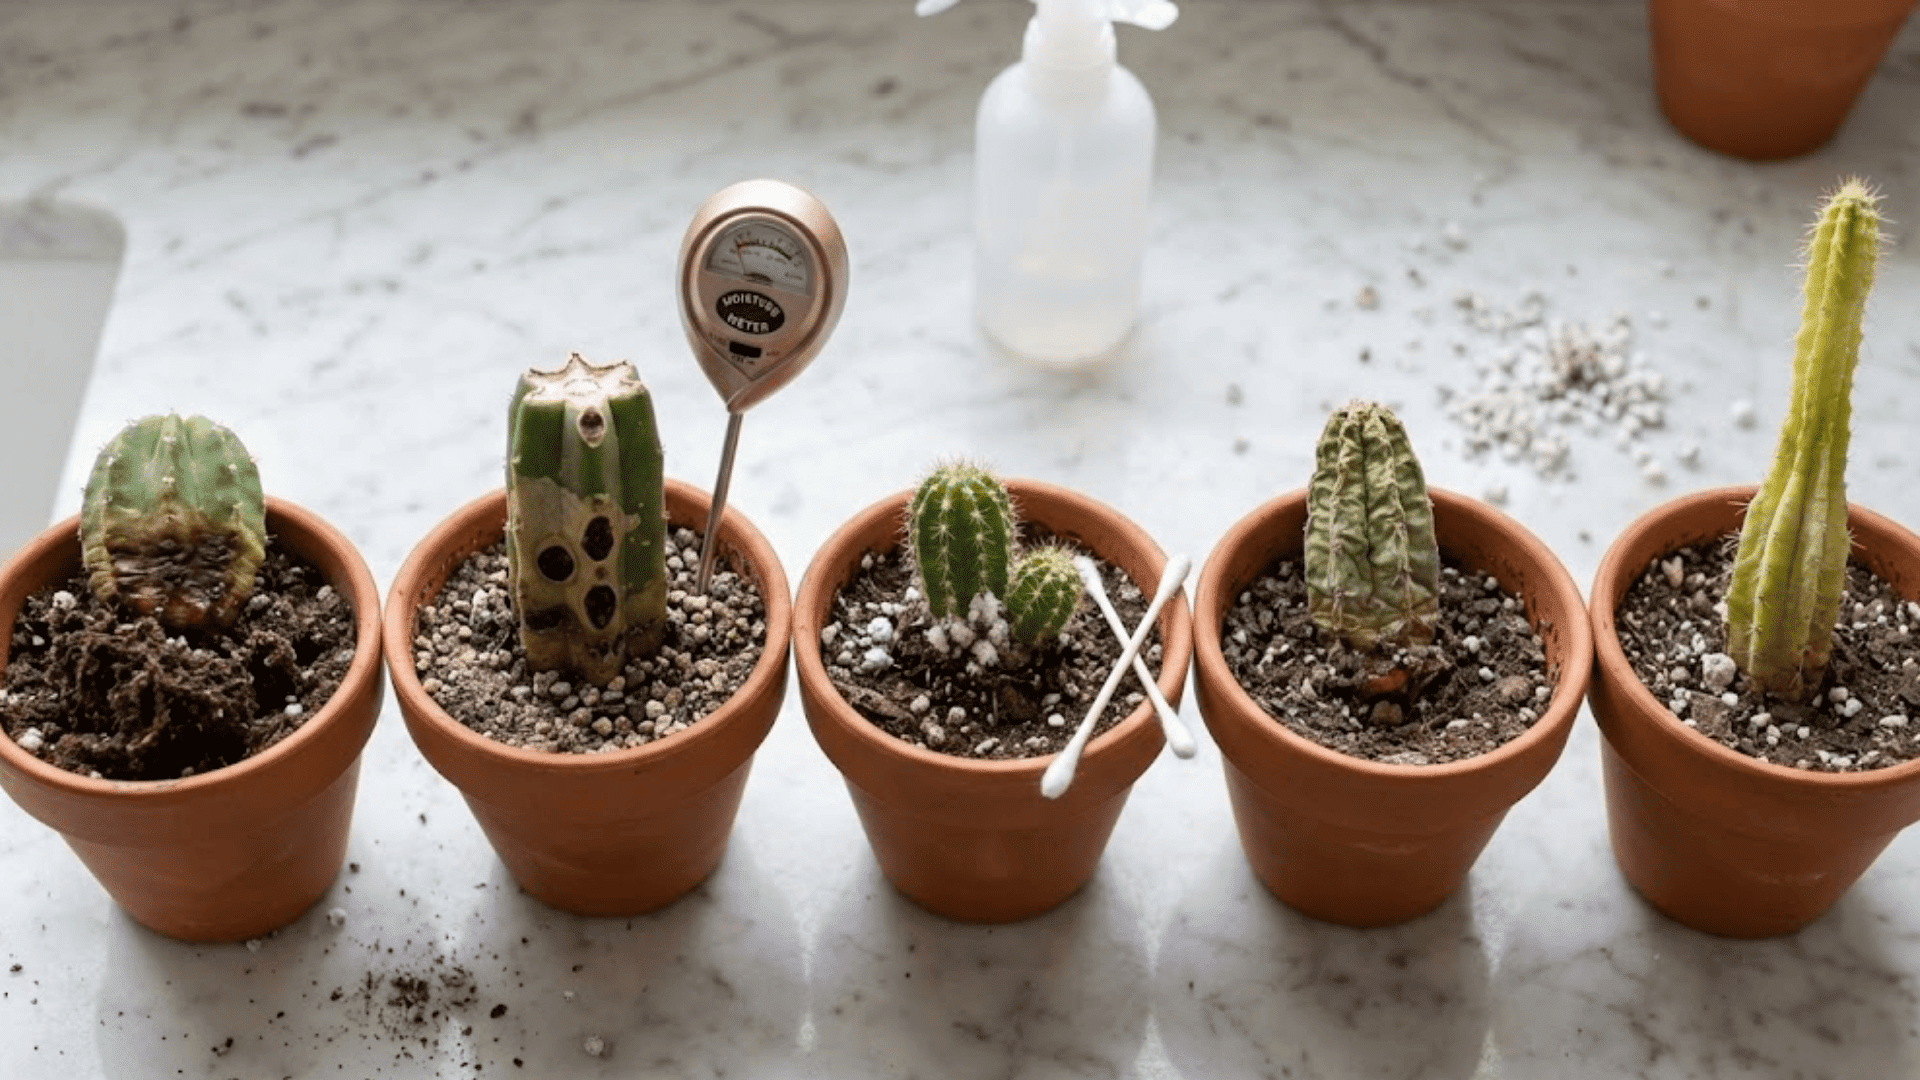
Even with careful attention, cactus propagation can hit a few bumps along the way. Knowing how to spot and solve these common issues keeps your cuttings on track toward healthy growth.
Problem 1: Cuttings or Offsets Fail to Root
Solution: This happens if the cutting isn’t callused enough before planting, making it vulnerable to rot. Overwatering early on creates a damp environment that promotes fungi and bacteria before roots establish.
Problem 2: Rot Sets In Despite Proper Callusing
Solution: Even callused cuttings can rot if the soil stays too moist or lacks proper drainage. Switch to a grittier mix with more perlite, water less often, and ensure your pot has drainage holes to prevent water pooling.
Problem 3: Pests Appear on New Cuttings
Solution: Mealybugs and scale insects target tender new growth and weaken propagating cacti. Wipe them away with rubbing alcohol on a cotton swab and isolate affected plants to prevent spreading.
Problem 4: Cutting Shrivels and Wrinkles
Solution: Mild shriveling during callusing is normal, but excessive wrinkling indicates dehydration. Water lightly, keep out of direct hot sun and dry air, then monitor for improvement.
Problem 5: New Growth Appears Pale or Etiolated
Solution: Insufficient light causes pale, elongated growth that weakens your new cactus. Move your cutting to a brighter spot with indirect sunlight and rotate regularly for even, compact development.
How to Propagate Cactus: Tips for Higher Success Rates
Small adjustments to your propagation process can dramatically improve your results and save you from unnecessary setbacks.
These tried-and-true tips come straight from experienced cactus growers who’ve learned what truly makes a difference.
- Always propagate during spring or summer when cacti are in active growth mode for faster rooting.
- Keep your workspace and tools dry, as moisture during callusing invites rot before roots even form.
- Apply rooting hormone to the cut end of tricky or slow-growing species to speed up root development.
- Resist the urge to check for roots too often, as disturbing the cutting can damage fragile new growth.
- Practice patience and wait several weeks for roots to establish, as rushing leads to disappointment.
Mastering these fundamentals turns propagation from a gamble into a reliable skill you can count on every time.
After Your Cactus Has Rooted
Once roots have established, your new cactus needs gentle guidance into its independent life. Resist repotting for at least 6 to 8 weeks to let roots anchor firmly in their current home.
When the time comes, choose a pot only slightly larger than the root system, as oversized containers hold too much moisture. Begin watering more regularly but still sparingly, letting the soil dry completely between sessions.
After 3 months of steady growth, introduce a diluted cactus fertilizer at half strength during spring and summer.
This patient, gradual transition helps your propagated cactus build strength without the shock of sudden changes to its care routine.
Wrapping Up
You now have everything you need to propagate cacti with confidence and care.
Each method we’ve covered opens up new possibilities for growing your collection, sharing plants with friends, and deepening your connection to these resilient desert beauties.
The process might feel tentative at first, but soon you’ll find yourself naturally knowing when a cutting has callused enough or when roots are ready to establish.
Your windowsill is about to become a thriving nursery of spiky companions. Have questions or tips of your own on how to propagate a cactus?
Share them in the comments below, and let’s grow together.