There’s something utterly enchanting about creating your own miniature world where imagination blooms alongside tiny toadstools and pebble pathways.
Learning how to make a fairy garden turns any corner of your space into a whimsical retreat that sparks joy every time you glimpse it.
Crafting this magical hideaway with little ones eager to house their favorite sprites, or designing a serene escape for yourself, fairy gardens offer that perfect blend of creativity and calm.
These petite landscapes work beautifully nestled on a sunny windowsill or tucked into a garden corner, inviting you to slow down, play, and bring a touch of storybook wonder into everyday life.
What is a Fairy Garden?
A fairy garden is a tiny, magical landscape designed to look like a home for fairies and woodland creatures. Think of it as a living dollhouse for nature lovers.
These enchanting mini worlds typically include adorable little houses, winding pathways made from pebbles or bark, lush moss carpets, and delicate plants that stay small and manageable.
You’ll often find charming accessories like miniature benches, lanterns, or tiny garden tools scattered throughout.
What makes fairy gardens so special is how easily customizable they are. You can create a cozy woodland cottage with mushrooms and ferns, a breezy beach theme with shells and succulents, or any dreamy setting you desire.
Benefits of Making a Fairy Garden
Creating a fairy garden isn’t just about the adorable end result. It’s a project that brings genuine joy and practical perks to everyone involved.
Here’s why it’s worth exploring:
- Encourages creative thinking and imaginative play, turning quiet moments into storytelling magic for kids and adults alike.
- Fits any budget with simple materials you might already have at home.
- Adapts to any space from sprawling backyards to tiny apartment windowsills.
- Perfect for giving thrifted finds and recycled treasures a magical second life.
- Offers a calming, hands-on activity that helps you unwind and reconnect with nature.
Beyond the creative satisfaction, you’re building a little sanctuary that keeps giving back every time you tend to it or simply pause to admire your handiwork.
Essential Supplies for Your Fairy Garden
Before you start building your miniature wonderland, gather your supplies. This checklist covers everything from the basics to those special touches that make your fairy garden uniquely yours.
| Category | What You’ll Need |
|---|---|
| Container | Pots, planters, wheelbarrows, teacups, wooden crates, or shallow bowls |
| Base & Soil | Good quality potting soil with proper drainage |
| Plants | Moss, succulents, creeping thyme, miniature ferns, baby tears |
| Hardscape | Pebbles, stones, sand, bark pieces, twigs |
| Structures | Fairy houses, miniature doors, tiny bridges, fences |
| Accessories | Miniature furniture, garden tools, figurines, lanterns, and signs |
| Tools | Small trowel, glue gun, paintbrush, scissors |
| Optional Extras | Solar fairy lights, miniature ponds, decorative moss, tiny stepping stones |
Start with the essentials and add decorative pieces as you go. Half the fun is finding charming little treasures at craft stores or creating your own handmade touches.
Step-by-Step: How to Make a Fairy Garden?
Ready to bring your fairy garden to life? Follow these simple steps to create an enchanting miniature world.
We’ll walk you through everything from decorating tiny houses to arranging plants and accessories for that perfect storybook look.
Step 1: Paint and Decorate Your Fairy Houses

Start by turning small terracotta pots into adorable fairy homes. Paint the pot base in bright colors like yellow or red, and use a clay saucer as the roof in a contrasting shade.
Add whimsical details with paint pens or markers, creating polka dots for a toadstool effect. Once dry, hot glue felt cutouts for doors and windows, plus any other charming details like hearts or tiny wreaths.
Let everything dry completely before moving to the next step.
Step 2: Create Miniature Accessories and Fencing
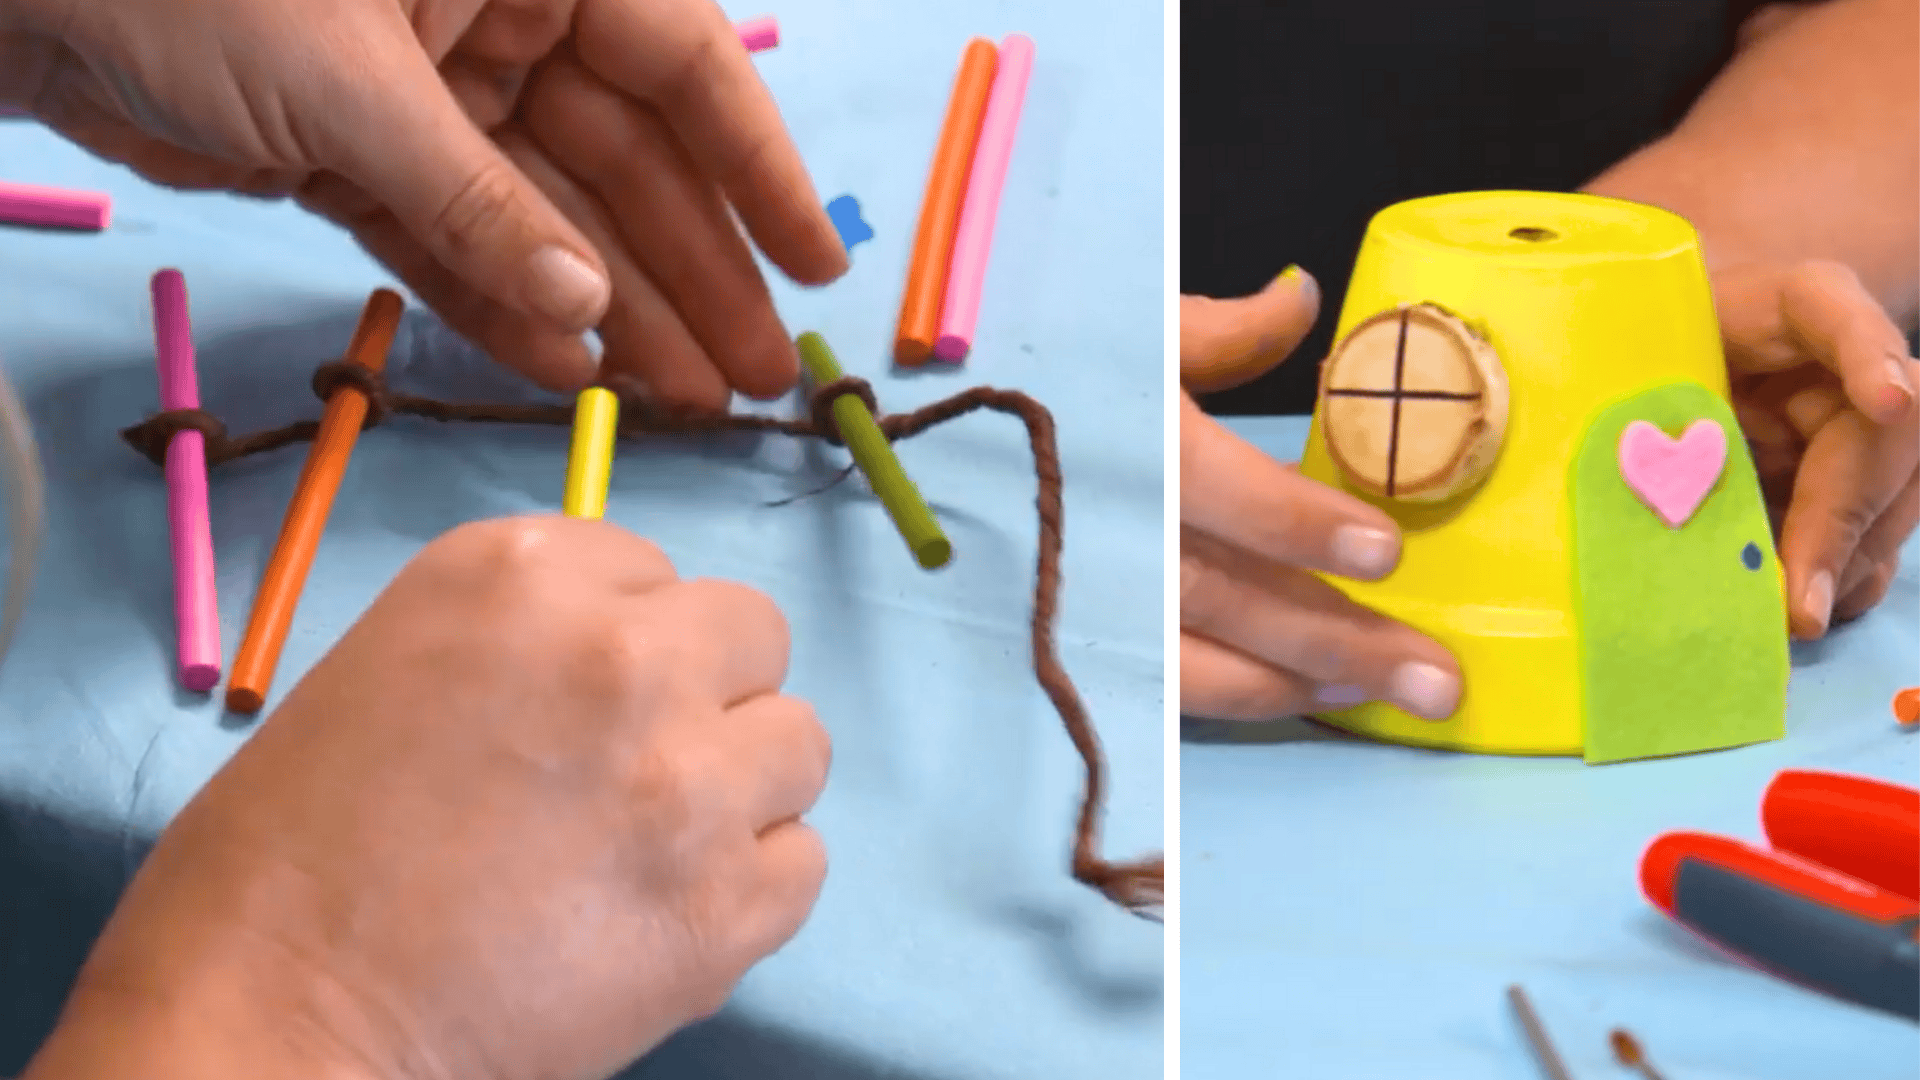
Get creative with craft supplies you already have at home. Build a tiny fence using wooden dowels or popsicle sticks tied together with floral wire or string, keeping the bottom pieces long so they stick into the soil.
Make pathways using small pebbles or create stepping stones from painted rocks. You can also craft benches from twigs, signs from toothpicks, or repurpose old toy figurines.
These handmade touches add personality and make your garden uniquely yours.
Step 3: Prepare Your Container and Add Soil
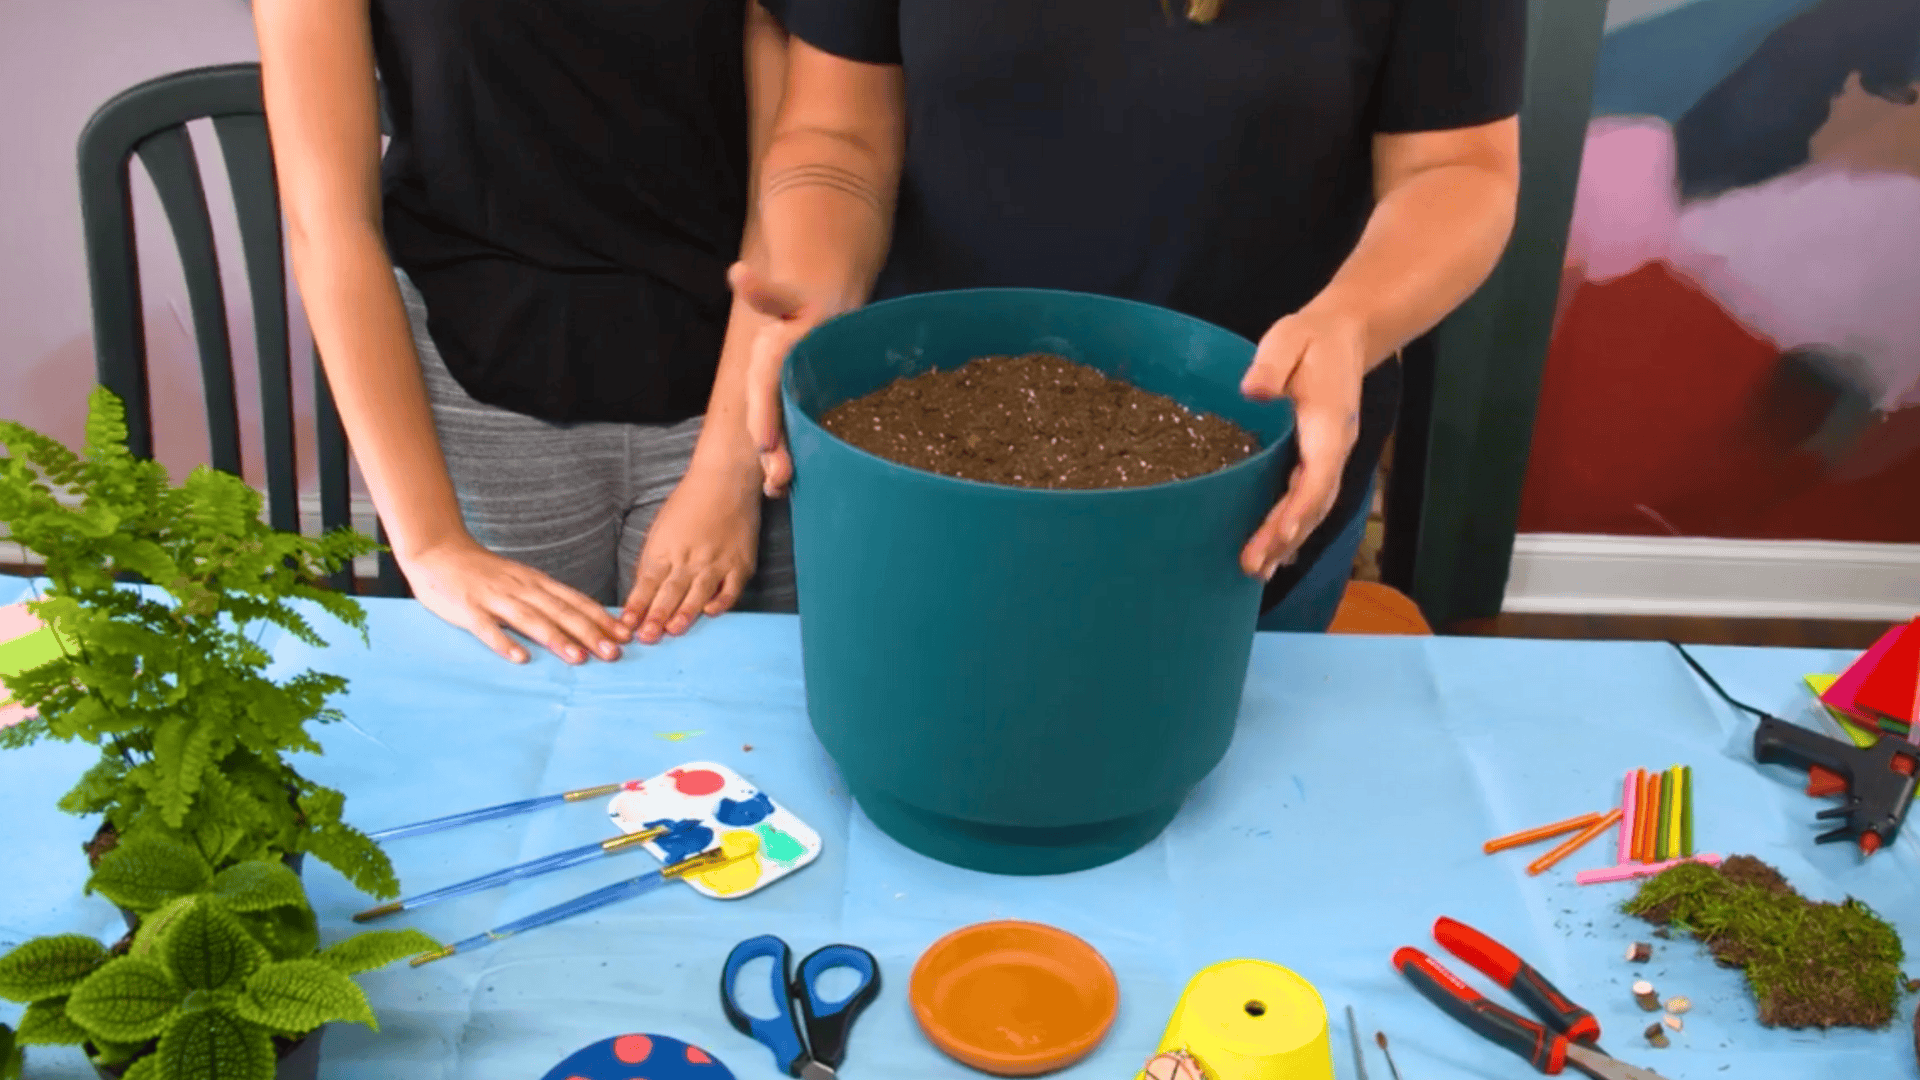
Choose your container, making sure it has proper drainage, or add a layer of gravel at the bottom. Fill it about three-quarters full with quality potting soil, leaving enough room for plants and decorations.
Pat the soil down gently to remove air pockets, but keep it loose enough for roots to grow.
If you’re using an existing planted container like an herb garden, simply clear a small area in the front for your fairy house and accessories.
Step 4: Plant Your Greenery Strategically
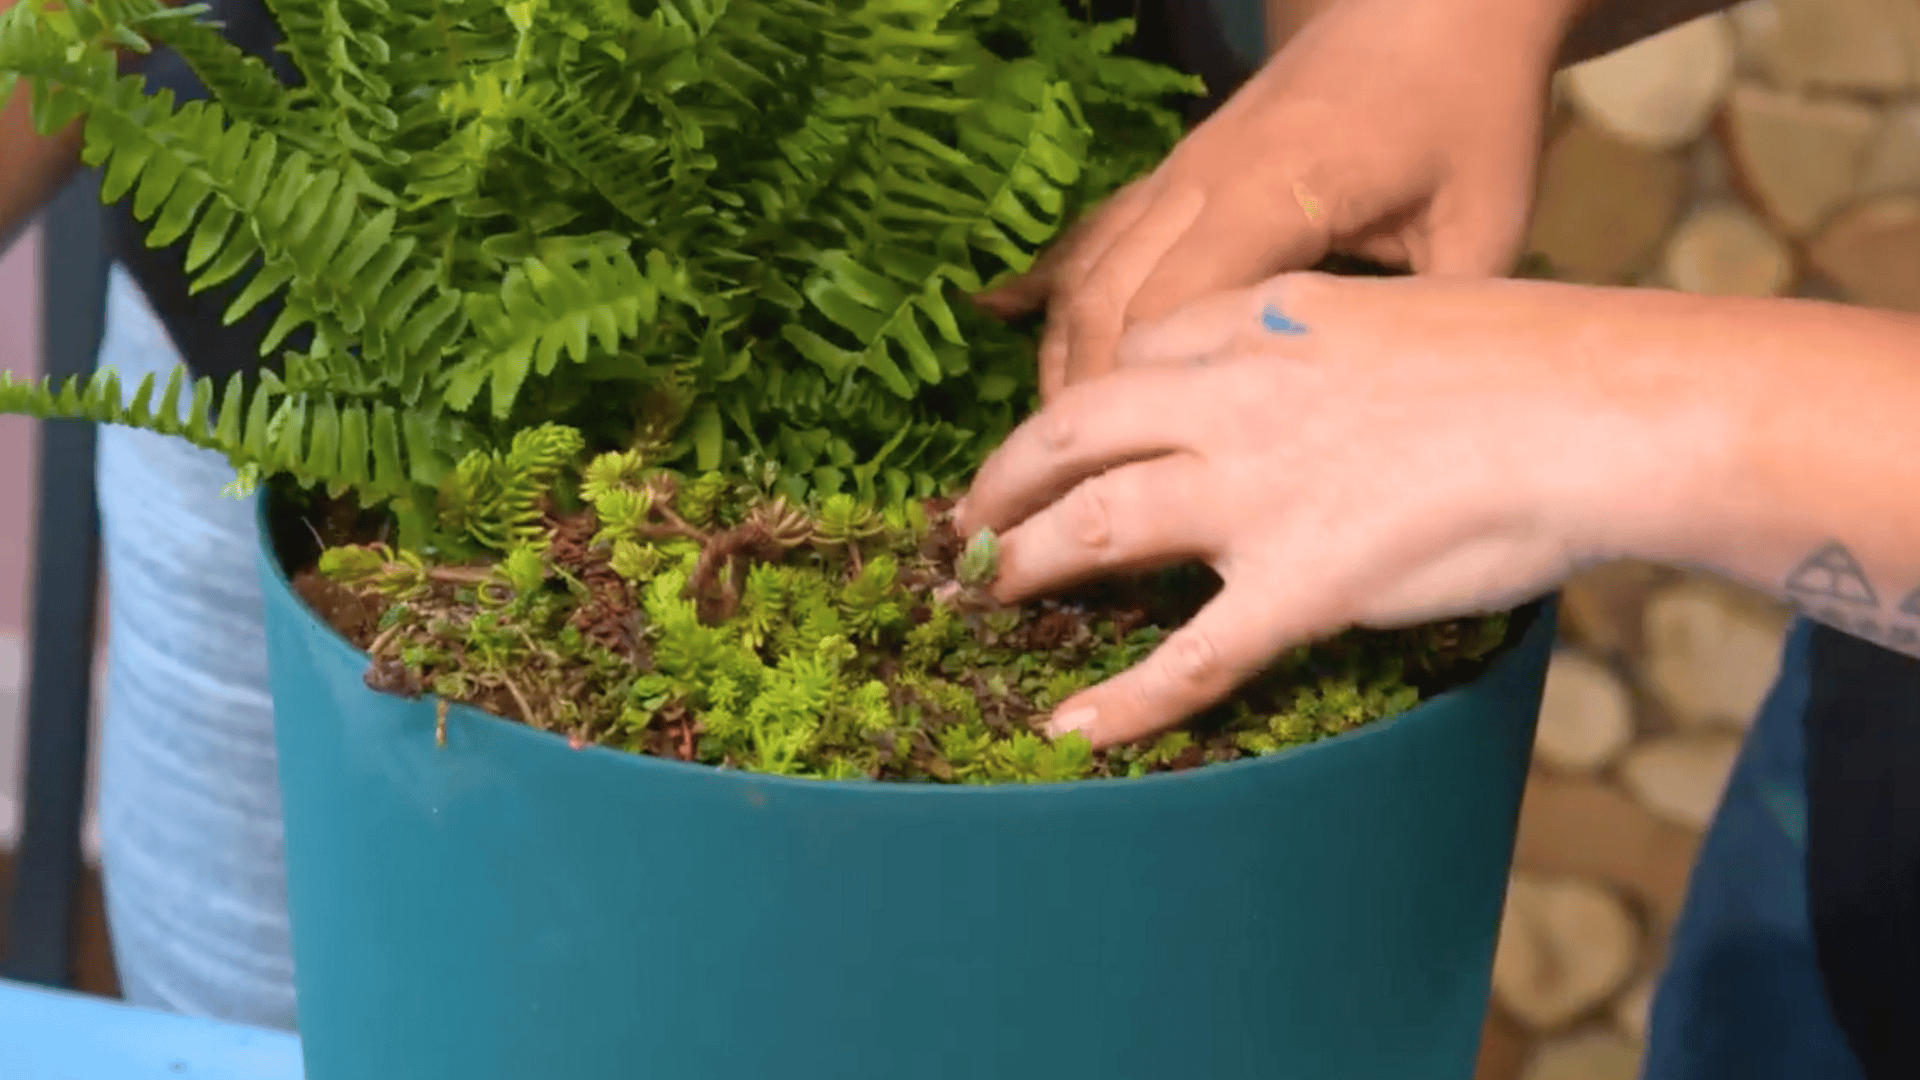
Position taller plants like ferns and small shrubs toward the back of your container to create depth and a backdrop. Leave the front area open for your fairy house and pathways.
Add ground cover plants like moss, baby tears, or creeping thyme to fill in bare spots and create a lush carpet effect. Gently press soil around plant roots and water lightly.
Remember to choose slow-growing varieties that will maintain their miniature scale over time.
Step 5: Arrange Your Fairy House and Final Touches
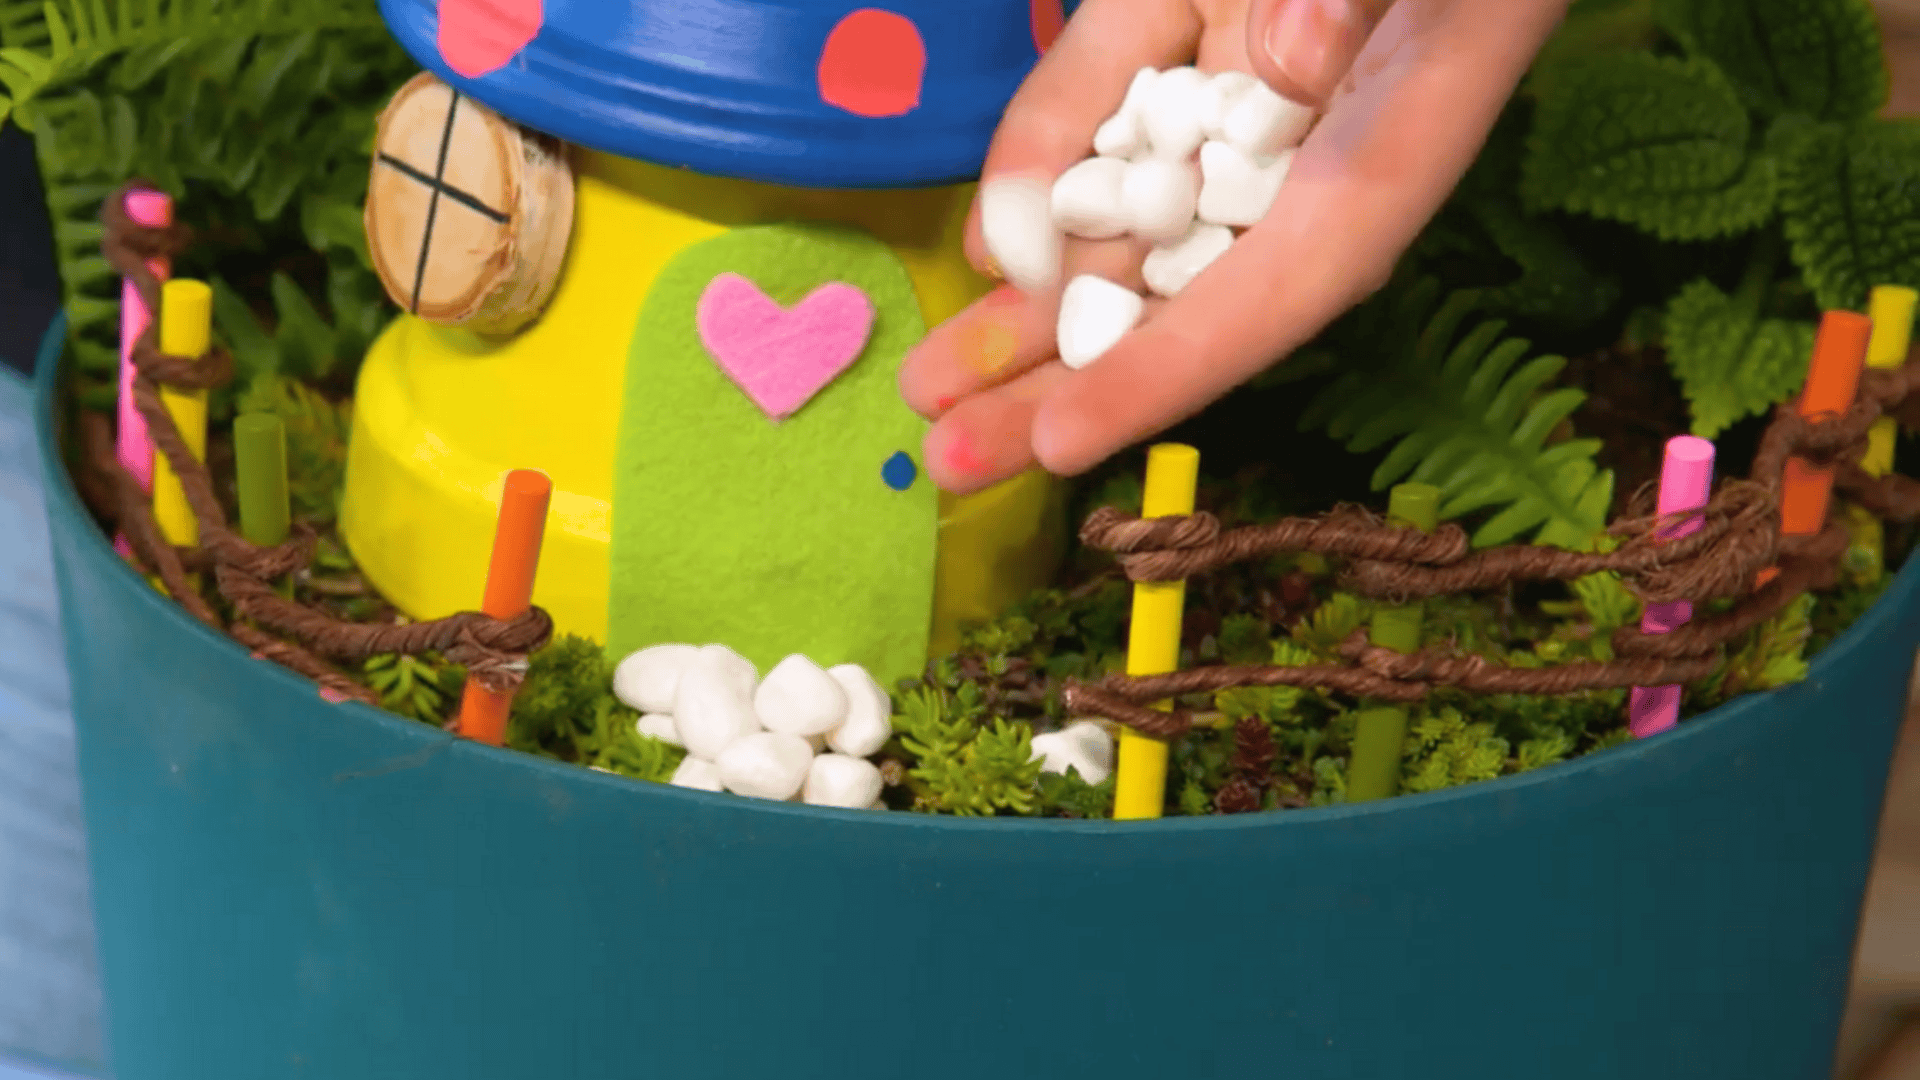
Place your decorated fairy house in the front area, pressing it gently into the soil. Position your fence nearby and create a pebble pathway leading to the door.
Layer in your other accessories like figurines, tiny furniture, and decorative elements, being careful not to overcrowd the space. Tuck moss around the base of structures for a natural, lived-in look.
Add finishing touches like fairy lights or a mirror pond to complete your magical miniature world.
Video Walkthrough: See How Experts Do It
For more information, check out this video tutorial by Lowe’s Home Improvement.
How to Make Fairy Garden Accessories?
The magic of a fairy garden often lives in the tiniest details. Crafting your own accessories not only saves money but gives your garden that one-of-a-kind charm store-bought pieces can’t match.
Start with a mini picnic table using popsicle sticks glued together in a classic design, painted in soft hues, or left natural.
For whimsical toadstools, mold air-dry clay into mushroom shapes with spotted caps, or take the easier route and paint rounded rocks with cheerful polka dots.
Create a sweet mailbox from a small wooden block mounted on a twig post. Finish with an adorable fairy swing by tying twine between two branches and gluing a flat twig as the seat.
These handmade touches tell a story all their own.
Fun DIY Fairy Garden Ideas for Inspiration
Looking for fresh ways to style your fairy garden? These creative setups offer something special for every space and skill level, from tiny teacup gardens to glowing nighttime displays.
1. Teacup Fairy Garden
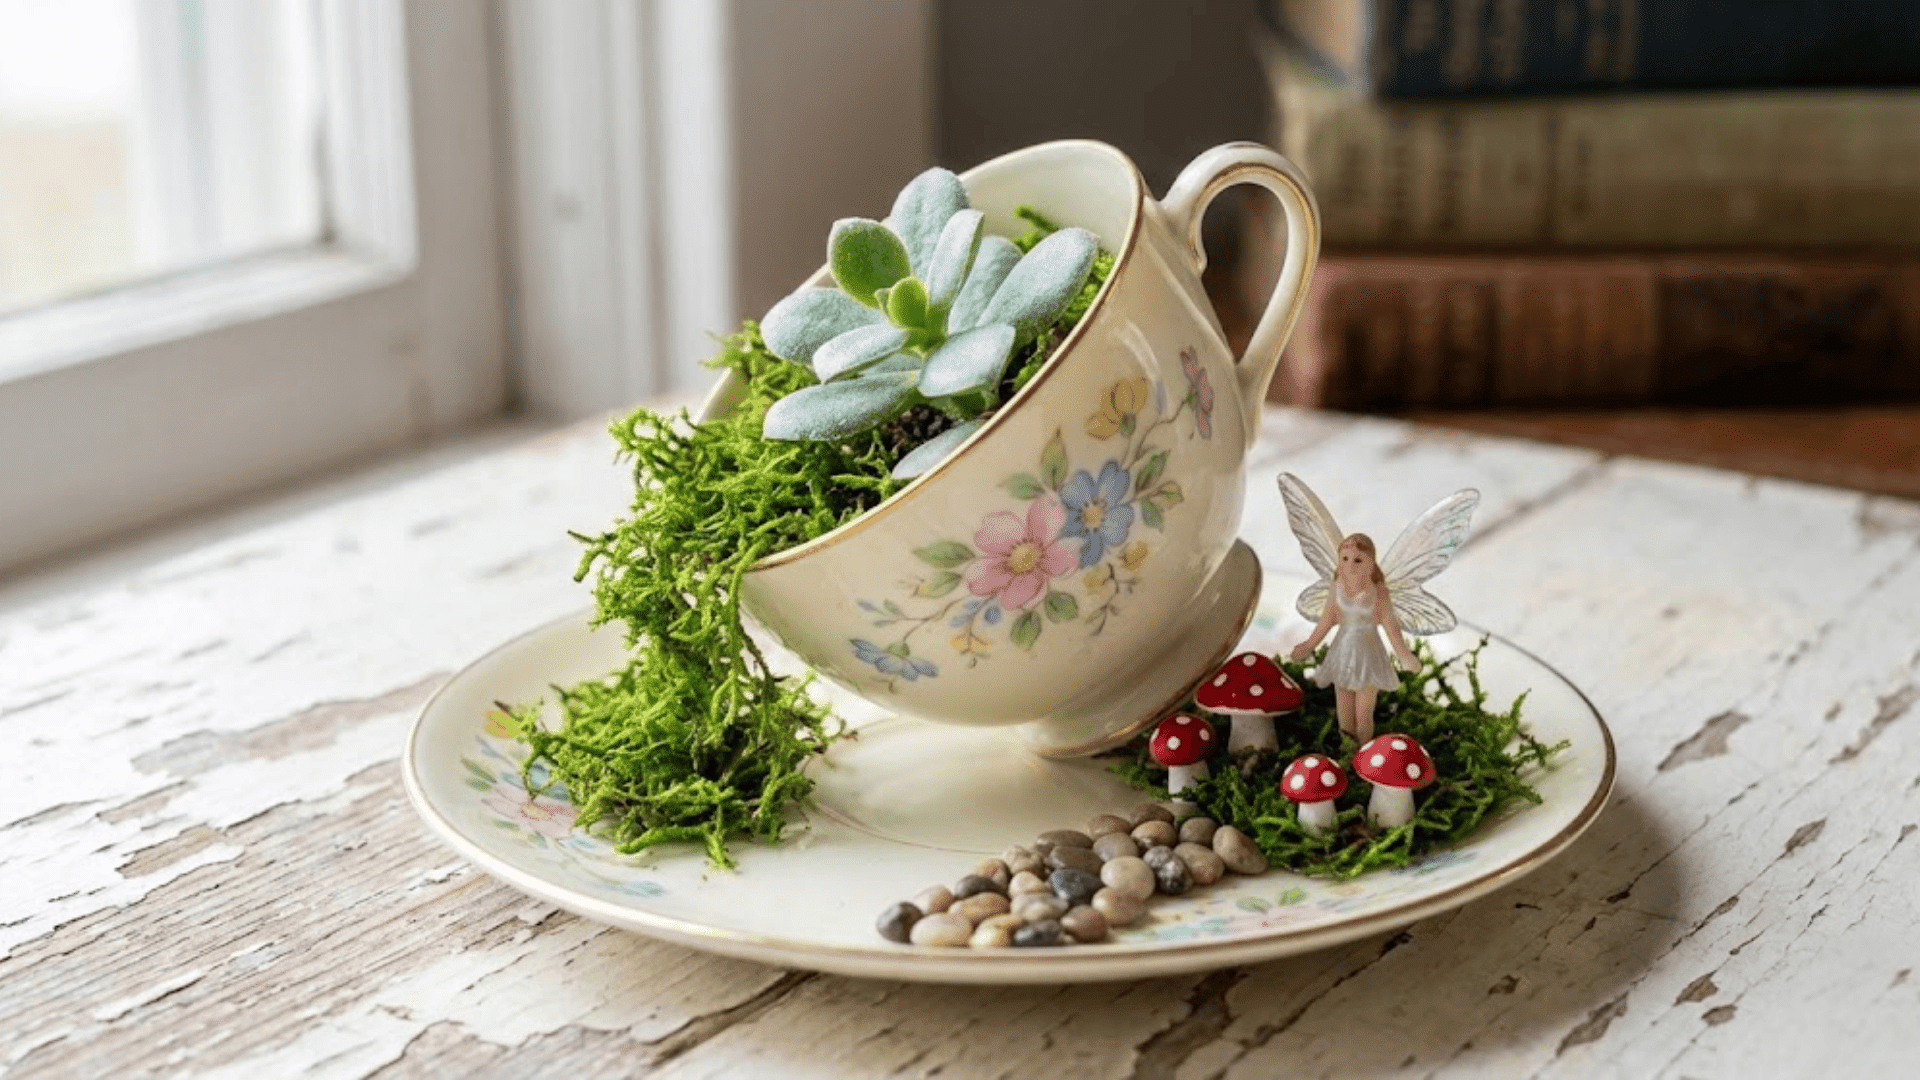
Ideal for: Tiny indoor spaces, desks, or as charming gifts for fairy garden lovers
Materials You’ll Need: Vintage teacup and saucer, small succulents, mini fairy figurine, tiny mushrooms, moss bits
Turn a pretty teacup into the sweetest miniature garden. The saucer becomes your base while the tilted cup creates a whimsical focal point that looks like it’s pouring out plants.
Tuck a single small succulent inside the cup with moss spilling out, and arrange a tiny fairy figurine on the saucer as if she’s tending her garden. Add miniature toadstools or a pebble path for extra charm in this compact design.
2. Wheelbarrow Fairy Garden
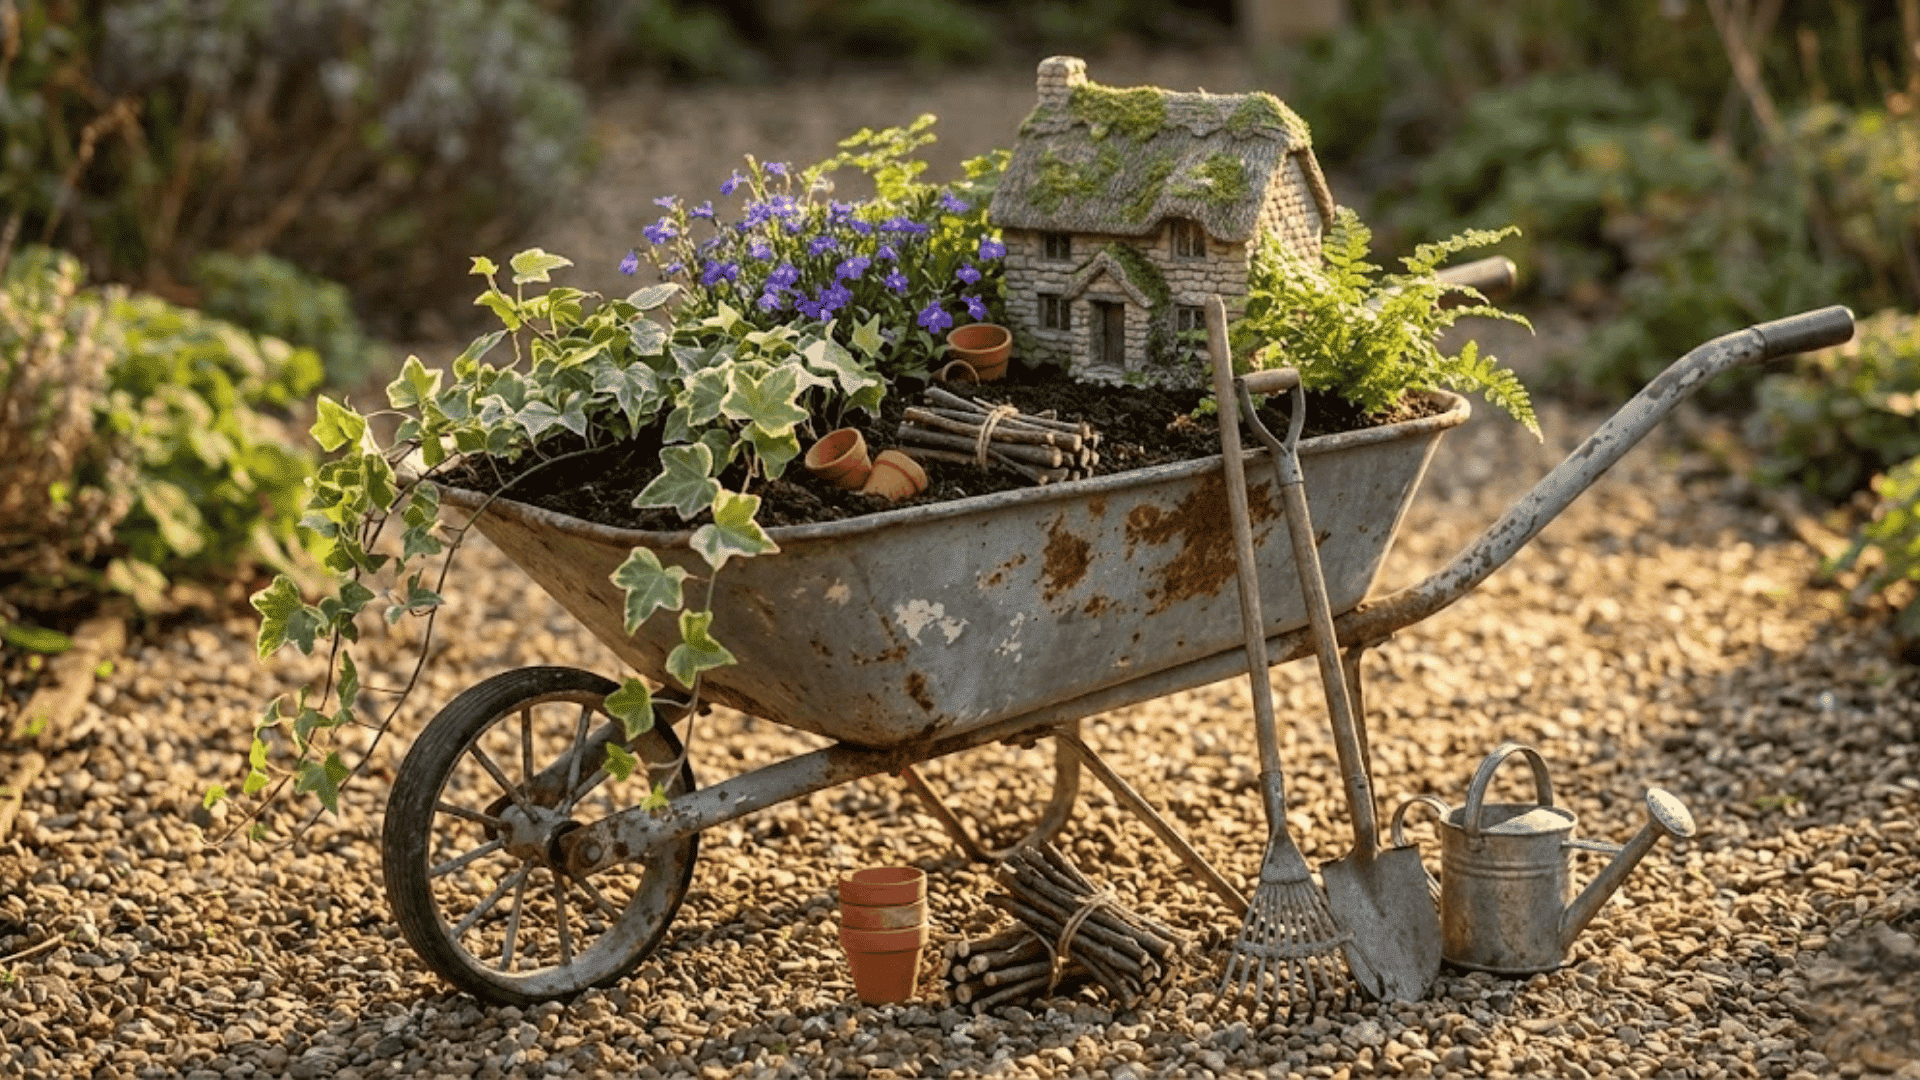
Ideal for: Rustic outdoor settings, farmhouse porches, or country garden corners
Materials You’ll Need: Old wheelbarrow or miniature version, trailing plants, weathered fairy house, garden tool miniatures, stacked firewood pieces
Give an old wheelbarrow a new purpose as a mobile fairy garden. The slanted design creates natural layers for planting, with trailing plants cascading over the edges.
Position a rustic fairy cottage at one end and add miniature garden tools, tiny clay pots, or stacked “firewood” for authentic farm charm. This portable garden moves with the sun, becoming a stunning outdoor focal point.
3. Mason Jar Fairy Garden

Ideal for: Closed terrariums, indoor displays, or as enchanting nightlights
Materials You’ll Need: Large mason jar, terrarium soil, small air plants or moss, mini fairy house, pebbles, preserved moss, LED tea light
Build a self-contained magical world inside a glass jar. Layer pebbles at the bottom for drainage, add soil, and plant humidity-loving varieties, or use preserved moss for a maintenance-free option.
Position a tiny house and a fairy figurine inside, then seal the jar to create a miniature ecosystem. Place an LED tea light underneath at night to make your fairy garden glow softly from within.
4. Glow in the Dark Garden Paths
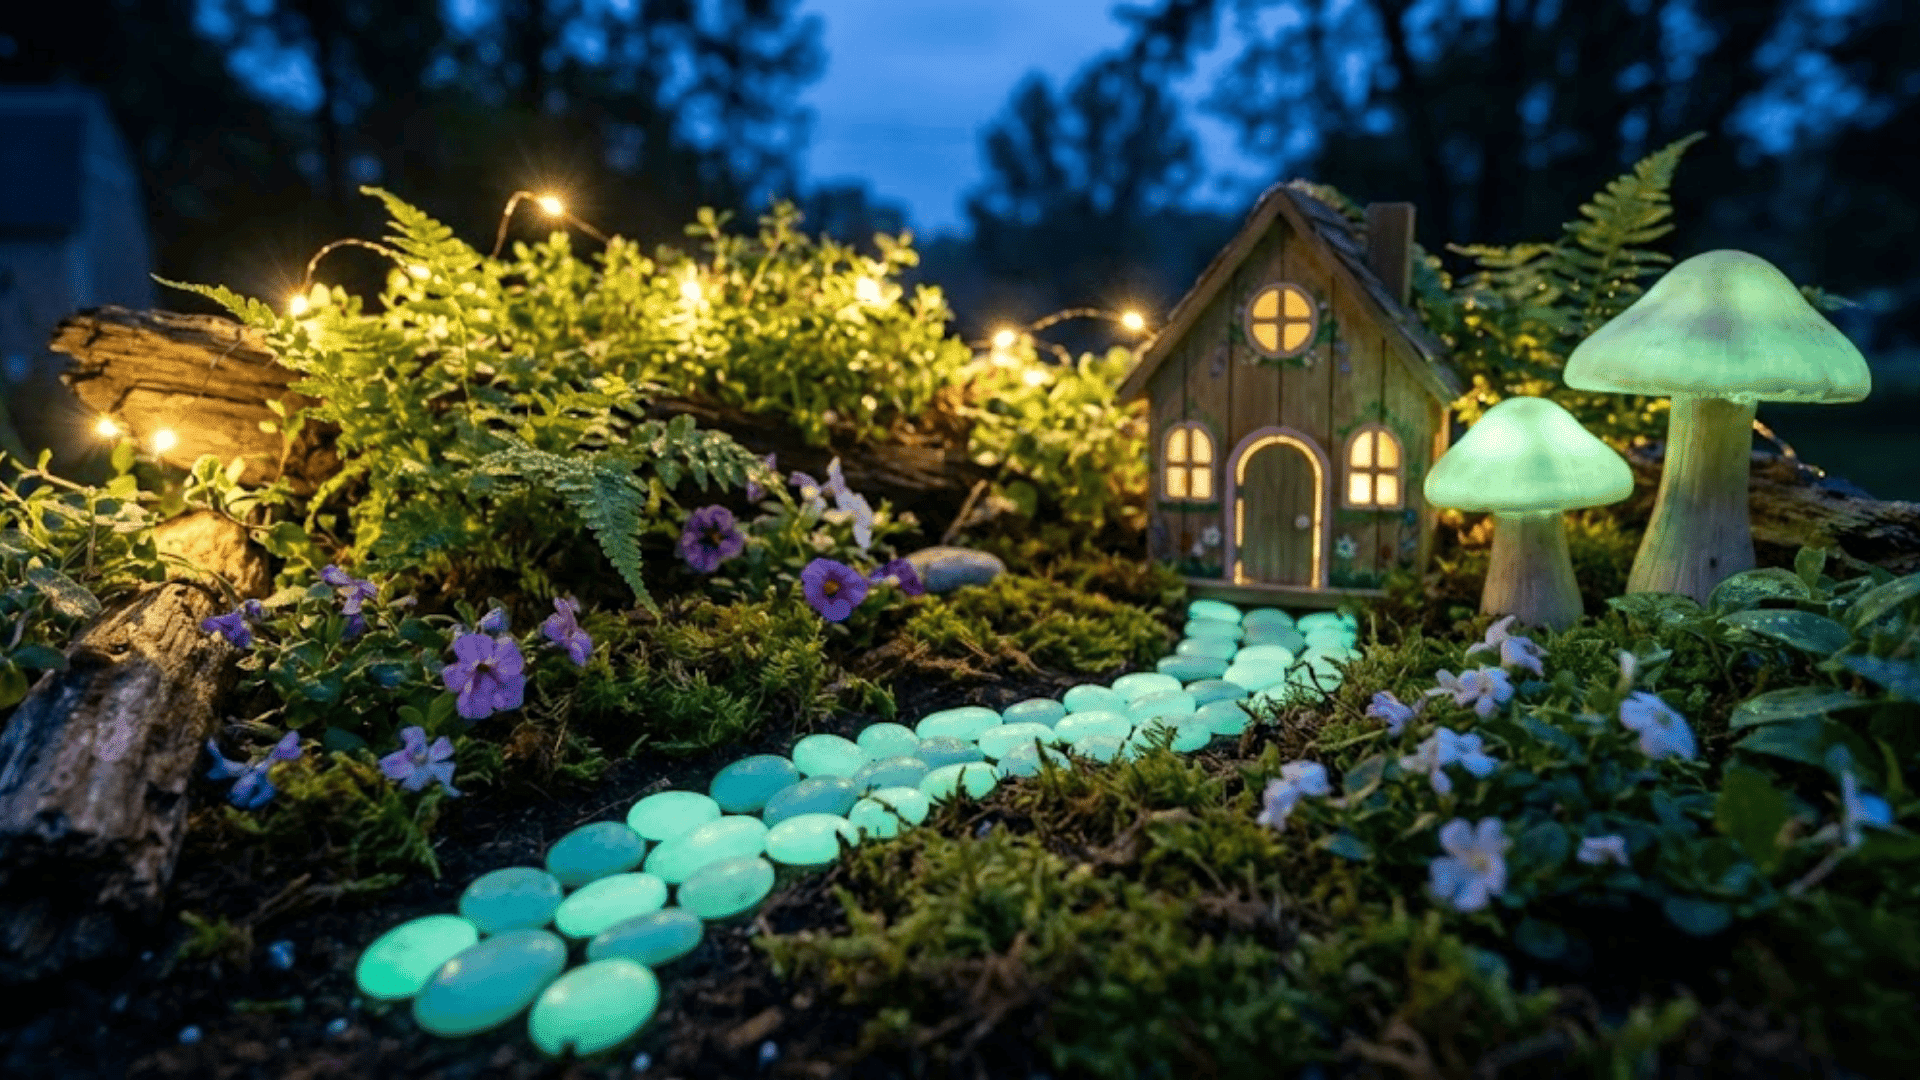
Ideal for: Evening entertaining areas or adding nighttime magic to existing gardens
Materials You’ll Need: Glow-in-the-dark paint or pebbles, small stones for pathways, solar fairy lights, luminescent mushrooms, and clear sealant
Turn your fairy garden into an enchanted nighttime wonder. Paint small stones with glow-in-the-dark paint to create pathways that illuminate after sunset, or use pre-made luminescent pebbles.
Weave solar-powered fairy lights through plants and around structures. Add glow-in-the-dark mushrooms or painted accents on houses. Seal everything with weatherproof coating for outdoor durability.
5. Fairy Picnic Scene
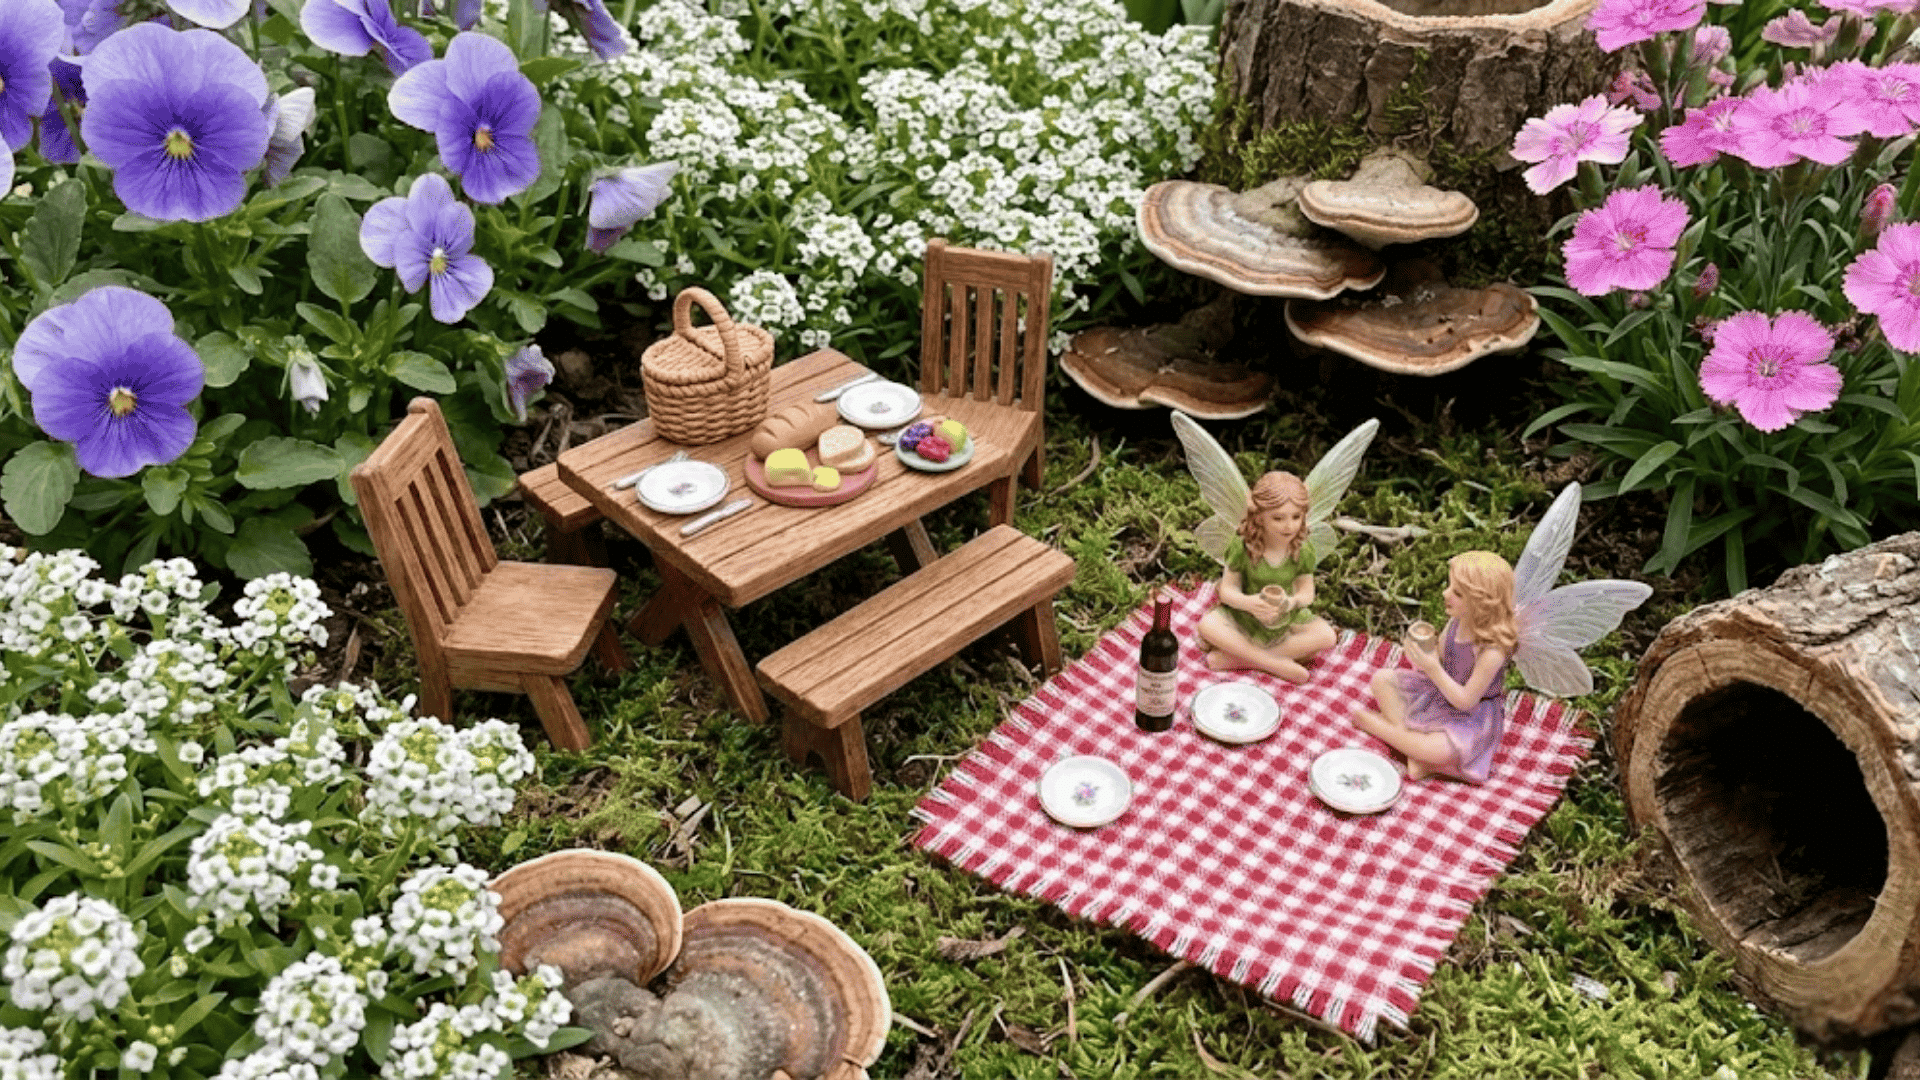
Ideal for: Interactive play spaces for children or storytelling garden displays
Materials You’ll Need: Miniature picnic table and chairs, tiny food items, fabric scrap blanket, basket, fairy figurines, and flowering plants as a backdrop
Set up an adorable gathering spot where fairies come together. Arrange a miniature picnic table or lay out a fabric scrap as a blanket with tiny plates, food, and a basket. Position fairy figurines as if they’re enjoying a meal together.
Plant colorful flowers around the scene as a natural backdrop and add mushrooms or tree stumps as extra seating. This setup invites children to create stories and swap out accessories for different seasons.
Caring for Your Fairy Garden Through the Seasons
A little ongoing care keeps your miniature world thriving and magical year-round. These simple maintenance habits ensure your plants stay healthy and your tiny accessories weather the elements beautifully.
- Water moss daily with a light mist and succulents once weekly, checking soil moisture before watering.
- Bring delicate outdoor accessories inside during harsh weather or coat them with weatherproof sealant.
- Refresh your garden seasonally with themed plants and decorations like tiny pumpkins for fall or miniature snowmen for winter.
- Secure lightweight items with hot glue or floral wire to prevent wind from scattering your carefully placed accessories.
- Trim back overgrown plants regularly to maintain the miniature scale and prevent larger plants from overtaking tiny structures.
With these easy habits, your fairy garden stays picture-perfect through every season. A few minutes of weekly attention keeps the magic alive and your little landscape looking its absolute best.
Creating Fairy Gardens with Kids
Fairy gardens offer the perfect blend of crafting, nature, and imaginative play that keeps children engaged for hours.
Here’s how to make the experience fun, safe, and educational for little helpers.
| Activity | What Kids Can Do | Age Range | Safety Note |
|---|---|---|---|
| Painted Stones | Paint rocks as toadstools, pathway markers, or miniature houses | Ages 3+ | Use washable, non-toxic paints only |
| Clay Accessories | Mold air-dry clay into tiny furniture, food, or decorations | Ages 5+ | Keep clay away from the mouth, and wash your hands after |
| Planting | Choose plants, dig small holes, and pat soil around roots | Ages 4+ | Supervise the use of small trowels and tools |
| Arranging Scenes | Position figurines and accessories to create stories | Ages 3+ | Keep tiny pieces away from younger siblings |
| Building Fences | Glue popsicle sticks together for fences and structures | Ages 6+ | Adults handle hot glue guns |
| Pathway Design | Place pebbles and stones to create walkways | All ages | Check that stones aren’t choking hazards |
The Closing Thoughts
Now that you know how to make a fairy garden from start to finish, it’s time to let your creativity bloom.
Building a cozy teacup garden for your desk or an entire fairy village in your backyard brings pure joy as you watch your tiny world come to life. Each plant you tend, and every miniature detail you add, makes it uniquely yours.
The magic happens in those quiet moments when you’re arranging pathways or positioning a new figurine just right.
We’d love to see what magical spaces you create! Drop a comment below sharing your favorite fairy garden ideas or any questions you have along the way.