
Somewhere between tired of mulching every spring and scrolling through gorgeous landscaping inspo online, a lot of homeowners are landing on the same quiet revelation: rocks just work.
They sit pretty, they stay put, and they give flower beds that clean, intentional look that feels both effortless and polished.
But is swapping mulch for rocks actually worth it?
We’re breaking down the honest pros and cons, sharing what real gardeners have experienced, and getting into exactly when rocks are a flower bed’s best friend, and when they’re really not.
What are Rock Flower Beds?
Rock flower beds are exactly what they sound like, decorative stone or gravel laid around plants in place of traditional organic mulch.
The most popular options you’ll come across are:
- Pea gravel (small, smooth, and budget-friendly)
- River rock (larger, rounded, and great for a natural look)
- Crushed stone (angular pieces that lock together nicely)
The biggest difference from mulch comes down to composition. Mulch breaks down and feeds the soil over time; rocks don’t.
They’re inorganic, meaning they stick around for years without decomposing, which is both their strength and, sometimes, their limitation.
Why People Choose Rocks Instead of Mulch?
Rocks have been quietly winning over gardeners for good reason. Once they’re down, they’re mostly down for good, and the visual payoff is hard to ignore.
1. Long-Lasting Investment
Unlike mulch, which breaks down and needs removal each season, rocks stay for years. You lay them once and forget about them, appealing to those who prefer enjoying their garden over maintenance.
No seasonal replacements, no gradual thinning out, just consistent coverage that holds up year after year without asking much in return.
2. Low Maintenance Once Installed
After the initial setup, rock beds ask very little of you. No topping up, no decomposition to worry about, and no annual trips to the garden center just to keep things looking fresh.
An occasional rinse or weed pull is about as demanding as it gets. For busy homeowners or anyone who wants a beautiful yard without the recurring effort, that kind of simplicity is a genuine selling point.
3. Natural Erosion Control
Heavy rain can wash mulch right out of a flower bed fairly quickly. Rocks, especially larger river rocks or crushed stone, hold their ground considerably better through heavy downpours and runoff.
For sloped beds or areas that see a lot of rainfall, this is a practical, long-term fix that actually holds up season after season without needing to be repositioned or replaced.
4. Less Inviting to Insects
Mulch, being organic, creates a warm and cozy environment for pests and insects to settle into. Rocks don’t offer that same appeal. Without moisture-retaining, decomposing material below, many garden pests are less likely to move in.
It won’t eliminate every bug concern, but it does meaningfully reduce the kind of habitat that draws unwanted visitors into your flower beds regularly.
5. Design Versatility
From soft grey pea gravel to warm terracotta crushed stone, rocks come in a surprisingly wide range of colors, sizes, and textures.
That variety helps match your landscaping vision, whether understated or making a statement. Mixing rock types adds depth and interest that mulch rarely achieves.
The Downsides of Using Rocks Instead of Mulch
Rocks aren’t a perfect solution, and being upfront about that matters. A few real drawbacks are worth sitting with before you commit.
1. Heat Retention
This is a major concern with rock beds: rocks absorb heat during the day and radiate it back at night, which can stress roots and dry soil faster, especially in warmer climates.
Heat-sensitive plants can really struggle in these conditions, and without the insulating buffer that mulch naturally provides, the temperature swings around the root zone become harder to manage.
2. No Nutrients for Soil
Mulch slowly breaks down and feeds the soil underneath; rocks simply don’t. Your soil gets no organic matter, no improvement in texture, and no natural nutrient boost over time.
For gardens with plants that rely on rich, well-fed soil, this gap becomes noticeable fairly quickly. You’d need to regularly add fertilizers or compost, increasing costs and effort in an otherwise simple gardening setup.
3. Poor Moisture Retention
Organic mulch acts like a light blanket over soil, slowing down evaporation noticeably. Rock beds don’t offer that same moisture lock, which means the soil underneath tends to dry out faster between waterings.
Depending on your climate and the plants you’re growing, you may find yourself watering more frequently than expected. In drier regions, this can translate into noticeably higher water usage over the course of a season.
4. Higher Upfront Cost
The long-term savings are real, but getting there costs more initially than most people anticipate. Quality rock, landscape fabric, and installation can add up quickly compared to a few bags of mulch.
It’s an investment that pays off over time, particularly given how infrequently rocks need replacing. But the starting number can surprise people, especially for larger beds needing substantial material and ground prep.
5. Difficult to Remove Later
If you ever change your mind, getting rocks out is no small task. Separating stone from soil is tedious, time-consuming work, and if landscape fabric was used underneath, that adds another layer to deal with entirely.
It’s worth knowing this choice is long-term. Unlike mulch, which breaks down naturally, rocks need active removal, possibly taking a full weekend of hard work, depending on the bed size.
Real Experiences: What Gardeners Say
The internet has no shortage of opinions on this one.
Gardeners who’ve actually lived with rock beds tend to land in two very different camps, and both sides make fair points worth hearing.
What People Love About Rock Beds?
Gardeners who made the switch and never looked back tend to share a few things in common: low-maintenance goals and yards that genuinely suit rocks.
- “Set it and Forget it” Appeal: Works best for permanent shrubs, trees, or drought-tolerant plants that don’t need seasonal replanting.
- Wind and Rain Resistance: Rocks stay put in windy areas where mulch tends to disappear before the end of summer, a point that comes up repeatedly in r/landscaping discussions.
- Cleaner Upkeep: Leaves and debris blow off rocks easily without disturbing the ground cover.
- Long-Term Cost Payoff: Rocks don’t fade, need replacing, or wash out after storms.
Common Complaints From Gardeners
The frustrations tend to show up a few years in, once the novelty of “low maintenance” wears off.
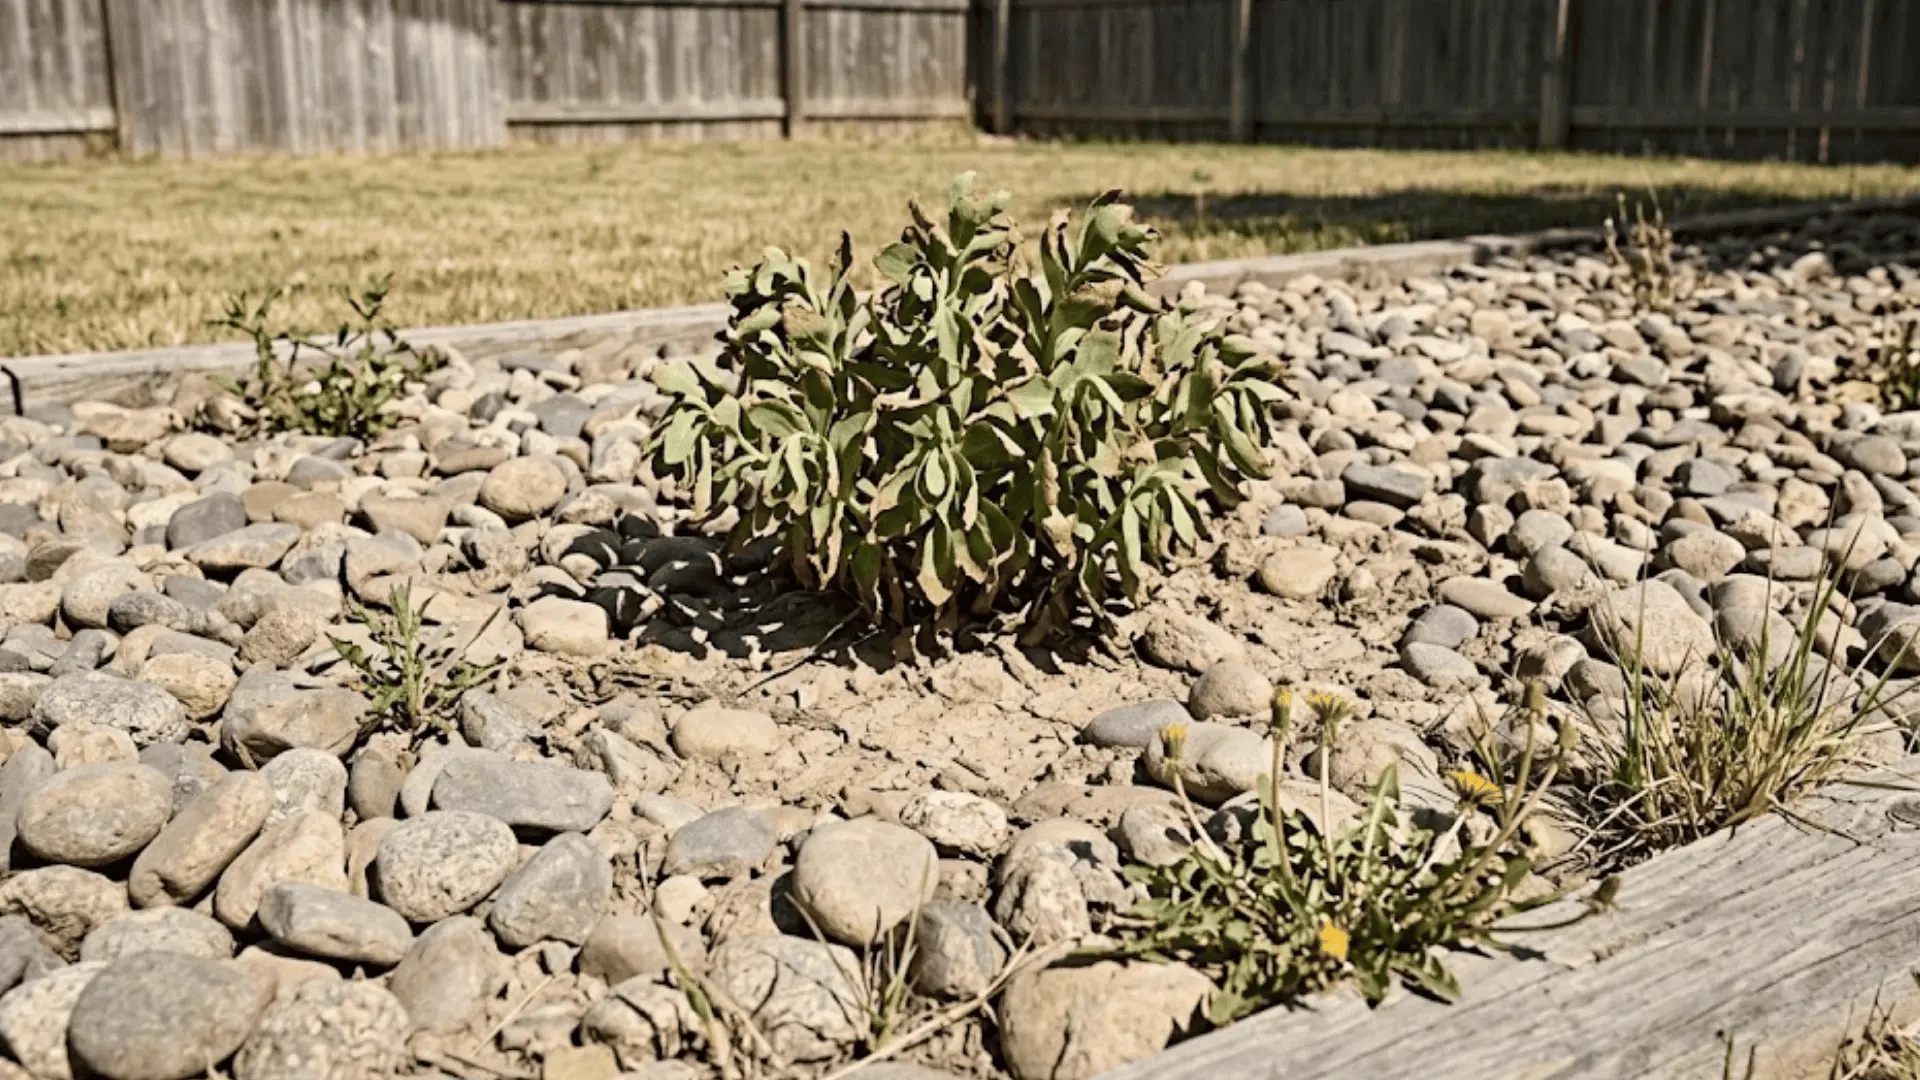
- Weeds Still Come: Wind blows soil between rocks over time, and those weeds are significantly harder to pull than ones in mulch.
- Heat is a Real Issue: Rocks absorb and reflect heat back toward plants, causing them to dry out faster than most first-timers expect.
- Difficult to Reverse: In a popular r/landscaping thread on landscaping regrets, rocks ranked as the second most-cited mistake, with gardeners calling them “hot, of no benefit to the soil, and weeds grow right through them.”
- Sort drainage first: Rocks over poorly draining soil don’t fix the problem; they compound it.
Still on the fence? This Reddit thread on whether rock beds are more trouble than they’re worth is a solid read with candid takes from gardeners at every experience level.
Rocks vs. Mulch: Which is Better for Flower Beds?
Neither option is universally better, and the right pick really does come down to your yard, your climate, and what you’re actually trying to grow.
Here’s a side-by-side to help you think it through.
| Factor | Rocks | Mulch |
|---|---|---|
| Durability | Lasts indefinitely; no replacement needed | Breaks down; needs topping up every 1–2 years |
| Moisture Retention | Poor; soil dries out faster | Excellent; slows evaporation and hydrates roots |
| Soil Health | Adds no nutrients to the soil | Improves soil fertility and structure over time |
| Weed Control | Good at first; weeds return as debris builds up | Suppresses weeds well at the right depth |
| Heat Impact | Absorbs and radiates heat; can stress plants | Insulates roots; keeps soil temperature stable |
| Maintenance | Low; occasional weeding and debris clearing | Moderate; annual reapplication required |
| Upfront Cost | Higher | Lower |
| Long-Term Cost | Lower; largely a one-time investment | Recurring seasonal expense |
| Ease of Changes | Difficult; removal is labor-intensive | Easy; beds can be reshaped or replanted freely |
| Best For | Dry climates, slopes, decorative or drainage areas | Plant-heavy beds, vegetable gardens, and flowering perennials |
| Plant Compatibility | Succulents, ornamental grasses, drought-tolerant shrubs | Annuals, perennials, edibles, moisture-loving plants |
Best Situations to Use Rocks in Flower Beds
Rocks aren’t the right fit for every garden, but in the right setting, they genuinely shine.
Here’s where they tend to work best.
- Around Foundations and Structures: Fire-resistant, tidy, and low-maintenance, rocks are a practical choice right up against the house.
- Xeriscaping and Drought-Tolerant Gardens: A natural match for succulents, ornamental grasses, and drought-hardy shrubs that thrive in drier, warmer conditions.
- Pathways and Border Edging: Rocks create clean, defined lines that hold their shape season after season without any upkeep.
- Slopes and Erosion-Prone Areas: Heavier stones anchor soil effectively, making them far more reliable than mulch on sloped or high-runoff beds.
If your yard checks any of these boxes, rocks could be a genuinely smart, long-term choice worth considering.
When Should You Avoid Rocks?
As practical as rocks can be, there are situations where they can do more harm than good. Here’s when it’s better to reach for mulch instead.
- Hot or Warm Climates: Rocks absorb and radiate heat, which can stress roots and dry out soil faster than plants can handle.
- Beds with Delicate Flowers: Most flowering plants prefer stable moisture and cooler soil conditions that rocks simply can’t provide.
- Vegetable Gardens: Edibles need nutrient-rich, well-fed soil to thrive, and rocks contribute nothing to that equation.
- Poorly Drained or Compacted Soil: Rocks won’t fix an existing drainage problem and can actually make waterlogging worse over time.
When in doubt, mulch is the safer, more plant-friendly default, especially if your garden is anything but low-maintenance by nature.
Step-by-Step: How to Install Rock Flower Beds Properly?
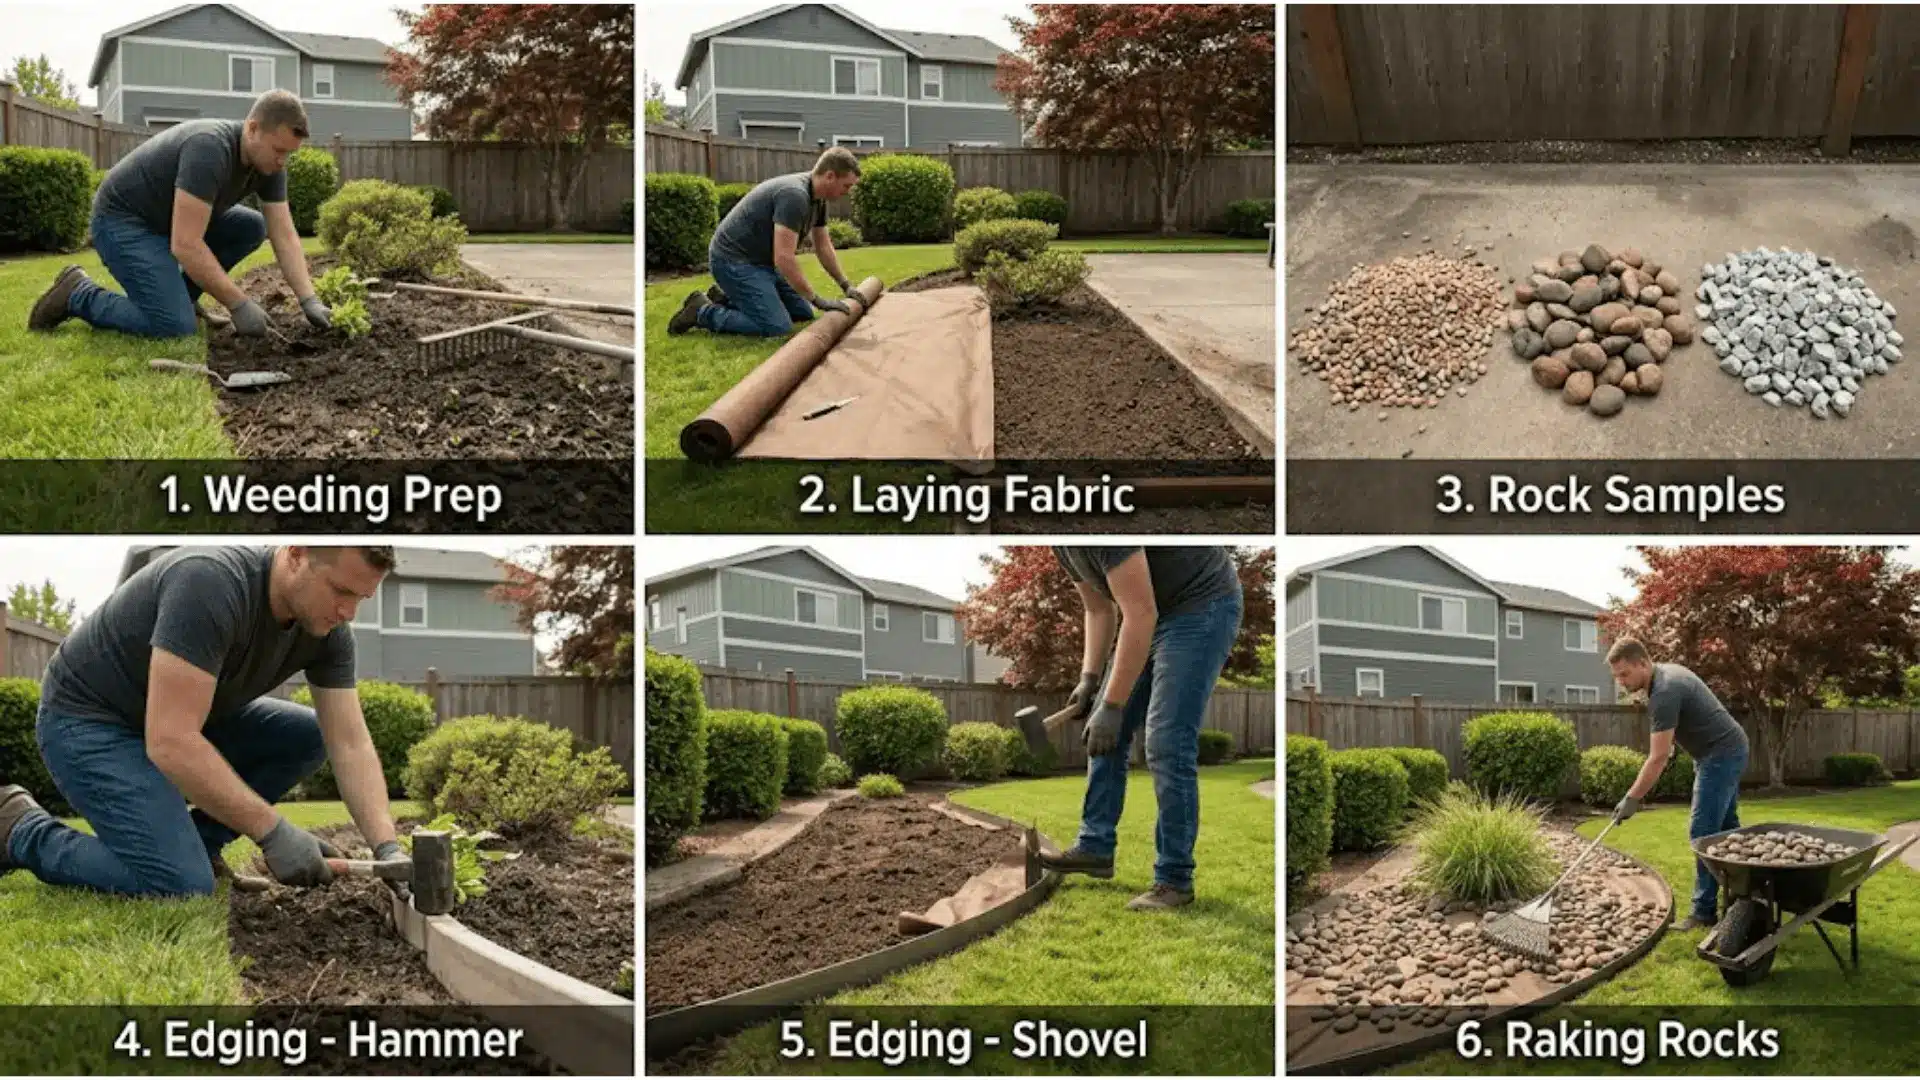
Getting the look right is one thing; making sure it actually holds up is another. A little prep work upfront goes a long way in making your rock bed low-maintenance for years to come.
Step 1: Prepare the Area
A clean, level base is everything with rock beds. Pull out all existing weeds, roots included, since anything left behind will push through later.
Clear away debris, rake the soil smooth, and if the ground is uneven, take the time to level it out properly. Rocks laid over messy or lumpy soil will shift, settle unevenly, and create gaps where weeds love to sneak in.
Step 2: Lay Landscape Fabric
Landscape fabric acts as a barrier between your soil and the rocks, slowing down weed growth and preventing stones from sinking into the ground over time.
Use woven geotextile fabric instead of plastic sheeting to let water and air pass, preventing soil suffocation. Cut slits for plants and secure edges with landscaping pins to keep them flat.
Step 3: Choose the Right Rock Type
The rock you pick affects both how the bed looks and how well it functions, so it’s worth thinking through before you buy.
- Pea Gravel: Small, affordable, and easy to spread, though it tends to migrate without solid edging.
- River Rock: Larger and more decorative, great for statement beds and areas with heavier foot traffic.
- Crushed Stone: Angular pieces that lock together well, making them a solid choice for slopes or erosion-prone spots.
Step 4: Install Edging
Edging keeps your rocks contained and your bed looking sharp. Steel or aluminum edging works best for clean, defined borders that won’t shift or degrade over time.
Set it deep enough so rocks can’t spill over into the lawn, and make sure it follows the natural curve of your bed rather than forcing straight lines where they don’t belong.
Step 5: Spread Rocks Evenly
Pour rocks in sections and use a rake to distribute them evenly. Aim for a depth of 2 to 3 inches, which is enough to suppress weeds and insulate the soil without smothering plant bases or creating an unstable surface.
Keep rocks pulled back slightly from plant stems and trunks to avoid trapping moisture against them.
Design Ideas for Flower Beds with Rocks
Rocks offer a lot more creative flexibility than most people give them credit for. Clean and minimal or bold and textured, there’s a style here for every kind of garden.
| Style | Best Rock Type | Pairs Well With |
|---|---|---|
| Minimalist Modern | Grey pea gravel or white crushed stone | Ornamental grasses, low hedges |
| Desert-Style Xeriscaping | Terracotta crushed stone or tan river rock | Succulents, cacti, lavender |
| Mixed Rock and Plant Beds | River rock and pea gravel combined | Perennials, flowering shrubs |
| Border Accents | Dark lava rock or polished black pebbles | Bright annuals, hostas |
Maintenance Tips for Rock Flower Beds
Rock beds are low-maintenance, not no-maintenance. A little routine care keeps them looking sharp and functioning well long-term.
- Clear Debris Regularly: Leaves and organic matter sitting between rocks break down into a layer that weeds are happy to grow in.
- Use a Leaf Blower, Not a Rake: A blower clears debris quickly and cleanly without displacing or scattering the rocks.
- Stay on Top of Weeds: They will show up eventually, and catching them early makes removal significantly less frustrating.
- Rinse Rocks Occasionally: A light hose-down keeps the surface looking fresh and prevents dust and grime from building up over time.
- Check for Sinking or Shifting: Rocks settle over time, so topping up thin spots every few years keeps the bed even and weed-resistant.
Consistent upkeep doesn’t have to be a big commitment. A few small habits spread across the season is all it really takes to keep a rock bed looking its best.
Cost Comparison: Rocks vs. Mulch
Upfront price isn’t the whole story here. How each option plays out over time is where the real difference shows up.
| Cost Factor | Rocks | Mulch |
|---|---|---|
| Upfront Cost | $150–$700+ per 200 sq ft | $30–$120 per 200 sq ft |
| Cost Per Sq Ft | $0.75–$3.50 | $0.15–$0.60 |
| Replacement Frequency | Rarely, if ever | Every 1–2 years |
| Annual Upkeep Cost | Minimal; occasional top-up only | $30–$120 per refresh |
| 5-Year Estimated Cost | $150–$700 (one-time) | $150–$600+ (recurring) |
| Labor Cost | Higher upfront; professional install recommended | Low; easy DIY install |
Environmental Impact Considerations
On the environmental front, mulch has the edge. Organic mulch feeds the soil, supports microbial activity, and creates a healthier ecosystem for plants, worms, and beneficial insects over time.
Rocks, being inorganic, offer none of that. They don’t decompose, don’t nourish, and in warmer climates, rocks can raise soil temperatures enough to disrupt root health and reduce moisture retention significantly.
That said, rocks do reduce the need for herbicides and synthetic weed control products, which counts for something.
The more plant-heavy your bed, the more the environmental scales tip toward mulch.
Final Thoughts
Choosing between flower beds with rocks instead of mulch isn’t about finding a perfect answer; it’s about finding the right fit for your space, your plants, and, honestly, how much weekend time you want to spend gardening.
Both options have real merit, and both come with trade-offs worth respecting.
The best-looking yards tend to be the ones where the ground cover actually works with the garden, not against it.
Tried rocks in your flower beds? Still loyal to mulch? Drop your experience in the comments below; real stories always help someone make a better decision.


One Response
I have rocks around the foundation in the front of my house. This article is interesting and I was not aware of the heat not being good for the roots. I love flowers and they keep dying. I was searching as to why. I may change my flower bed in the front to mulch. I don’t want to be so limited with what I can plant.