Why settle for scattered pieces across your coffee table when you could create a dedicated haven for your puzzling passion?
Puzzle enthusiasts everywhere know the struggle of protecting work-in-progress from curious pets, spilled drinks, or simply needing that table back for dinner.
That’s where a DIY puzzle board becomes your crafting companion: a portable workspace that keeps everything organized and safe.
Beyond the practical perks, building your own means customizing it perfectly to your style and puzzle size preferences.
Ready to reimagine how you puzzle? Let’s walk through creating a beautiful, functional board that’ll make every piecing session feel like a creative retreat.
What is a Puzzle Board?
A puzzle board is essentially a flat, portable surface designed specifically for assembling puzzles.
Think of it as your puzzle’s dedicated home: a lightweight base that keeps pieces secure and organized while giving you the freedom to move your project wherever inspiration strikes.
Unlike bulky puzzle tables that stay in one spot, puzzle boards slip under beds, lean against walls, or travel between rooms effortlessly.
Casual puzzlers like the flexibility, while enthusiasts value a stable workspace that protects progress. Families with limited space find them handy when the dining table needs to be switched back to dinner.
A puzzle board brings that perfect balance of convenience and protection to your favorite pastime.
Why Build a DIY Puzzle Board Instead of Buying One?
Building your own puzzle board puts you in complete control of the final result. Store-bought options can feel limiting and often come with a hefty price tag, but crafting one yourself opens up a world of possibilities.
Here’s what makes DIY the smarter choice:
- Budget-Friendly Approach: Save significantly compared to retail versions, often spending half the cost or less on materials.
- Perfect Fit for Your Puzzles: Create exact dimensions that match your favorite puzzle sizes, from small weekend projects to sprawling masterpieces.
- Material Freedom: Choose from foam board, cork, fabric, or wood based on your aesthetic preferences and functional needs.
- Personal Touches: Add decorative elements, custom colors, or special features that reflect your unique style.
Planning your puzzle board thoughtfully ensures it fits your space and puzzling style perfectly. Start by determining the right dimensions, then consider which features will enhance your puzzling experience.
Choosing the Right Size
Match your board dimensions to your favorite puzzle sizes while leaving room for comfortable assembly and piece sorting.
| Puzzle Size | Recommended Board Dimensions | Workspace Notes |
|---|---|---|
| 500-piece | 18″ x 24″ | Compact option for smaller spaces |
| 1,000-piece | 20″ x 27″ | Most versatile standard size |
| 1,500-piece | 24″ x 33″ | Ideal for dedicated puzzlers |
| Extra margin | Add 2-4 inches per side | Allows room for sorting pieces by color or pattern |
Deciding on Features
Consider which add-ons will make your puzzle board more functional and enjoyable to use.
- Raised Edges: Wooden trim or foam borders keep pieces from sliding off during moves.
- Non-Slip Backing: Felt, cork, or rubber liner grips tables and prevents frustrating shifts.
- Storage Drawers: Small attached compartments organize loose pieces between sessions.
- Folding Design: Hinged panels collapse flat for tucking under beds or into closets.
- Stackable Layers: A matching cover board protects unfinished work from dust and curious hands.
Materials for a DIY Puzzle Board
Selecting the right materials sets the foundation for a puzzle board that’s both functional and beautiful. Your choice depends on budget, desired durability, and the aesthetic you’re aiming for.
Base Materials
- Plywood: Sturdy and long-lasting with a smooth surface
- MDF (Medium-Density Fiberboard): Affordable alternative with consistent flatness
- Foam board: Lightweight and easy to cut for portability
- Cardboard: Most economical option for testing designs
- Corkboard: Naturally textured surface that grips pieces
Surface Liners
- Felt fabric: Soft texture prevents pieces from sliding
- Flannel or fleece: Cozy alternatives with similar grip
- Canvas or cotton: Durable woven fabrics with subtle texture
Budget Considerations: Premium materials like plywood and wool felt create durable boards that last for years, while foam board and basic felt work beautifully at a fraction of the cost.
DIY Puzzle Board Build Methods
These 4 popular build methods help you find the perfect match for your skill level and puzzling needs. Each approach offers unique benefits, from budget-friendly simplicity to premium functionality.
DIY Option 1: Simple Wooden Puzzle Board
A classic wooden base provides durability and a professional finish that’ll serve you through countless puzzles.
This straightforward build requires minimal tools and creates a smooth, stable workspace.
Step-by-Step Build:
- Step 1: Cut plywood or MDF to your desired dimensions using a circular saw, or have it cut at the hardware store
- Step 2: Sand all edges and surfaces smooth with medium-grit sandpaper to prevent splinters
- Step 3: Apply wood stain or paint if desired, allowing full drying time between coats
- Step 4: Seal with clear polyurethane for a protective finish that resists moisture and wear
DIY Option 2: Cardboard Puzzle Board
Perfect for testing designs or creating a temporary solution, this ultra-lightweight option works wonderfully for occasional puzzlers or crafting with kids.
Cardboard boards last several months with gentle use, but eventually soften from repeated handling.
Step-by-Step Build:
- Step 1: Source sturdy cardboard from appliance boxes or purchase a presentation board from craft stores
- Step 2: Cut to size using a sharp utility knife and a straightedge for clean lines
- Step 3: Layer two or three pieces together with craft glue for added rigidity and stability
- Step 4: Cover with kraft paper or decorative contact paper to create a smooth, finished surface
DIY Option 3: Felt-Lined Puzzle Board
Felt creates gentle friction that keeps pieces exactly where you place them without damaging delicate imagery.
The soft surface makes sorting and assembling more comfortable during long puzzle sessions, and flannel, fleece, or thin cork sheets provide a similar grip with different textures.
Step-by-Step Build:
- Step 1: Start with your chosen base material (wood, foam board, or sturdy cardboard)
- Step 2: Cut felt fabric 1-2 inches larger than the board on all sides for wrapping edges
- Step 3: Apply spray adhesive evenly to the board surface, working in a well-ventilated area
- Step 4: Smooth felt onto the board from the center outward, wrap excess around the edges, and secure with hot glue
DIY Option 4: Puzzle Board with Raised Edges
Raised borders prevent pieces from sliding off during transport or when bumped accidentally.
This feature is essential if you plan to move your board frequently or store it vertically, with ½ to ¾ inch edges offering the best balance between protection and visibility.
Step-by-Step Build:
- Step 1: Build or prepare your base board using any method above as the foundation
- Step 2: Cut wood trim strips to match all four sides of your board
- Step 3: Miter corners at 45-degree angles for professional-looking joints, or simply butt them together
- Step 4: Attach edges with wood glue and small finishing nails, ensuring corners are square and secure
Adding Storage to a DIY Puzzle Board
Clever storage solutions keep your puzzle pieces organized and your work-in-progress protected between sessions. These add-ons maximize functionality without sacrificing portability.
| Storage Feature | Function | Materials |
|---|---|---|
| Slide-in drawers | Shallow boxes beneath the board for sorting pieces by color or pattern | Small wooden boxes, drawer slides, and screws |
| Stackable sorting trays | Removable compartment trays that sit on the board surface | Plastic organizers, small bins, cardboard dividers |
| Cover boards | Flat panel protects unfinished puzzles from dust and pets | Foam board, thin plywood, cardboard |
| Vertical storage | Portfolio-style closure allows upright storage in closets | Ribbon ties, Velcro strips, wooden edge guards |
DIY Puzzle Board Design Ideas
Personalize your puzzle board to match your aesthetic and lifestyle needs. Sleek modern designs, playful kid-friendly versions, and everything in between can boost creativity while keeping functionality front and center.
1. Minimalist Designs
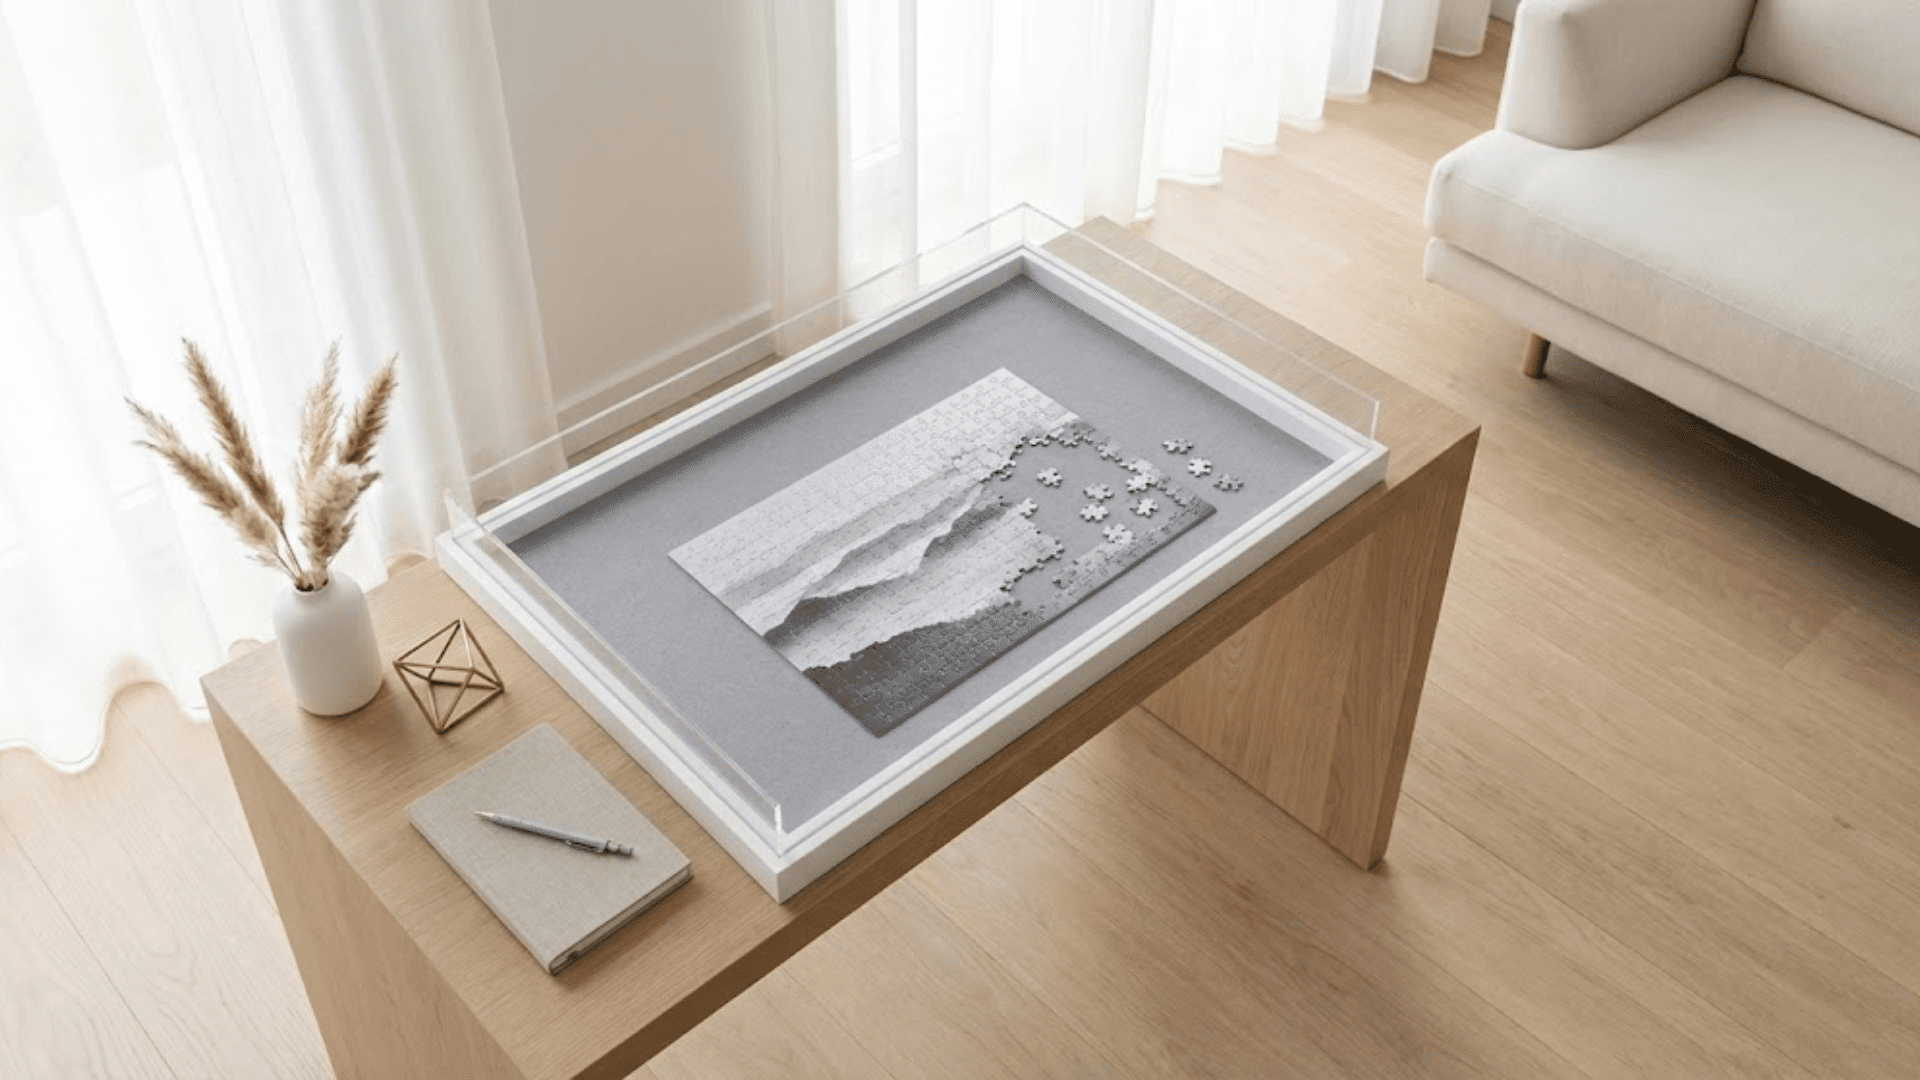
Materials Required: Smooth plywood or white-painted MDF, soft gray or ivory felt liner, and optional clear acrylic edges for a contemporary touch.
Clean lines and neutral tones create a calming workspace that blends seamlessly into modern interiors. Skip decorative elements and focus on quality materials with flawless finishes.
The understated palette keeps attention on your puzzle’s artwork while maintaining that coveted Scandinavian-inspired simplicity. Perfect for display-worthy setups in living rooms or studios.
2. Rustic Wood Finishes

Materials Required: Reclaimed wood or natural pine boards, dark walnut or weathered oak stain, rough-hewn edge trim, matte polyurethane sealer.
Embrace organic textures and warm wood tones for a cozy, farmhouse-inspired puzzle board. Leave natural grain visible through lighter stains, or distress edges for vintage character.
This style pairs beautifully with cottage aesthetics and brings tactile warmth to your crafting sessions. The rugged charm makes each board feel handcrafted and one-of-a-kind.
3. Kid-Friendly Boards

Materials Required: Lightweight foam board or thin plywood, bright acrylic paints in primary colors, non-toxic sealers, rounded edge padding for safety.
Vibrant colors and playful patterns make puzzling exciting for little hands. Choose durable, easy-to-clean surfaces that withstand enthusiastic handling and occasional spills.
Add their name with stencils or stickers for a personalized touch. Lower height edges prevent frustration while still containing pieces during energetic puzzle sessions.
4. Travel-Friendly Puzzle Boards
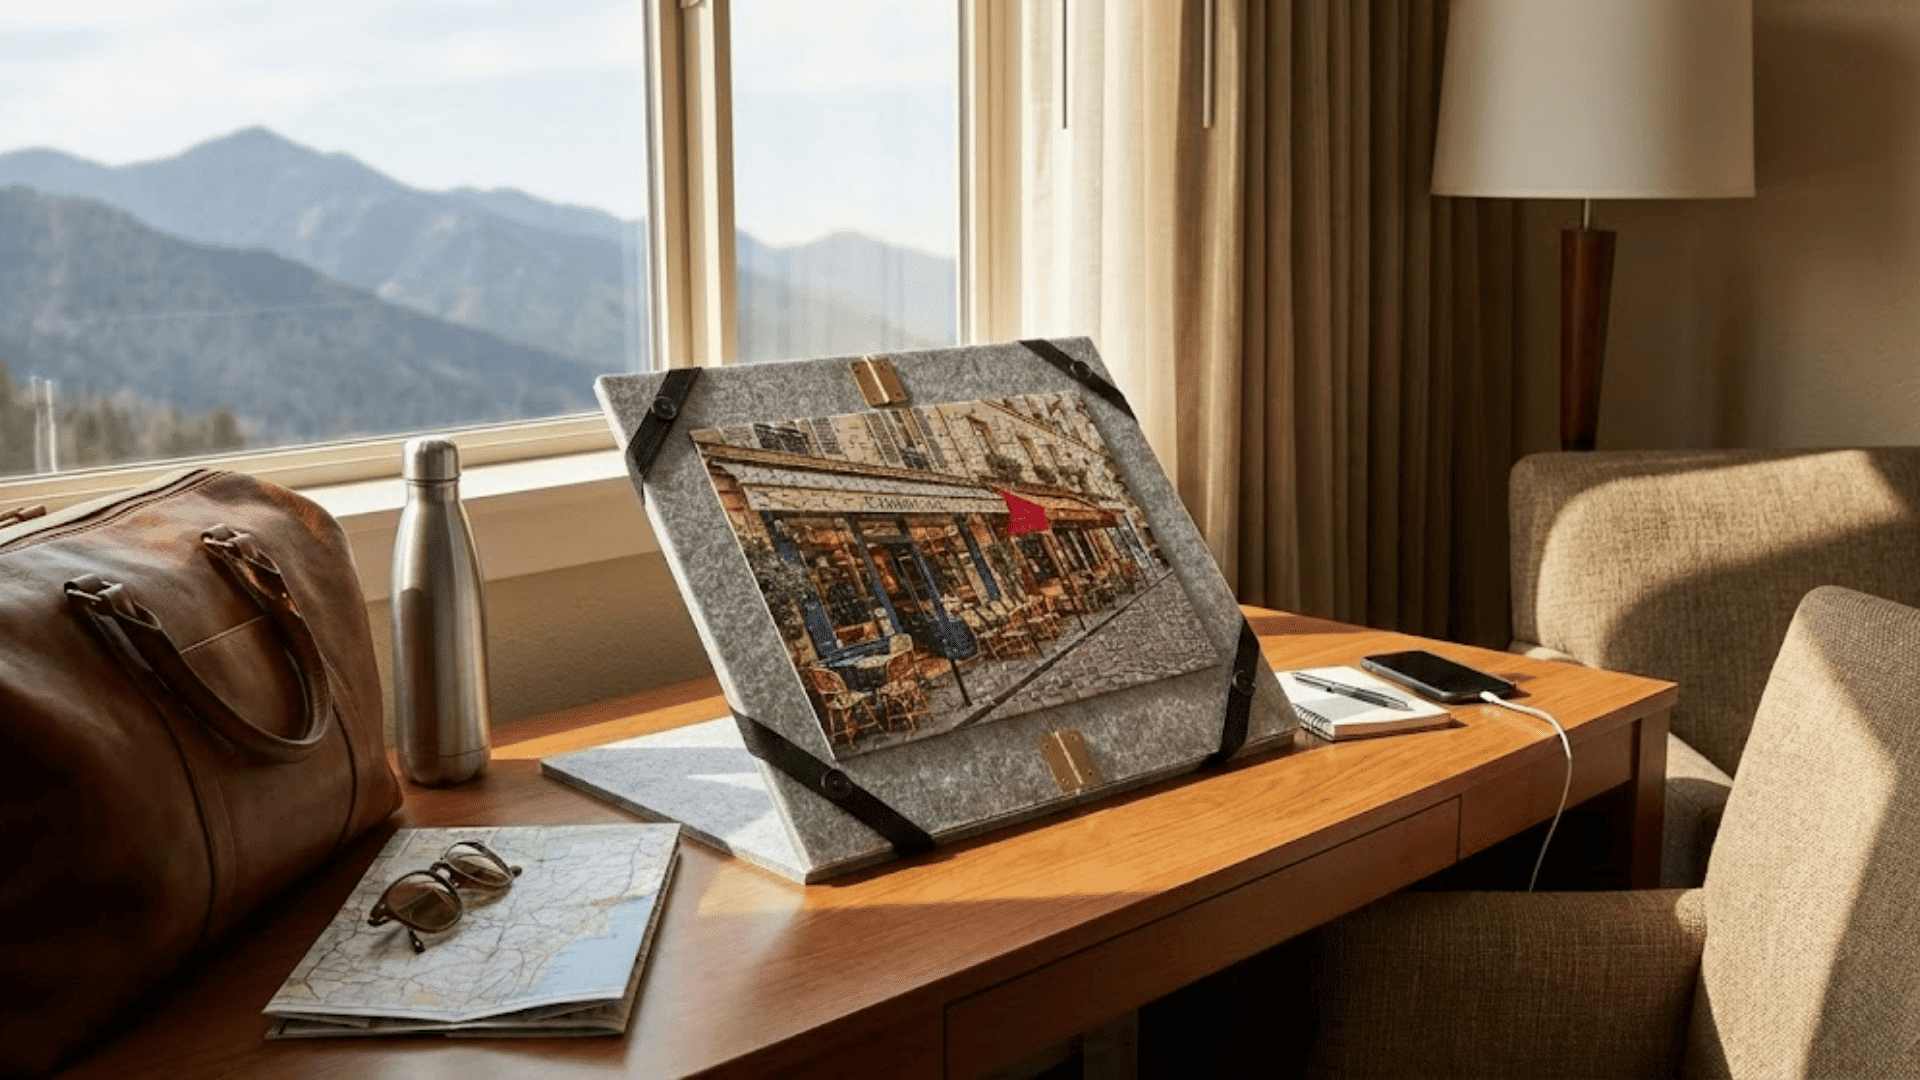
Materials Required: Thin foam core board or corrugated plastic, lightweight felt squares, hinges for folding designs, elastic corner straps, or fabric envelope closure.
Compact and portable designs fold or roll for easy packing in luggage or backpacks. Prioritize featherlight materials that won’t add bulk to your travel bag.
Secure closures keep pieces contained during transit, making road trips and vacation rentals puzzle-ready. Collapsible versions slip into carry-ons without taking precious space.
DIY Puzzle Board: Finishing Touches and Customization
Add personality and polish to your puzzle board with these finishing touches. Small details make the difference between a functional tool and a cherished crafting companion.
| Finishing Touch | Purpose | Application Tips |
|---|---|---|
| Painting or staining | Adds color and protects wood surfaces | Apply thin, even coats with foam brushes; sand lightly between layers for smoothness |
| Decorative borders | Frames the puzzle area with visual interest | Use washi tape, painted patterns, or woodburned designs along edges |
| Handles for portability | Makes carrying and moving easier | Attach rope handles, leather straps, or recessed cabinet pulls on short sides |
| Labeling puzzle sizes | Quick reference for matching boards to puzzles | Stencil or burn dimensions onto one corner; use removable labels for multi-use boards |
Tips for Success and Safety
Building your puzzle board right the first time saves frustration and ensures a safe, enjoyable crafting experience. Keep these essential tips in mind as you work through your project.
- Undersizing Your Board: Always add extra inches beyond puzzle dimensions for comfortable sorting and assembly space.
- Skipping Non-Slip Backing: Felt, cork, or rubber liner prevents annoying shifts mid-puzzle and protects your table surfaces.
- Tool and Material Safety: Wear safety glasses when cutting, choose non-toxic paints if kids will use the board, and work with adhesives in well-ventilated areas.
- Using Slick Surfaces: Glossy finishes or bare wood cause pieces to slide; opt for matte textures or fabric liners instead.
- Poor Edge Finishing: Sand all corners and edges thoroughly to eliminate splinters and sharp spots that could catch on hands or clothing.
Taking time to plan carefully and work safely results in a puzzle board that brings joy for years without compromising your well-being.
Cost Breakdown: DIY Puzzle Board
Understanding the investment helps you choose materials that match your budget and puzzling habits.
Here’s what to expect at different price points for creating your custom puzzle board.
| Build Type | Estimated Cost | Materials |
|---|---|---|
| Budget builds | $10-$20 | Foam board or cardboard, basic felt, craft glue |
| Mid-range builds | $25-$50 | MDF or thin plywood, quality felt, wood trim, and paint |
| Premium custom boards | $60-$100+ | Hardwood plywood, wool felt, hinges, drawer components |
That’s a Wrap
Creating your own DIY puzzle board opens up endless possibilities for customization while saving money compared to store-bought options.
You’ve now got the knowledge to build something perfectly suited to your space, style, and puzzling preferences.
Start with simple materials if you’re testing the waters, or go all-in on a premium build that’ll last decades. What makes this project special is the freedom to design exactly what works for your needs.
Ready to get started? Share your finished puzzle board creations or questions in the comments below.
Happy puzzling, and enjoy every peaceful moment with your new handmade workspace.