A small bathroom can feel tight, cluttered, and difficult to use, but you can change that with the right design choices. When you plan with purpose, you create a space that feels open, functional, and easy to maintain without increasing its size.
The top 10 small bathroom ideas help you maximise space, improve layout, and increase storage so your bathroom works better every day. You will explore practical upgrades that open sightlines, improve ventilation, free up floor area, and add smart storage while keeping the room visually simple.
As you move through this guide, you will see how thoughtful fixtures, efficient layouts, and clear design principles work together to make even the most compact bathroom feel organised and comfortable.
1) Semi-Frameless Glass Shower Screen for Visual Openness
A semi-frameless glass shower screen helps your bathroom feel larger by reducing bulky framing without removing structural support entirely. Clear panels draw the eye across the room while minimal frame elements remain discreet, creating a strong sense of openness. You keep the layout feeling spacious without committing to a fully frameless installation.
In a small bathroom, heavy metal frames can divide the space and make it feel tighter. When you choose semi-frameless glass, you significantly reduce visual clutter while still benefiting from added stability around key edges. This approach supports a brighter and more balanced look without the premium cost of fully frameless alternatives.
You can pair semi-frameless screens with slim chrome, matte black, or brushed nickel profiles to complement your existing fittings. The partial framing typically sits along the outer edges only, leaving the glass panels largely uninterrupted. If privacy matters, subtle frosting on selected sections can be added without overwhelming the open feel.
Semi-frameless glass suits modern, contemporary, and transitional bathroom styles with ease. It offers a practical middle ground for compact bathrooms, balancing visual lightness with structural reliability. When you want the open appearance of frameless glass alongside greater durability and a friendlier price point, a semi-frameless screen is a smart and stylish solution.
2) Double Glazed Sliding Window for Improved Ventilation
A double glazed sliding window gives you reliable airflow without taking up extra space. The panels move horizontally, so you avoid the clearance issues that come with hinged windows in tight bathrooms, while the dual-pane construction adds an extra layer of thermal and acoustic performance.
You can open the window partially to control how much air enters. This helps you manage humidity after showers and reduce the risk of mould forming on walls and ceilings. The double glazing also retains warmth inside the bathroom when the window is closed, helping you maintain a comfortable temperature between uses.
Position the double glazed sliding window to catch natural cross-ventilation where possible. If your bathroom sits opposite another window or external door, you can improve airflow by opening both at the same time. When the window is closed, the insulating air gap between the two panes reduces heat loss and keeps cold drafts out during cooler months.
Frosted or obscure double glazed glass lets you maintain privacy while still bringing in daylight. This approach suits bathrooms that face neighbouring properties or busy streets, and the added glazing thickness provides a modest improvement in sound insulation from outside noise.
Choose aluminium or uPVC frames for durability in damp conditions. Both materials resist moisture, support double glazed units reliably, and require minimal maintenance. This makes them a practical and energy-efficient choice for small, high-use bathrooms where comfort and ventilation matter equally.
3) Wall‑hung vanity to free floor space
A wall‑hung vanity instantly opens up your bathroom by exposing more floor area. When you lift the cabinet off the ground, you create a clearer sightline, which helps the room feel less cramped.
You also make cleaning easier. With no base touching the floor, you can mop underneath without working around awkward corners.
Choose a slimline design if your layout feels tight. Floating units with drawers give you practical storage while keeping visual bulk to a minimum.
Consider integrated sinks and streamlined handles to maintain a clean look. Simple lines and a compact basin prevent the vanity from dominating the space.
You can use the gap beneath the vanity to your advantage. Add a low basket for towels or keep it clear to enhance the sense of openness.
Pair your wall‑hung vanity with a large mirror and good lighting. Together, these elements help your bathroom feel brighter, more organised, and easier to use every day.
4) Recessed mirrored medicine cabinet for hidden storage
A recessed mirrored medicine cabinet gives you storage without taking up extra space. You install it into the wall cavity, so it sits flush and keeps walkways clear. This design suits tight bathrooms where every centimetre matters.
The mirrored front serves two purposes at once. You gain a practical grooming surface while concealing toiletries, medications, and daily essentials behind it. A frameless or slim-edged design helps the room feel open rather than crowded.
Many models include adjustable shelves, internal lighting, or soft-close doors. These features improve daily use without adding visual bulk. In a small bathroom, streamlined details make a noticeable difference.
If you plan a renovation, ask your builder about recessing the cabinet between wall studs. Surface-mounted options work in some cases, but a fully recessed unit delivers a cleaner finish. You keep clutter out of sight and maintain a calm, organised look.
5) Corner pedestal basin to maximise circulation
A corner pedestal basin frees up valuable floor area in a tight bathroom. By positioning the basin into an unused corner, you keep the centre of the room clear and improve day-to-day circulation.
You reduce awkward pinch points near the door or shower. This layout works especially well in narrow ensuites and powder rooms where every centimetre matters.
Unlike a full vanity, a pedestal basin keeps the footprint light and open. The slim profile supports the basin without bulky cabinetry, which helps the space feel less crowded.
Choose a model with a compact bowl but adequate depth to limit splashing. Pair it with a wall-mounted mirror cabinet if you still need storage, so you maintain function without sacrificing movement.
A corner installation also creates a natural flow between the toilet and shower. When you plan the plumbing carefully, you achieve a clean layout that feels intentional rather than compromised.
6) Vertical open shelving with baskets for organised storage
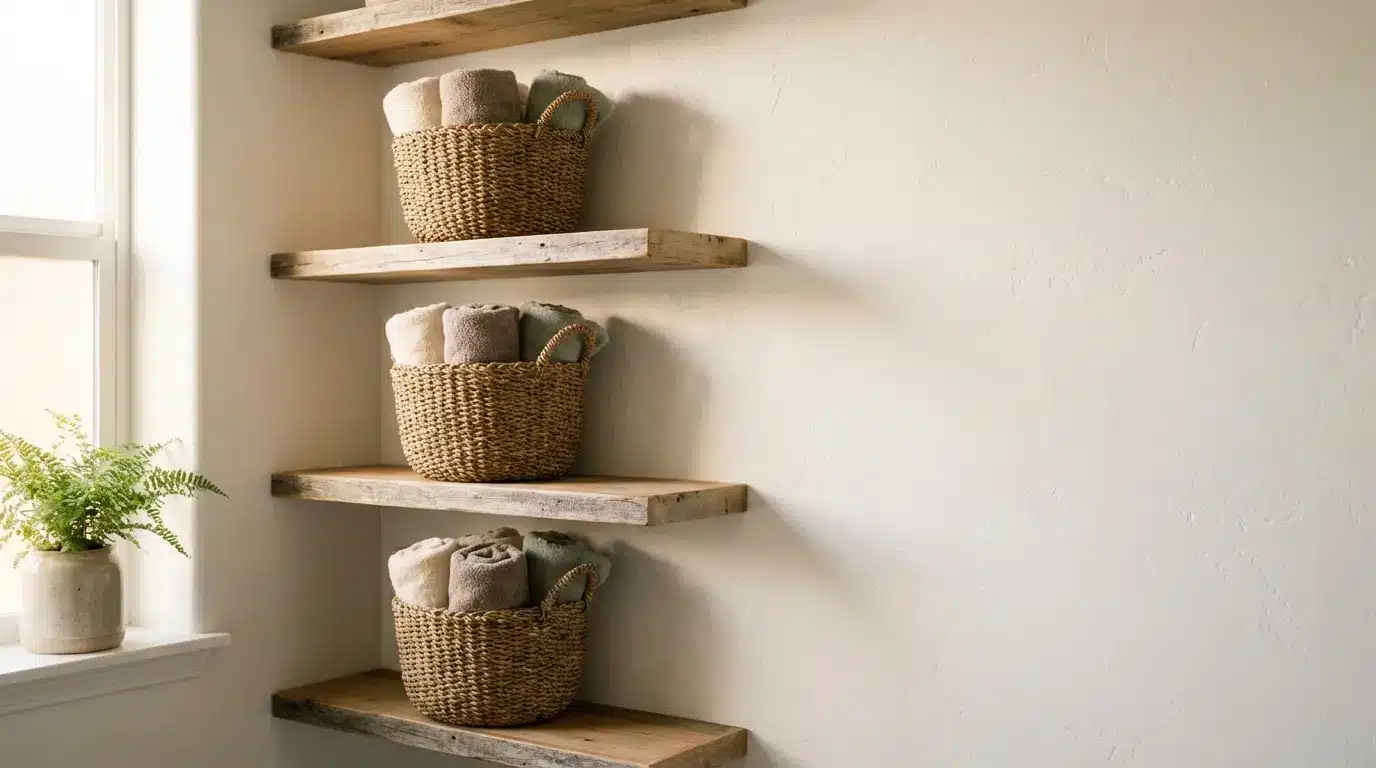
When floor space feels tight, you can move storage upwards. Vertical open shelving uses your wall height efficiently and keeps essentials within easy reach.
Install floating shelves above the toilet, beside the vanity, or along an unused wall. This approach frees up bench space and reduces visual clutter. It also works well in narrow bathrooms where bulky cabinets feel heavy.
Add woven or fabric baskets to each shelf to group similar items together. Store toiletries, spare toilet paper, and cleaning supplies in separate baskets so you can find what you need quickly. Baskets also soften the look of open shelving and keep smaller items from appearing messy.
Choose neutral tones if you want a calm, cohesive scheme. Timber shelves paired with simple baskets create warmth without overwhelming a compact room.
Place everyday items on lower shelves and reserve higher levels for bulkier supplies such as extra towels. By thinking vertically and organising deliberately, you create a bathroom that feels tidy, functional, and easy to maintain.
7) Sliding barn or pocket door to save swing space
A standard hinged door can take up valuable floor area in a small bathroom. When it swings open, it limits where you can place a vanity, toilet or storage unit. Replacing it with a sliding option frees up that clearance.
A pocket door slides into the wall cavity, so it disappears completely when open. This design keeps the doorway clear and maximises usable space. You gain more flexibility with your layout without changing the room’s footprint.
A sliding barn door runs along the outside of the wall on a track. It does not require internal wall space, which makes it suitable if you cannot modify the framing. Choose a solid core style if you want better privacy and noise control.
Both options suit tight layouts where every centimetre matters. You can select timber, painted finishes or frosted glass to match your existing design. With the right hardware and proper installation, you improve function while keeping a clean, simple look.
8) Half‑height tile wainscoting with washable grout
Install half‑height tile wainscoting to protect your walls without overwhelming a small bathroom. Run tiles up to about 900–1200mm from the floor, then finish the upper wall with paint or wallpaper. This approach adds texture while keeping the room visually open.
Choose simple tiles such as subway, kit‑kat, or small format porcelain to suit compact spaces. Larger tiles can also work because they reduce grout lines and make cleaning easier. Keep colours light if you want the room to feel brighter and more spacious.
Select a washable, mould‑resistant grout to handle moisture and daily splashes. Epoxy or stain‑resistant grout helps you maintain a clean finish with less scrubbing. Match the grout colour to the tile for a seamless look, or contrast it to highlight the pattern.
Use a slim trim or capping tile to create a clean transition at the top edge. This detail finishes the installation neatly and prevents chipped paint lines. You gain durability where it matters most while keeping costs and visual weight under control.
9) Compact back‑to‑wall toilet with dual‑flush cistern
Choose a compact back‑to‑wall toilet to reduce visual bulk in a small bathroom. The pan and cistern sit flush against the wall, which removes gaps and tight corners that collect dust. You gain a cleaner look and more usable floor space.
This design also makes everyday cleaning easier. With fewer exposed pipes and crevices, you can mop and wipe down surfaces faster. Many models include a rimless bowl that helps flush water evenly around the pan, improving hygiene and simplifying maintenance.
Look for a dual‑flush cistern with a strong WELS rating to reduce water use. The half‑flush handles liquid waste, while the full flush manages solid waste, helping you control water consumption without changing habits.
Check that the suite suits your plumbing setup. Many compact models support S‑trap or P‑trap configurations and offer back or bottom inlet options, which gives you flexibility during renovations.
In a tight layout, this type of toilet keeps the room functional, efficient and easy to maintain.
10) Heated towel rail that doubles as drying rack
Install a heated towel rail to add warmth without taking up floor space. In a small bathroom, wall-mounted or slim vertical models fit neatly beside the vanity or shower.
Choose a compact design with multiple bars so you can dry more than one towel at a time. Wider ladder styles or rails with 6 to 10 bars give you enough surface area for towels, bath mats, or light clothing. This works well if you do not have a separate laundry drying area.
Electric models suit renovations because you can install them without connecting to your hot water system. Many units heat to around 40–50°C, which helps towels dry faster and reduces lingering dampness. Dry towels also limit moisture that can contribute to mould in tight spaces.
If floor space allows, consider a slim freestanding option that you can move when needed. In very tight rooms, a wall-mounted rail keeps everything off the floor and maintains clear walkways.
Design Principles for Small Bathrooms
You improve a small bathroom by refining the layout and choosing materials that increase light, durability, and visual space. Focus on practical planning first, then support it with finishes that suit compact rooms.
Maximising Space Through Layout
Start with a layout that protects clear floor area. In narrow rooms, place the vanity and toilet along one wall and use a walk-in shower at the end to avoid visual breaks.
Choose wall-hung vanities and toilets to expose more floor and make cleaning easier. A floating vanity between 750–900mm wide often provides enough storage without crowding the room.
Replace hinged shower doors with frameless sliding panels or fixed glass screens. Clear glass keeps sightlines open, while bulky frames divide the space.
Consider these layout strategies:
- Use a corner basin in tight powder rooms.
- Install a recessed shower niche instead of caddies.
- Swap a full bath for a compact 1500mm bath or remove it entirely in very small ensuites.
- Add mirrored cabinets recessed into the wall cavity.
Keep pathways at least 600mm wide where possible. Even small adjustments to fixture placement can improve movement and daily use.
Selecting Colour Schemes and Materials
Light colours help small bathrooms feel open, but you need contrast to avoid a flat result. Use warm whites, soft greys, or pale stone tones on walls, then add depth through timber-look cabinetry or matte black tapware in moderation.
Choose glossy or satin finishes to reflect light, especially if the room lacks a window. Install a large mirror above the vanity to extend sightlines and increase brightness.
Select moisture-resistant materials such as porcelain tiles, acrylic shower bases, and polyurethane cabinetry finishes. These surfaces handle humidity common in Australian homes and reduce long-term maintenance.