I still remember the first time I tackled garage door framing, I stood there with my tape measure, completely confused. The rough opening seemed straightforward until I realized how many precise measurements and structural elements were involved.
Garage door framing requires specific header sizes, proper jack studs, and exact dimensions to support the door’s weight while ensuring smooth operation.
Get it wrong, and you’re looking at a door that binds, gaps that let in weather or structural issues down the line. You need to understand the load-bearing requirements, the right lumber dimensions, and how to account for the door type you’re installing.
I’ll walk you through each component so you can frame it correctly the first time and avoid the headaches I’ve seen too many DIYers face.
Why Your Garage Door Frame Can’t Be an Afterthought
I’ve seen what happens when garage door framing goes wrong, and it’s never a small fix. A poorly framed opening leads to doors that stick halfway up, gaps that let rain and cold air pour in, and in worst cases, a door that becomes a genuine safety hazard.
You’re dealing with something that weighs several hundred pounds moving up and down multiple times a day. If your header isn’t sized correctly or your studs aren’t plumb, that weight distribution gets thrown off.
The door tracks won’t align properly, putting extra strain on the opener and shortening its lifespan.
I’ve watched homeowners spend thousands trying to fix alignment issues that stemmed from framing errors made years earlier.
Your insulation efforts mean nothing if gaps around the frame let air through. The framing is your foundation, mess it up, and everything else suffers. Get it right, and your door will operate smoothly for decades.
Understanding the Rough Opening for Your Garage Door
Before you start nailing studs together, you need to wrap your head around what a rough opening actually is and why those measurements matter more than you think.
What is a Rough Opening for a Garage Door?
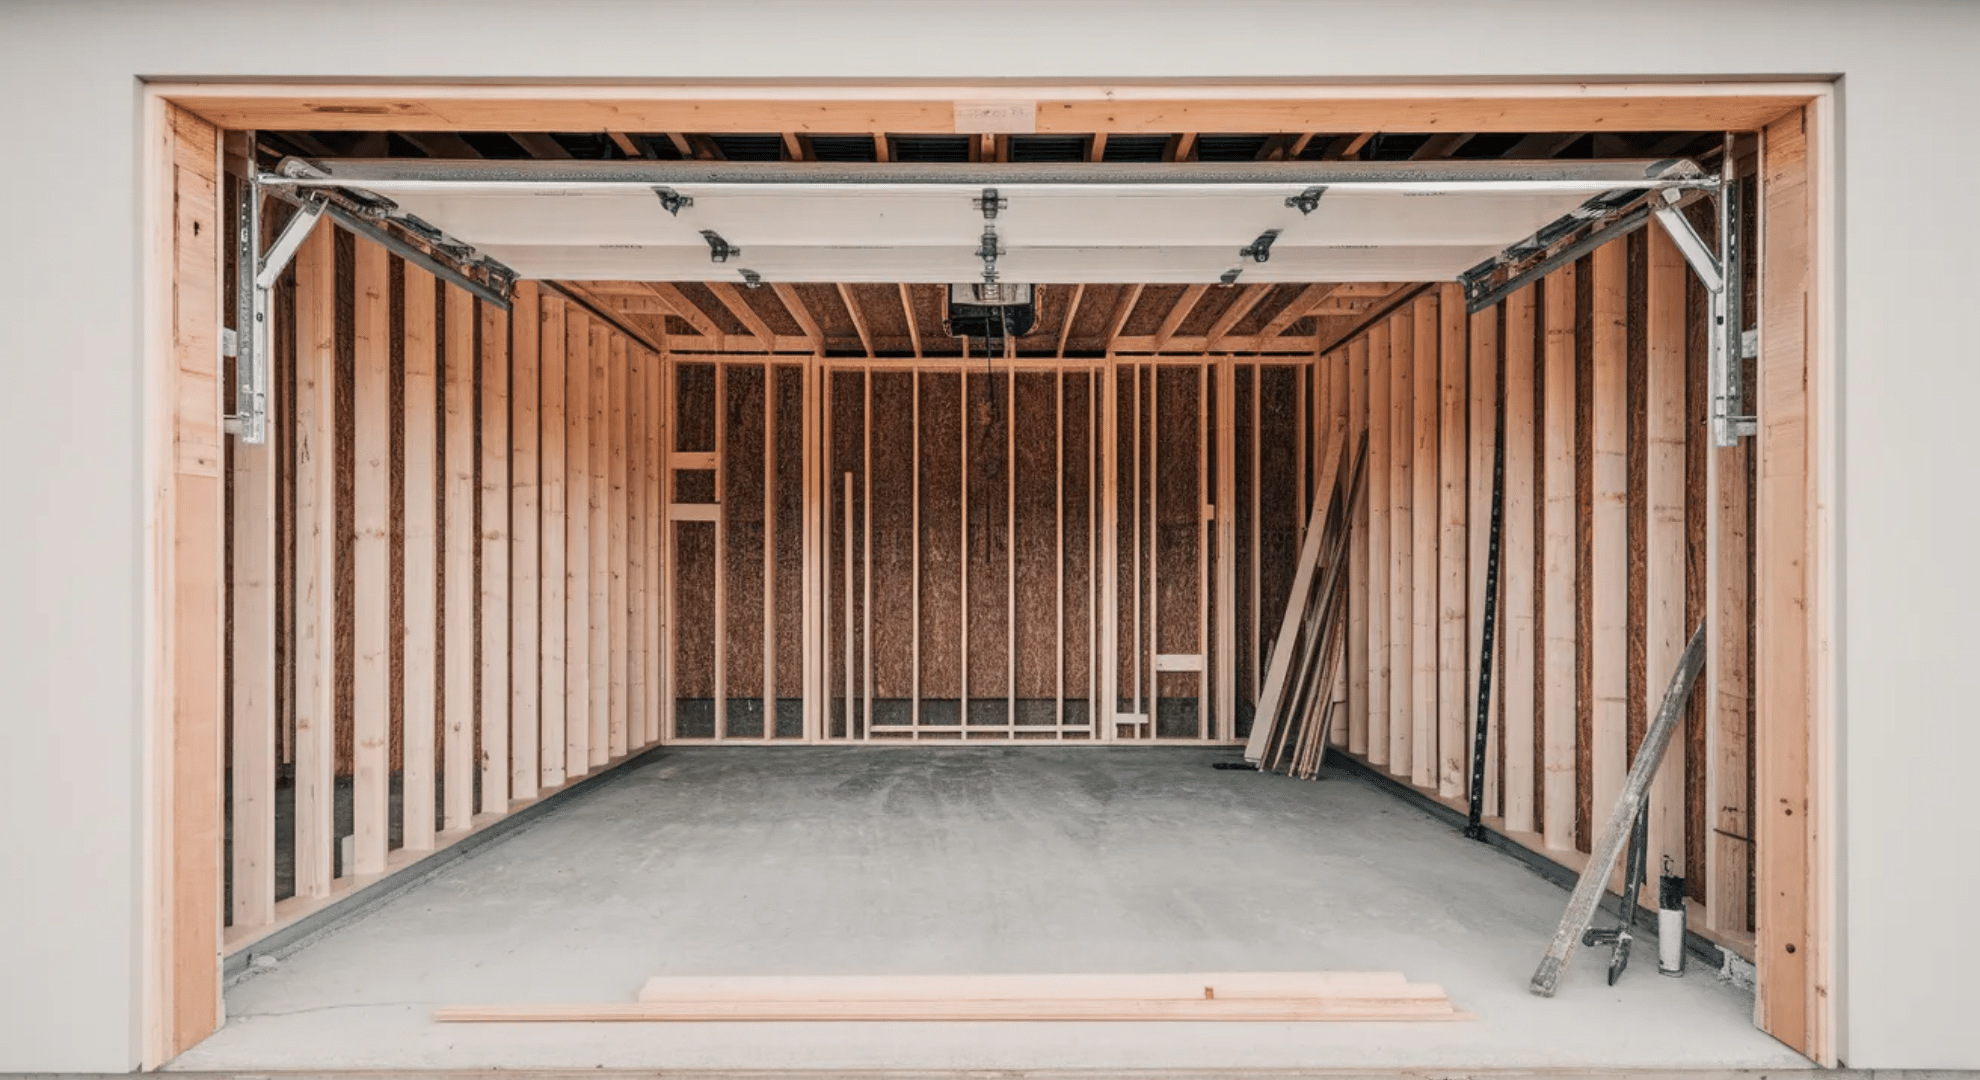
The rough opening is the framed space in your wall where the garage door will eventually sit. Think of it as the empty doorway before anything gets installed—no tracks, no door panels, just the bare wooden frame.
I always tell people it’s like creating a perfectly sized window frame, except you’re dealing with something much heavier and more complex. This opening gets created by your vertical studs on the sides, your header beam across the top, and your floor at the bottom.
You need it slightly larger than your actual door because the tracks, jambs, and weatherstripping all need space to fit inside. Without the right rough opening dimensions, you’ll be fighting the installation every step of the way.
Your door won’t sit flush, tracks won’t mount correctly, and you’ll end up tearing things apart to start over.
How to Measure Your Garage Door Rough Opening
Measuring your rough opening isn’t complicated, but you need to be precise.
Start with your actual garage door dimensions, if you’re installing a 16×7 door, that’s your starting point. I always add 3 inches to the width and 1.5 inches to the height for the rough opening.
So that 16-foot door needs a 16-foot-3-inch wide opening, and the 7-foot height needs 7-foot-1.5-inches of vertical space. Use a quality tape measure and double-check everything twice.
Measure from the inside faces of your side studs for width, and from your floor to the bottom of your header for height. Make sure your measurements are consistent on both sides.
I’ve seen openings that were square at the top but off by half an inch at the bottom. Check your corners with a framing square to ensure everything is plumb and level.
Those extra inches give you room for the door jambs and tracks without fighting for space during installation.
Materials and Tools You’ll Need for Garage Door Framing

You can’t build a solid frame with the wrong materials or missing tools. I’ve learned this the hard way, and I’ll save you that trouble.
For most garage door framing, you’re looking at these materials:
- 2×6 lumber for king studs and jack studs on standard residential doors
- 2×4 lumber for cripple studs above the header since they’re not load-bearing
- Pressure-treated lumber for bottom plates sitting on concrete to prevent moisture rot
- Header lumber sized based on your span and load requirements (covered later)
- Kiln-dried framing lumber for vertical studs and anything above ground level
I use pressure-treated wood for anything touching concrete because I’ve seen untreated bottom plates turn to mush in just a few years. The downside is that pressure-treated lumber is heavier and often wetter, which means more warping as it dries.
For your vertical studs and headers, stick with standard kiln-dried lumber that’s straight and true.
Always sight down every board at the store before tossing it in your cart, warped lumber creates problems you’ll fight through the entire build.
Your basic tool list includes:
- 25-foot tape measure
- Framing square
- 4-foot level
- Circular saw for cutting studs
- Miter saw (optional but makes cleaner cuts)
- Cordless drill with drill bits and driver bits
- Hammer for adjustments
- Chalk line for floor layouts
- Speed square for marking cut lines
- Safety glasses
- Work gloves
- Ear protection
- Pencil and utility knife
I prefer screws over nails for most connections because they hold better and you can back them out if needed. A cordless drill is non-negotiable—you’ll be driving dozens of screws and drilling pilot holes throughout the project.
Don’t skip the safety gear either. Sawdust in your eye will ruin your day fast, and power tools running for hours will damage your hearing more than you realize.
Step-by-Step Guide: How to Frame a Garage Door Opening
Framing a garage door opening follows a logical sequence that builds from the ground up. Here’s how the process works from start to finish:
Step 1: Measure and Mark the Opening
The first step involves measuring the rough opening dimensions based on the garage door size. Mark the layout on the floor using a chalk line, indicating where the king studs will sit on each side. Double-check these measurements before cutting any lumber.
Step 2: Install the Bottom Plate
Cut the bottom plate to span the width of the opening. If it’s sitting on concrete, use pressure-treated lumber. Secure it to the floor with appropriate fasteners, ensuring it’s level and square.
Step 3: Cut and Install King Studs
Cut the king studs to the full height from floor to ceiling. These are the main vertical supports on each side of the opening. Install them plumb and secure them to the bottom plate and top plate.
Step 4: Measure and Cut Jack Studs
Jack studs sit inside the king studs and support the header. Measure from the floor to the bottom of where the header will sit. Cut these studs to length and secure them to the king studs.
Step 5: Build and Install the Header
The header spans the width of the opening and carries the load above. Size it appropriately for the span, then lift it into place on top of the jack studs. Secure it with nails or screws through the king studs.
Step 6: Install Cripple Studs Above the Header
Cut cripple studs to fit between the top of the header and the top plate. Space them at 16 inches on center to maintain structural integrity and provide nailing surfaces.
Step 7: Add Center Support for Hardware
Install a 2×6 or appropriate blocking in the center of the header area where the garage door spring and opener will mount. This provides the necessary support for the heavy hardware.
Step 8: Verify the Opening
Measure the rough opening width and height one final time. Check that all corners are square using a framing square and verify that the sides are plumb with a level.
If you’re looking for a visual guide on the framing process, you can check out this helpful video walkthrough.
Garage Door Framing Diagrams: Visualizing the Process
Seeing the structure laid out visually makes everything click faster than reading descriptions alone. I keep these diagrams handy whenever I’m framing.
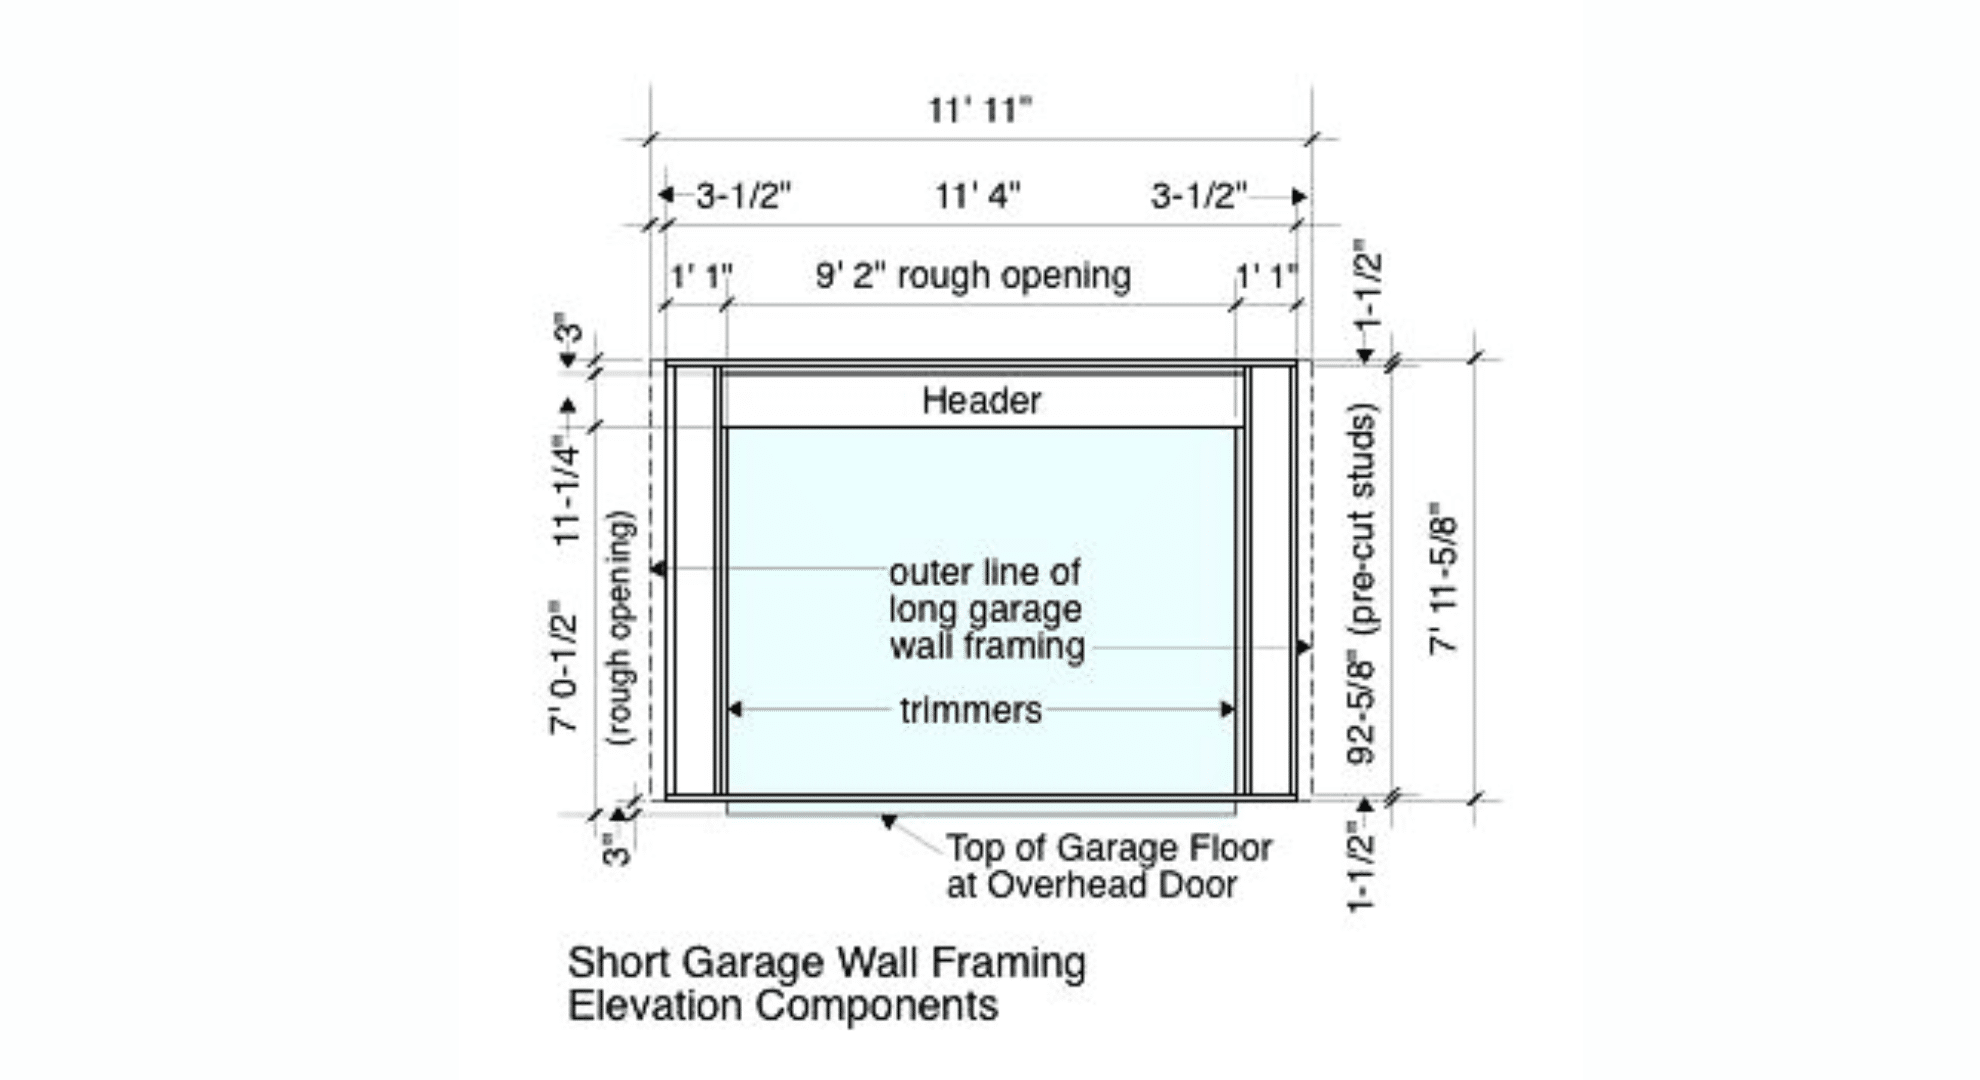
Essential Diagrams for Garage Door Framing

A good framing diagram shows you exactly where each component sits in relation to the others. The best diagrams label each piece clearly and show how everything connects before you start cutting lumber.
I always look for layouts that include both front and side views so you understand the depth and how the door tracks will eventually fit into this frame.
Key elements you’ll see in framing diagrams:
- King studs on the outer edges running full height from floor to ceiling
- Jack studs sitting inside the king studs, stopping at header level for support
- Header beam spanning the entire width and resting on jack studs
- Cripple studs filling space between header and top plate at 16-inch spacing
- Bottom plate running along the floor anchoring the base
- Center blocking showing where spring and opener hardware mounts
The side-view diagram is just as important as the front view because it reveals the relationship between your framing and where the actual door components will sit.
You need to visualize how the tracks mount to your jack studs and how much clearance exists between the header and the door when it’s in the up position.
Detailed Garage Door Framing Charts
Charts break down the exact measurements you need for different door sizes without guessing. I rely on these to avoid math errors when I’m covered in sawdust and trying to remember what I calculated earlier.
The pattern for rough openings stays consistent, you add 3 inches to width and 1.5 inches to height regardless of the door size you’re installing.
Standard rough opening measurements by door size:
- 9×7 single door: 9 feet 3 inches wide by 7 feet 1.5 inches tall
- 10×7 single door: 10 feet 3 inches wide by 7 feet 1.5 inches tall
- 16×7 double door: 16 feet 3 inches wide by 7 feet 1.5 inches tall
- 16×8 double door: 16 feet 3 inches wide by 8 feet 1.5 inches tall
- 18×7 double door: 18 feet 3 inches wide by 7 feet 1.5 inches tall
Header sizing charts are equally critical because they show what lumber dimensions you need based on your span and the load above. An 8-foot span might only need a double 2×8, but a 16-foot span requires a double 2×12 or even engineered lumber depending on if you’re supporting a second story or just a roof.
These charts also include jack stud heights, which change based on your door height and header dimensions, saving you from recalculating every time.
When to Hire a Professional for Garage Door Framing
I’m all for DIY projects, but garage door framing isn’t always the place to learn on the fly. If you’re dealing with a load-bearing wall or need to remove existing structure, call a professional, structural mistakes can compromise your entire home.
You should also bring in an expert if you’re uncomfortable with power tools or don’t have experience reading building codes. Every municipality has specific requirements for header sizes and fastener spacing, and inspectors will flag incorrect work.
I’ve seen homeowners get halfway through a frame only to realize they need permits they didn’t pull. If your garage has unusual dimensions, requires custom headers, or involves working around electrical and plumbing lines, the risk of costly mistakes goes up fast.
A professional framers can complete the job in a day versus your weekend struggle, and their work comes with accountability if something goes wrong.
Cost Breakdown: Budgeting for Garage Door Framing
I always tell people to budget more than they think they’ll need because lumber prices fluctuate and you’ll inevitably need extra materials. Here’s what you’re realistically looking at for a standard single or double garage door frame:
| Item | Estimated Cost | Notes |
|---|---|---|
| 2×6 lumber for king and jack studs | $40-$80 | Depends on door size and lumber prices |
| 2×4 lumber for cripple studs | $15-$30 | Based on span width |
| Header material (double 2×10 or 2×12) | $60-$150 | Wider spans need larger headers |
| Pressure-treated bottom plate | $10-$20 | Only if sitting on concrete |
| Fasteners (screws, nails, anchors) | $20-$40 | Include concrete anchors if needed |
| Center blocking (2×6) | $10-$15 | For spring and opener mounting |
| Total Material Cost | $155-$335 | For a standard residential door |
| Professional labor (if hiring) | $300-$800 | Varies by region and complexity |
These numbers assume you already own the basic tools. If you’re starting from scratch with tool purchases, add another $200-$400, depending on what you need. Material costs can spike if you’re framing an oversized door or need engineered lumber for longer spans.
Final Inspection Checklist Before Installing the Garage Door
Before you call in the door installer or start mounting tracks yourself, walk through this checklist to catch problems while they’re still easy to fix. I’ve learned that spending ten minutes on inspection saves hours of frustration later.
Pre-Installation Inspection Checklist:
- Rough opening width matches door width plus 3 inches
- Rough opening height matches door height plus 1.5 inches
- All four corners are square (check with framing square)
- Side jambs are plumb (verify with 4-foot level)
- Header is level across the entire span
- Jack studs are securely fastened to king studs
- Header is properly supported by jack studs on both sides
- Cripple studs are installed at 16 inches on center
- Center blocking is installed and secure for spring/opener mounting
- Bottom plate is anchored firmly to the floor
- No warped or twisted lumber in the frame
- All fasteners are tight and flush
- Measurements are consistent top to bottom and side to side
- Local building code requirements are met
- Required permits and inspections are completed
Run through this list with your tape measure and level in hand, actually checking each item rather than assuming it’s fine.
If something’s off by more than a quarter inch, fix it now before the door goes in and makes corrections ten times harder.
Wrapping It Up
I’ve walked you through garage door framing because getting it right the first time saves you from expensive fixes down the road. You now understand the rough opening measurements, the materials you need, and the step-by-step process to build a solid frame that’ll support your door for decades.
The diagrams and charts give you the visual reference to work confidently, and you know when it’s smarter to call in a pro. Before you start cutting lumber, double-check those measurements and make sure your frame is plumb and square, that’s where most mistakes happen.
If you found this helpful, check out other blogs on the website on garage door installation, maintenance tips, and troubleshooting common issues.
There’s always more to learn about keeping your garage functional and efficient!