
Fresh lettuce growing vertically on your apartment balcony, strawberries cascading down a tower in your kitchen, herbs spiraling up toward the sun in barely more space than a houseplant takes.
Hydroponic tower gardening lets you grow upward instead of outward, turning tiny corners into lush, productive gardens.
You might be dreaming of building your own DIY hydroponic tower from scratch, curious about aeroponic tower systems, or drawn to the popular Lettuce Grow tower design.
Vertical growing fits perfectly into modern life, and it’s more approachable than you think.
We’ll walk through everything you need to create your own tower garden, from choosing the right setup to harvesting your first homegrown greens, even if you’ve never grown anything before.
What is a Hydroponic Tower?
A hydroponic tower is a vertical growing system that delivers nutrient-rich water directly to plant roots without soil.
Water circulates from a reservoir at the base, flows down through stacked planting ports, and returns in a continuous loop.
An aeroponic tower works similarly but mists roots with nutrients instead of flowing water over them, giving roots more oxygen exposure.
Both systems excel at growing leafy greens and herbs because these plants have shallow root systems and love consistent moisture.
The Lettuce Grow tower popularized this concept with its sleek, stackable design that mimics commercial growing setups but scaled down for home gardeners.
Benefits of Building a DIY Hydroponic Tower
Building your own hydroponic tower opens up possibilities you won’t find with traditional gardening.
Here’s what makes DIY tower systems worth the effort:
- Vertical growing saves floor space; grow thirty plants in the footprint of a single potted herb.
- Plants grow up to 30% faster with constant access to nutrients and oxygen at the roots.
- Uses 90% less water than soil gardening since the system recirculates instead of draining away.
- No dirt means no pests, weeds, or soil-borne diseases; just clean, ready-to-eat greens.
- DIY costs a fraction of retail systems, and you can customize size, materials, and features to fit your space.
Once you see how quickly your first harvest comes in, you’ll understand why vertical growers rarely go back to traditional methods.
Hydroponic Tower vs. Aeroponic Tower: What’s the Difference?
Choosing between hydroponic and aeroponic towers comes down to how you want to deliver nutrients to your plants.
Both grow vertically and both skip the soil, but the mechanics differ in ways that affect your budget, upkeep, and learning curve.
| Feature | Hydroponic Tower | Aeroponic Tower |
|---|---|---|
| Water Delivery | Continuous flow or drip system cascades water down the tower | Mist nozzles spray fine droplets directly onto exposed roots |
| Initial Cost | Lower – simple pumps and tubes get the job done | Higher – requires specialized misters and pressure systems |
| Maintenance | Easier for beginners – fewer parts to clog or calibrate | Needs regular nozzle cleaning and pressure monitoring |
| Root Oxygenation | Good oxygen levels, but roots stay wetter | Maximum oxygen exposure leads to faster growth |
| Best For | Beginners and those wanting reliable, low-fuss growing | Experienced growers ready to optimize for speed and yield |
For your first tower, hydroponic systems offer a gentler entry point with room to experiment before jumping into aeroponic setups.
Materials Needed for a DIY Hydroponic Tower
Gathering your materials before you start building keeps the process smooth and helps you avoid multiple trips to the hardware store.
Here’s everything you need to get your DIY hydroponic tower up and running.
Core Components
- PVC pipe or tower column (4 to 6-inch diameter)
- Net pots (2 to 3-inch size, quantity depends on tower height)
- Submersible pump (160-400 GPH)
- Water reservoir (5 to 10-gallon capacity)
- Tubing and fittings (½-inch vinyl tubing)
Optional Upgrades
- Timer (15-minute intervals)
- Grow lights (full-spectrum LED)
- Nutrient solution (hydroponic-specific formula)
- pH meter and EC meter (digital models recommended)
- Support base or frame (metal or wood)
Step-by-Step Guide: How to Build a DIY Hydroponic Tower?
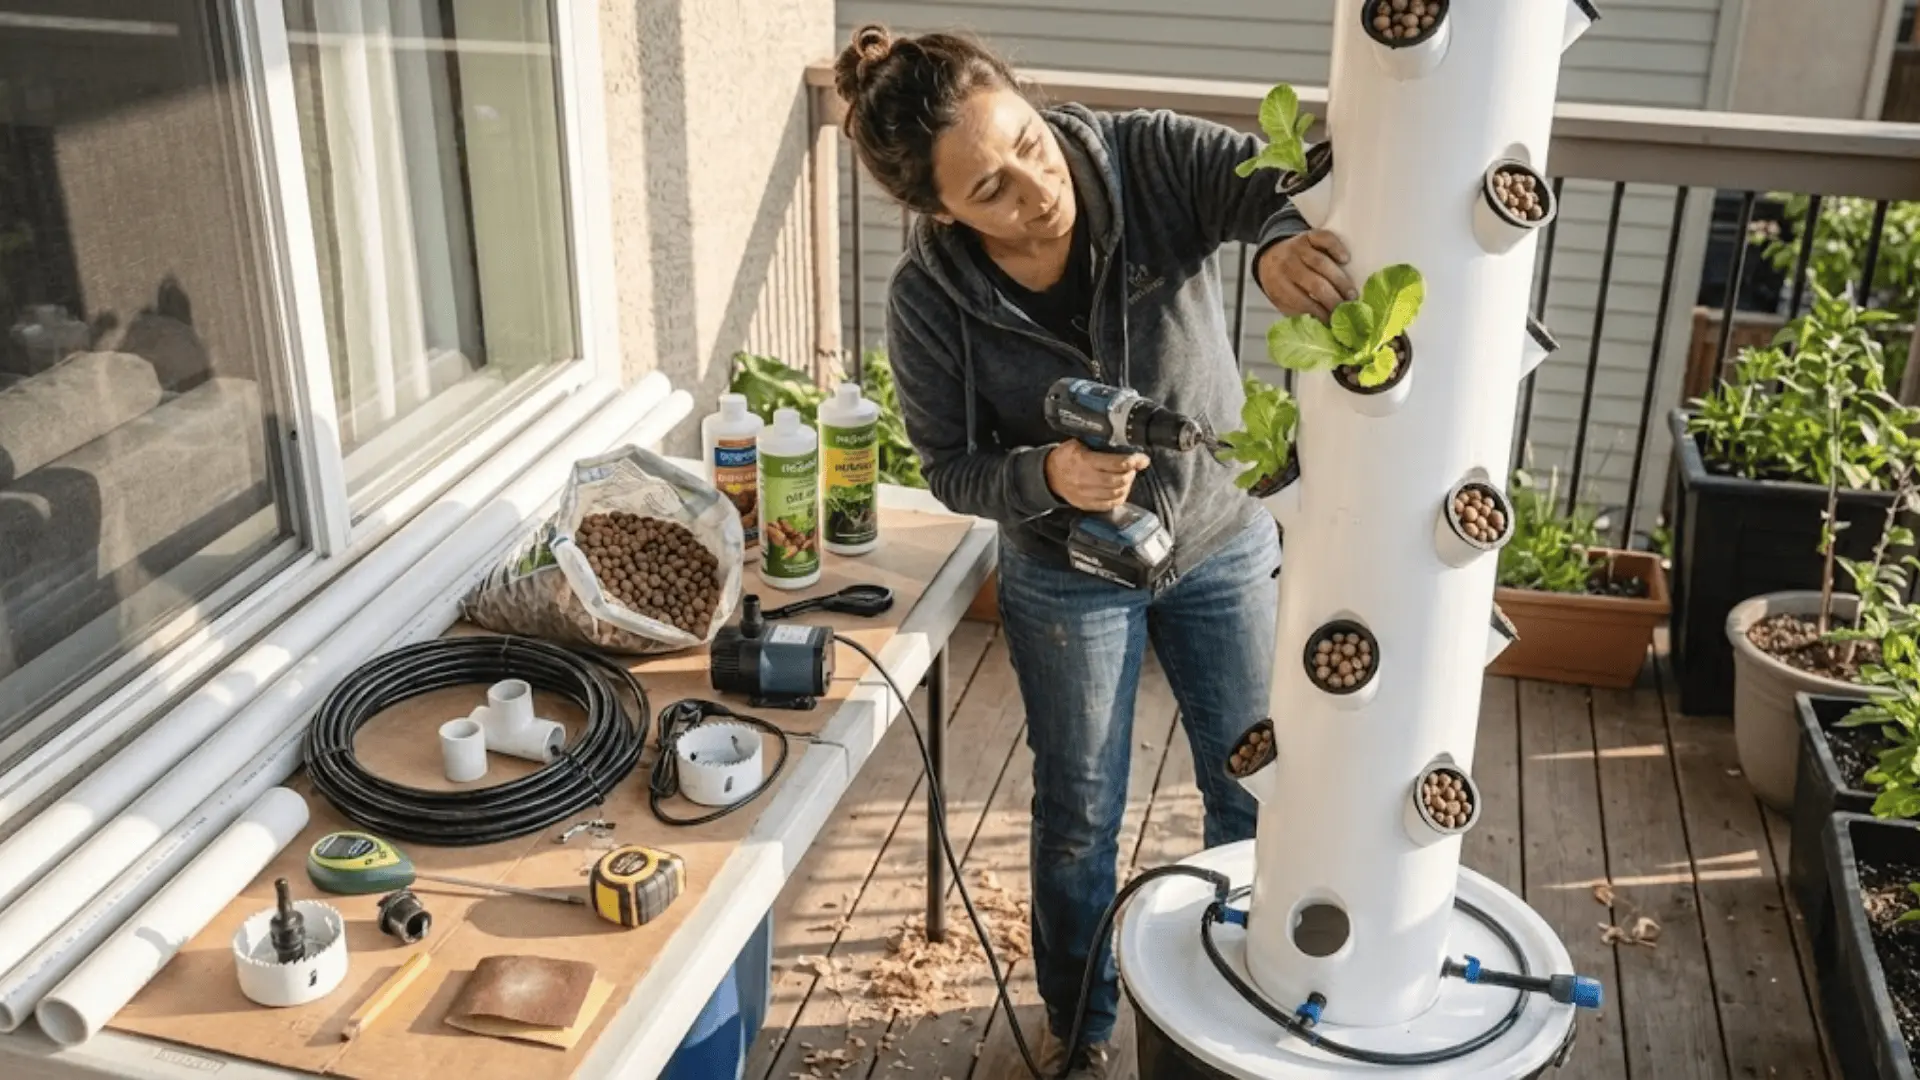
Building your own hydroponic tower sounds intimidating, but breaking it down into clear steps makes the process manageable even if you’ve never tackled a DIY project like this before.
Follow along, and you’ll have a working system ready to grow in just a few hours.
Step 1: Plan Your Tower Size and Layout
Decide on tower height based on your space and how many plants you want to grow. A 4-foot tower fits about 20 to 28 planting sites, while a 6-foot tower can hold 35 or more.
Indoor setups need access to electrical outlets for pumps and grow lights, while outdoor towers should be positioned where they’ll get at least 6 hours of sunlight. Sketch out your design before cutting any materials.
Step 2: Drill Planting Holes
Space holes 6 to 8 inches apart vertically in a spiral pattern around your PVC pipe. Use a hole saw attachment that matches your net pot size (usually 2 to 3 inches).
Angle each hole slightly upward at about 30 degrees so water doesn’t pool inside the pots. Sand down rough edges after drilling to prevent damage to plant roots.
Step 3: Set Up the Water Reservoir
Choose a reservoir that holds at least 5 gallons for a standard 4-foot tower. Place your submersible pump at the bottom of the container, making sure it sits flat and stable.
The pump intake should be fully submerged even when water levels drop between refills. Position your reservoir directly below or beside your tower column for easy tubing connections.
Step 4: Install Irrigation System
Run tubing from your pump up to the top of the tower, securing it along the back or inside the column. At the tower’s peak, create a drip emitter or small holes that allow water to cascade down through the planting sites.
Test water flow by running the pump before adding plants; water should trickle steadily down the inside of the tower and return to the reservoir.
Step 5: Assemble the Tower Structure
Secure your PVC column vertically using a sturdy base, wall mount, or freestanding frame. For outdoor setups, anchor the base with stakes or weights to prevent tipping in the wind.
Make sure the tower stands perfectly straight; leaning towers create uneven water distribution. Double-check all connections and fittings are tight before moving to the next step.
Step 6: Add Growing Medium and Seedlings
Your plants need support even without soil, and choosing the right medium makes transplanting easier.
- Best growing mediums: Rockwool cubes for seedlings, expanded clay pebbles for support, or coconut coir for moisture retention.
- Transplanting seedlings: Gently remove soil from roots under running water, place in net pots, and fill gaps with clay pebbles.
- Starting from seed: Germinate in rockwool cubes first, then transfer to the tower once roots emerge and first true leaves appear.
Step 7: Add Nutrients and Test the System
Mix hydroponic nutrient solution according to package instructions, typically 1 to 2 teaspoons per gallon of water. Test pH levels with your meter and adjust to 5.5 to 6.5 using pH up or down solutions.
Run the system for 24 hours without plants to check for leaks and ensure consistent water flow. Once everything runs smoothly, add your seedlings and start your pump timer for 15-minute cycles every hour.
Best Plants for a DIY Hydroponic Tower
Not all plants thrive in vertical tower systems, so picking the right crops from the start sets you up for success.
Leafy greens and compact herbs grow beautifully in towers, while heavy fruiting plants struggle with the limited root space.
| Plant Type | Why It Works | Harvest Time |
|---|---|---|
| Lettuce varieties | Shallow roots, fast growth, continuous harvests | 4-6 weeks |
| Spinach | Compact habit, loves consistent moisture | 5-7 weeks |
| Kale | Hardy, low-maintenance, nutrient-efficient | 7-10 weeks |
| Basil and herbs | Small root systems thrive with frequent harvesting | 3-4 weeks |
| Strawberries | Cascading growth occurs in compact spaces | 4-6 months |
| Plants to avoid | Tomatoes, peppers, and cucumbers need deep roots and support | N/A |
Lighting Requirements for Indoor Hydroponic Towers
Indoor hydroponic towers need proper lighting to thrive, and getting it right makes the difference between leggy, pale plants and vibrant, productive greens.
Here’s how to light your tower for optimal growth:
- Natural Sunlight Works if You Have South-Facing Windows: Aim for 6-8 hours of direct light daily.
- Full-Spectrum LED Grow Lights Are Best for Consistent Year-Round Growing: Position 6-12 inches above the top of your tower.
- Leafy Greens Need 12-16 Hours of Light per Day: Use a timer to maintain consistent cycles.
- Adjust Light Height as Plants Grow: Keep lights close enough for intensity but far enough to prevent leaf burn.
Getting your lighting dialed in early means faster growth and fuller harvests without stretching or yellowing leaves.
Hydroponic Tower Maintenance and Care
Keeping your hydroponic tower healthy doesn’t require daily attention, but a few routine checks and cleanings prevent problems before they start.
Stay on top of these maintenance tasks, and your system will run smoothly for years.
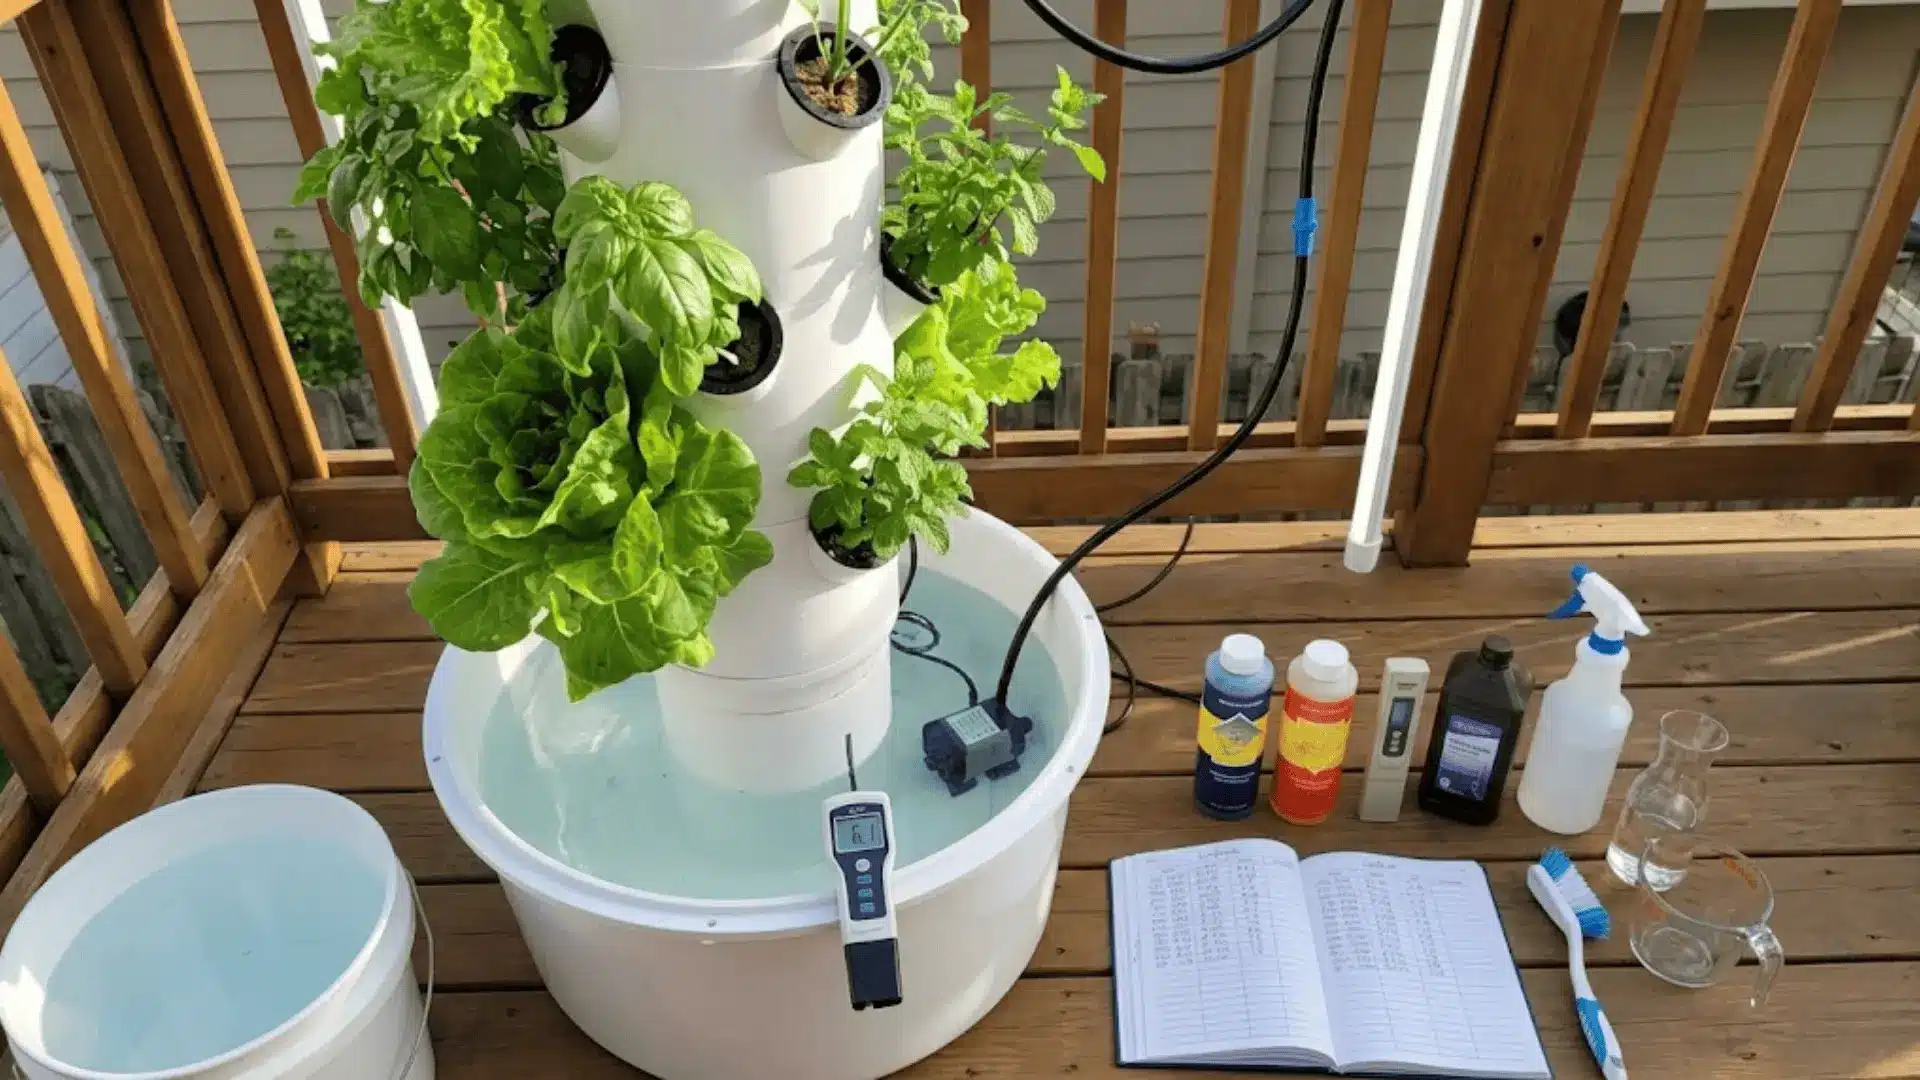
Water and Nutrient Monitoring
Regular monitoring keeps your plants fed and your system balanced.
Here’s your maintenance routine:
- Check Water Levels Weekly: Top off the reservoir when it drops below the pump intake to prevent dry running.
- Test pH Every 3-5 Days: Adjust to 5.5-6.5 range using pH up or down solutions as needed.
- Measure EC or PPM Bi-Weekly: Ensures nutrient concentration stays in the optimal range for your plants.
- Replace Nutrient Solution Monthly: Dump old solution, rinse reservoir, and mix fresh nutrients to prevent salt buildup.
Cleaning and Preventing System Issues
A clean system prevents algae, clogs, and bacterial growth that can damage roots.
Follow these preventive steps:
- Deep Clean Between Growing Cycles: Disassemble tower, scrub all parts with hydrogen peroxide solution, and rinse thoroughly.
- Keep Reservoir Covered and Light-Proof: Blocks algae growth by eliminating light exposure to nutrient water.
- Flush Tubing and Spray Nozzles Monthly: Run clean water through the system or use a vinegar solution to dissolve mineral deposits.
- Check Aeroponic Misters Weekly for Clogs: Remove nozzles, soak in vinegar, and clear any buildup with a small brush or pin.
How Much Does It Cost to Build a DIY Hydroponic Tower?
Building your own hydroponic tower costs significantly less than buying commercial systems, and you can scale your budget based on materials and features.
Here’s what to expect at different price points compared to retail options.
| Build Type | Estimated Cost | What’s Included |
|---|---|---|
| Budget Build | $50-$80 | PVC tower, basic pump, bucket, tubing, net pots |
| Mid-Range Build | $120-$180 | Larger tower, timer pump, pH/EC meters, grow lights |
| Commercial Lettuce Grow Tower | $500-$1,000+ | Pre-assembled, branded design, customer support |
| Long-Term Savings | $200-$400/year | Eliminates grocery costs, reduces water bills |
Your DIY tower pays for itself within a few months once you stop buying $5 boxes of organic lettuce every week.
Indoor vs. Outdoor Hydroponic Tower Setup
Indoor towers give you complete climate control and year-round growing, but require artificial lighting and proper ventilation to prevent humidity buildup.
Outdoor setups benefit from free sunlight and natural air circulation, though you’ll need to anchor your tower securely against wind and protect it from extreme temperatures below 50°F or above 85°F.
Pests are less problematic indoors, but outdoors, you might see aphids or caterpillars, which are easier to spot and remove than in soil gardens.
For seasonal outdoor growing, start cool-weather greens in spring and fall, then move your tower indoors or switch to cold-hardy kale during winter months.
Wrapping Up
Your DIY hydroponic tower is more than just a gardening project: it’s a shift toward fresher food, smarter use of space, and a deeper connection to what you eat.
Building your own system gives you control over every detail while saving money compared to store-bought options, and watching your first lettuce harvest come in weeks after planting makes all the effort worthwhile.
Start small, learn as you grow, and don’t be afraid to experiment with different plants and setups.
Have questions or want to share your own tower garden wins? Drop a comment below: we’d love to hear how your vertical growing experience unfolds.


